Fought At Hanover
2232 days 22 hours 34 minutes ago
Assault Across the Lamme
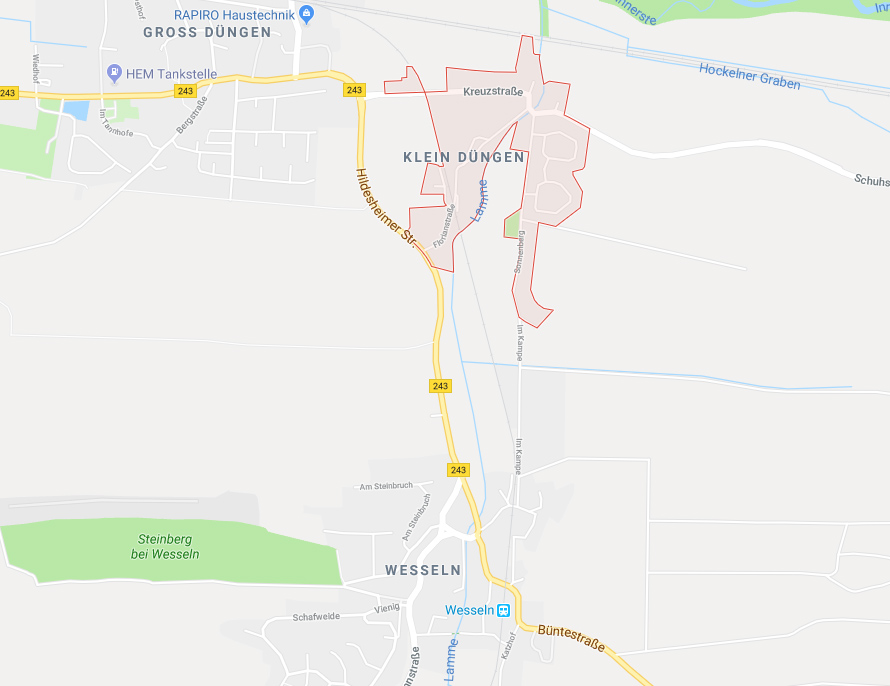
View Linked Report - CLICK HERE 100 POINTSRemnants of the 244th Guards MRR (see attached OOB) , in advance of the 27th Guards MRD, have been tasked with crossing the Lamme River just south of Klein Dungan near the hamlet of Wesseln (and both just south of Hanover), to preempt a British counter-attack known to be forming in that area. The MRR attack launches from just west of the Buntestrade. The scenario played was the Frankfurt Counterattack and 100 point forces were used.
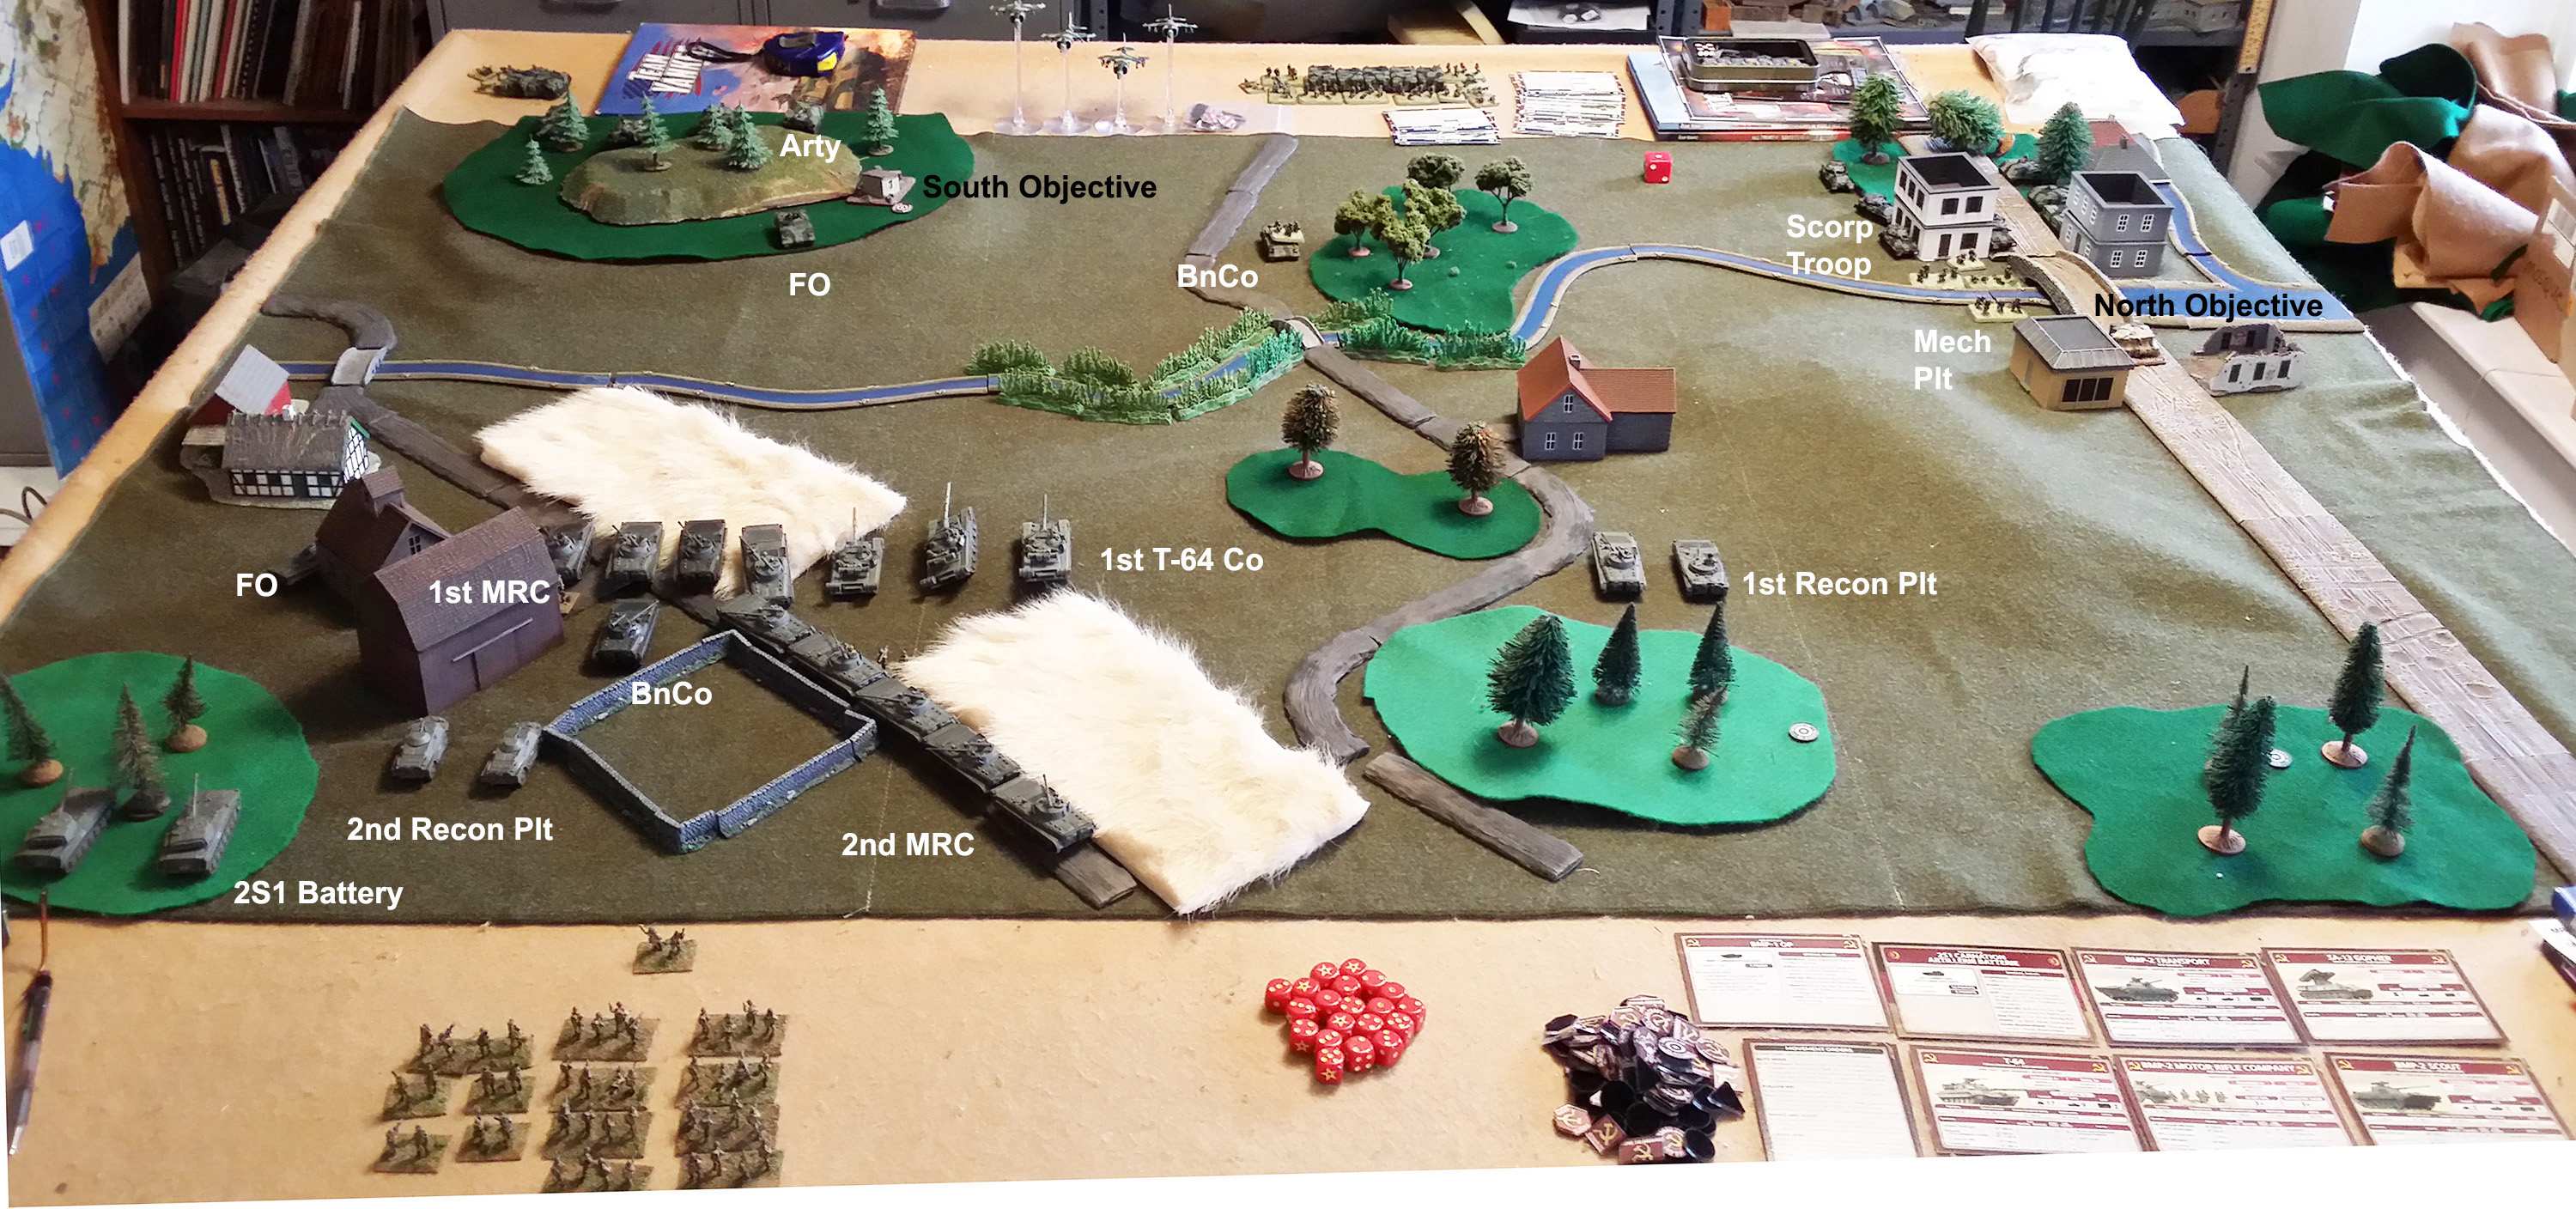
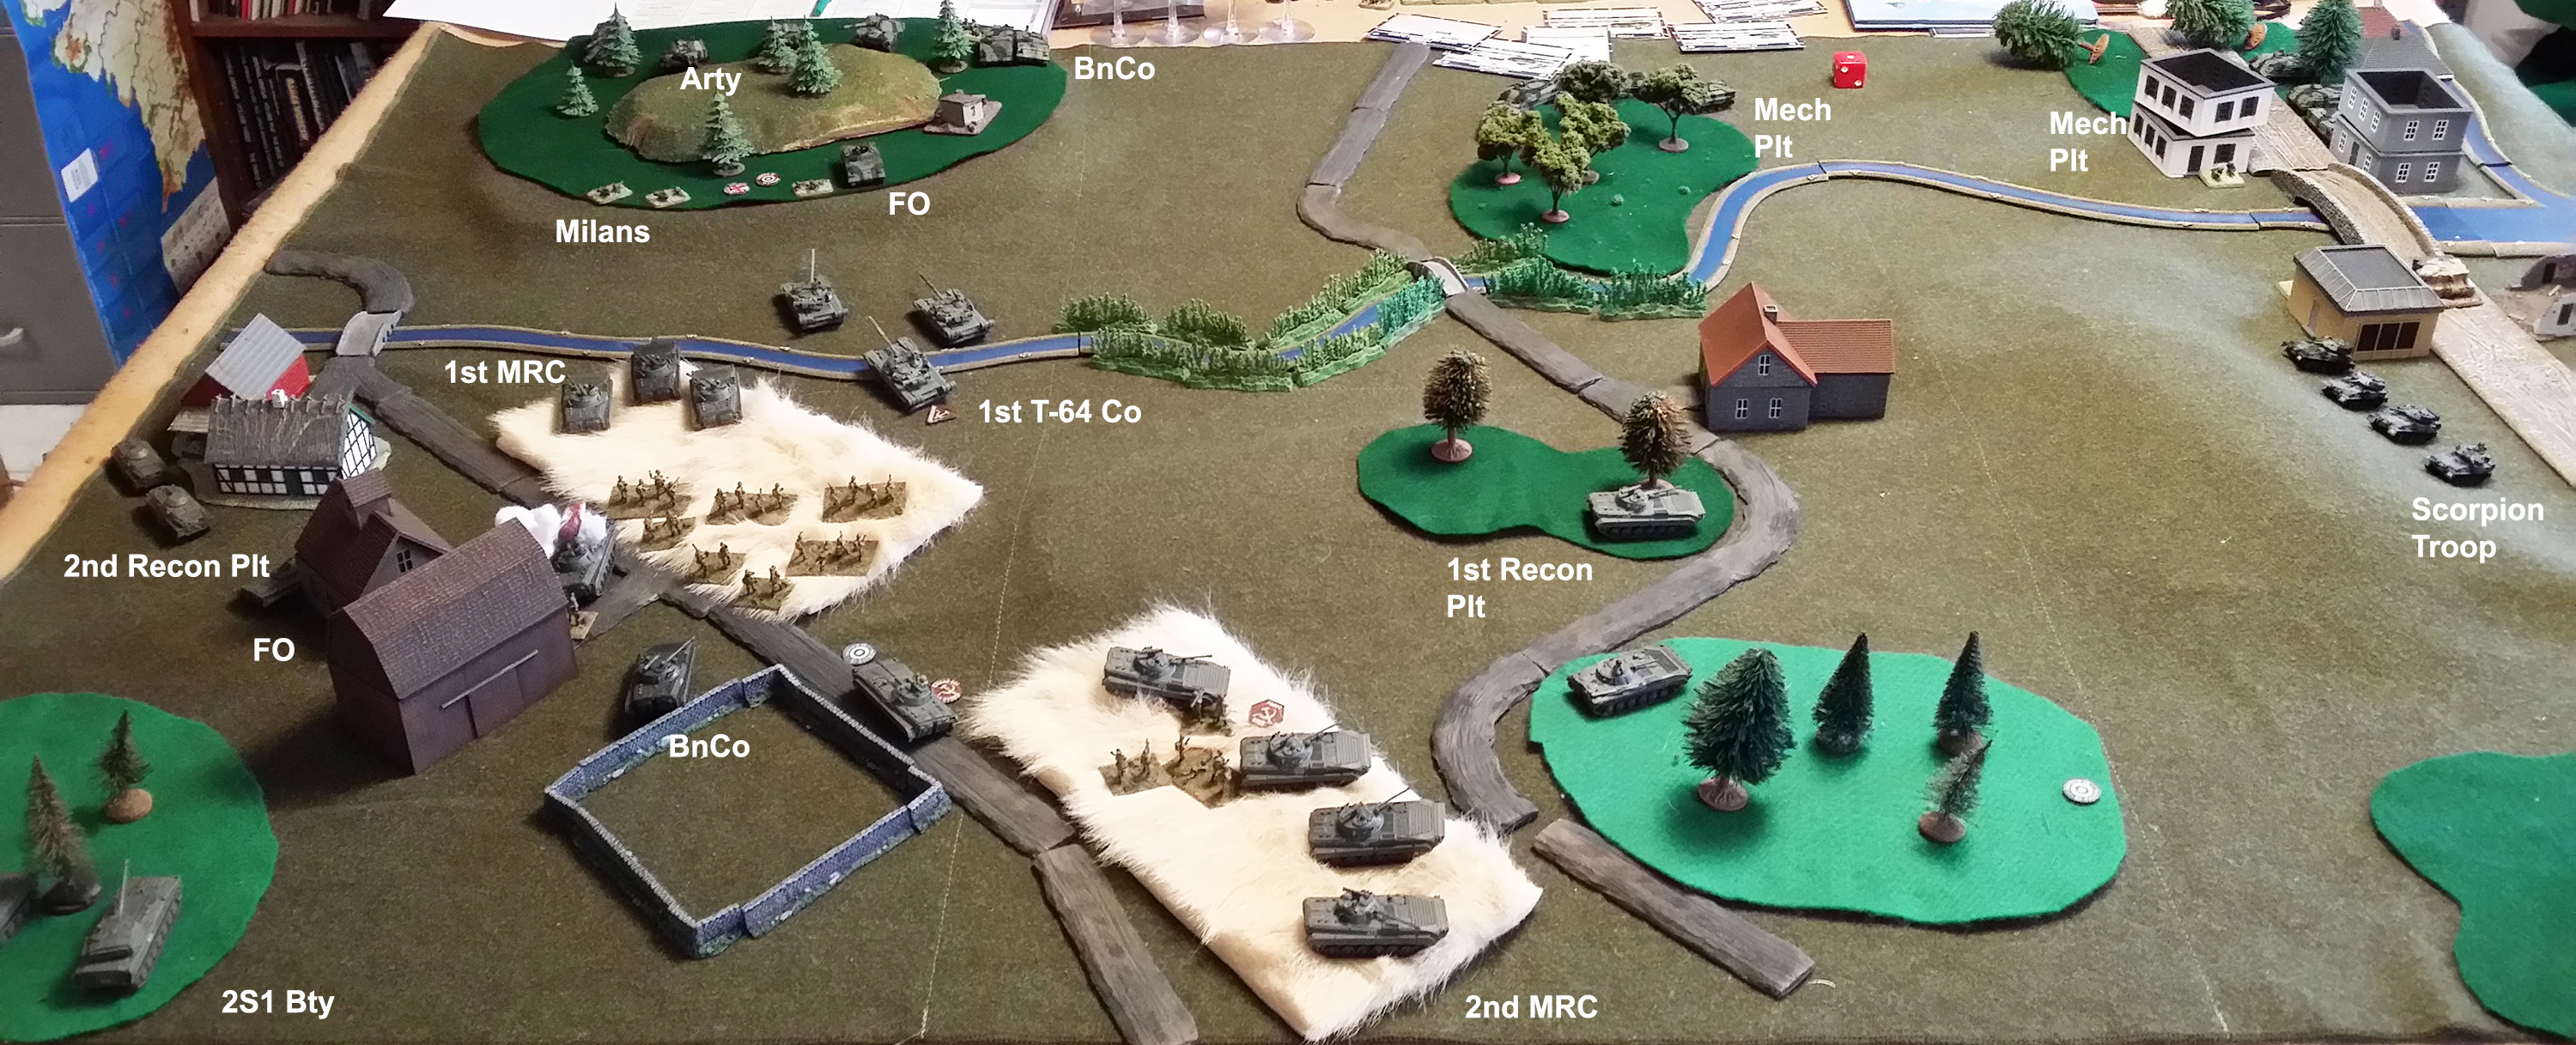
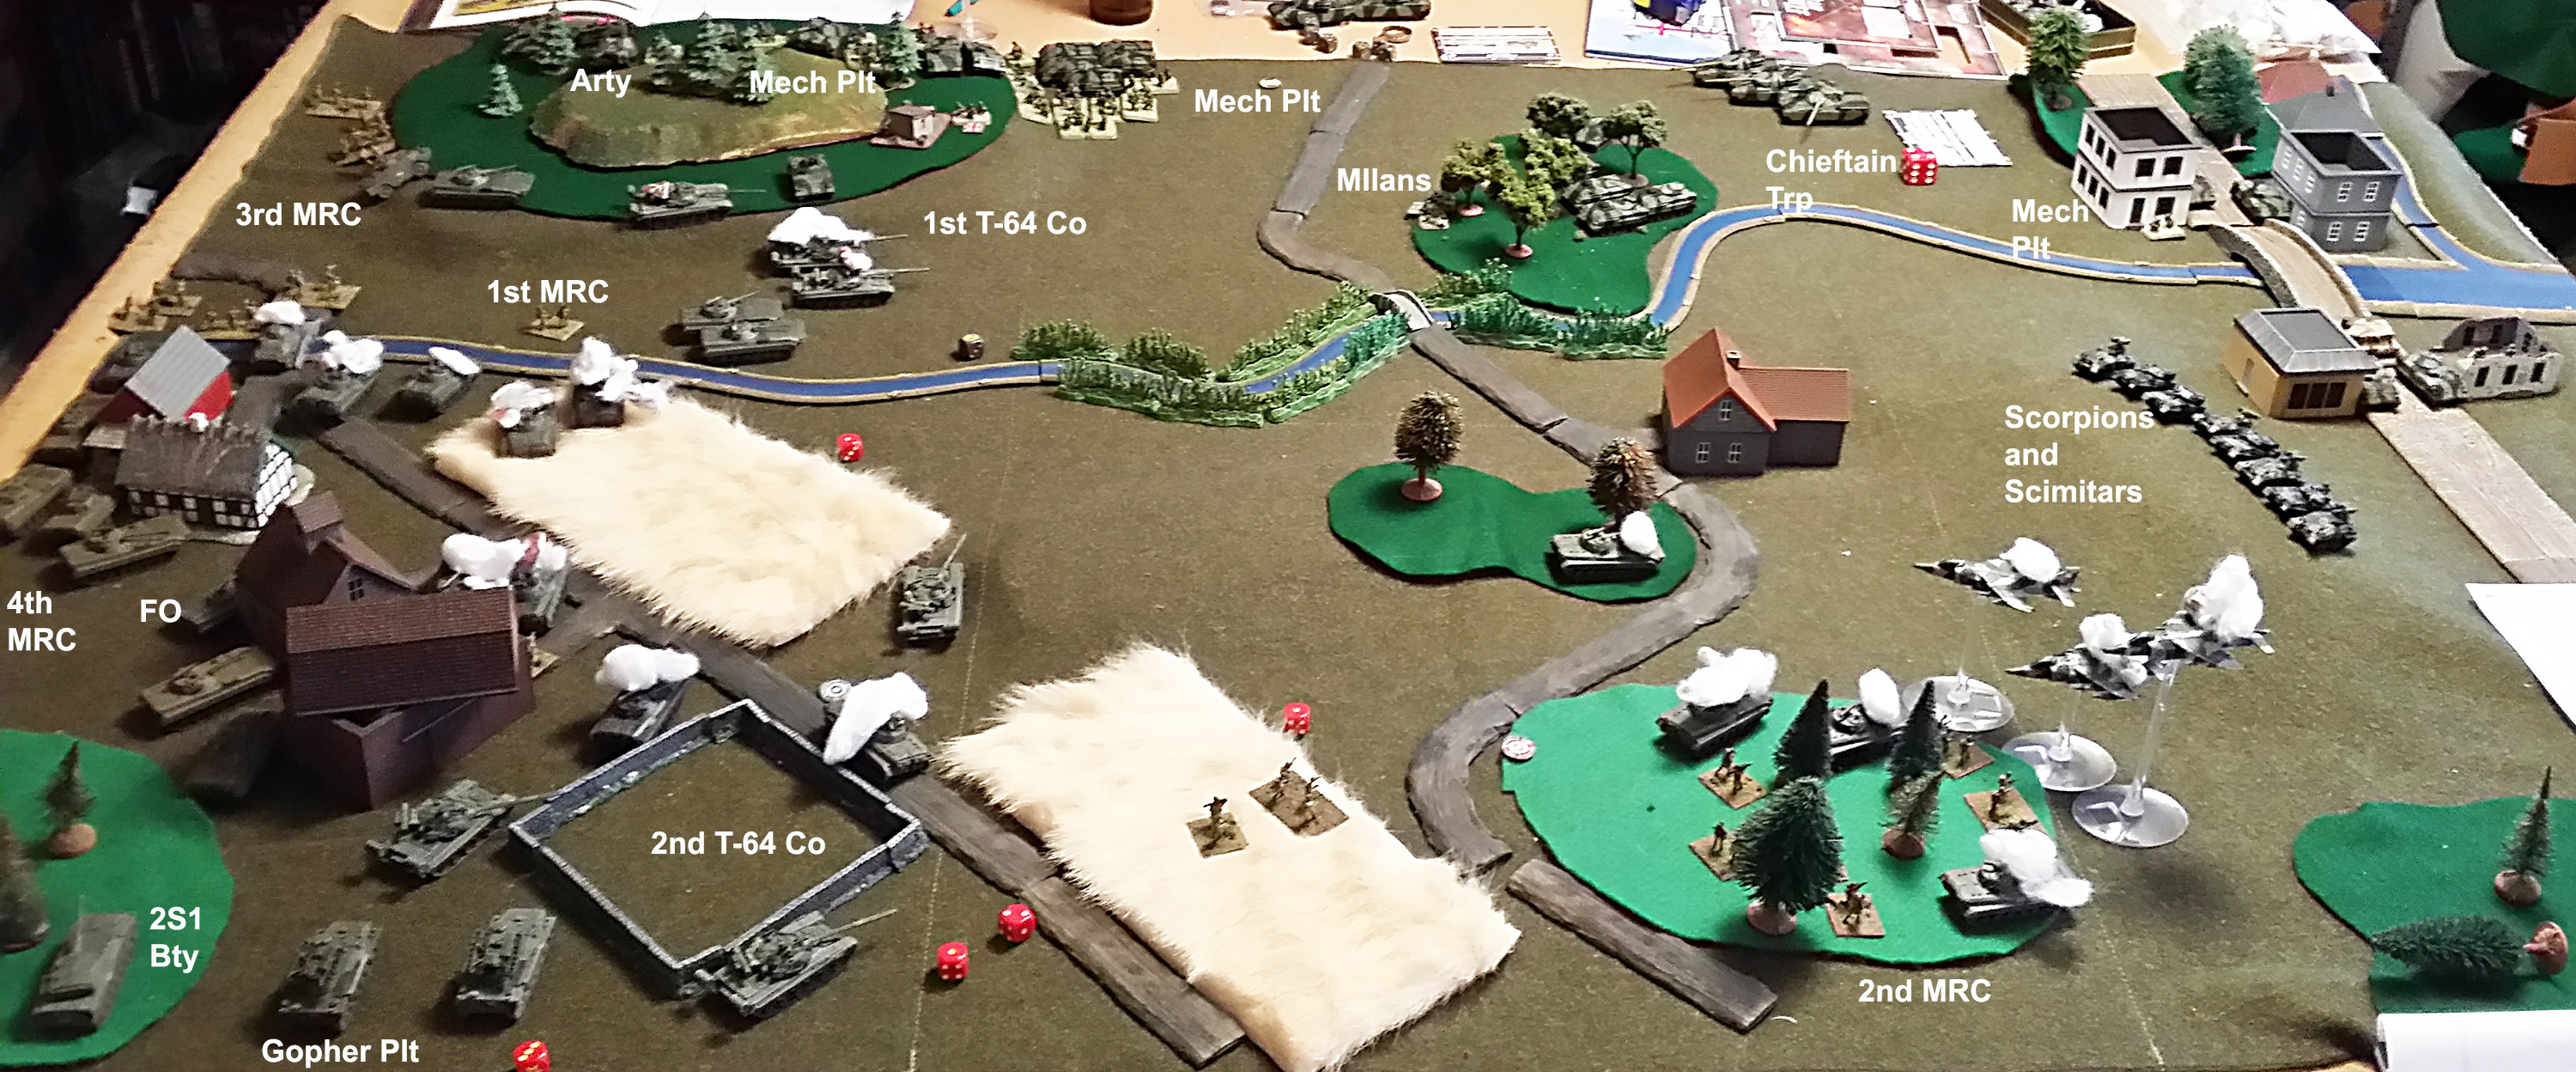
The initial troop dispositions are shown below (note: all high-level photos taken looking from the east). The British used their Scorpion troop during deployment to seize the north objective, defending it with one of their large infantry platoons as well as the Scorpion troop. The British FO and their M-109 battery seemed to be the only thing holding the south objective but even if there were an ambush there, it seemed to be the one to go for, given that British reinforcements would arrive from the NW corner of the battle area. The MRR deployed a recon platoon in its northern deployment area, mainly to keep the British honest, and deployed most of 1st MRB along with its attached T64 company and the regimental artillery battery, in the SE board corner with the intention of rushing the southern objective, capturing it, and defending that position. The most likely ambush site was pre-registered for the artillery battery, just in case.
Almost as expected, the British deployed an ambush in the woods near the south objective, but not where the artillery pre-registration was!
They, and a timely British artillery strike, managed to destroy a pair of BMPs along with the infantry in one and causing a third one to bail out. Meanwhile the Scorpion troop in the north moved to positions behind the big hill, to taunt the Soviet right flank.
Given the existence of the artillery pattern in the Soviet midst and the presence of Milans to our front, the 2nd company diverted right into the wheat field to block the Scorpions and anything else the British might bring to bear in the north. The T-64 company moved forward to close the range with the Milan teams (each already had the others range so getting inside 8” seemed prudent), bogging one on the Lamme.
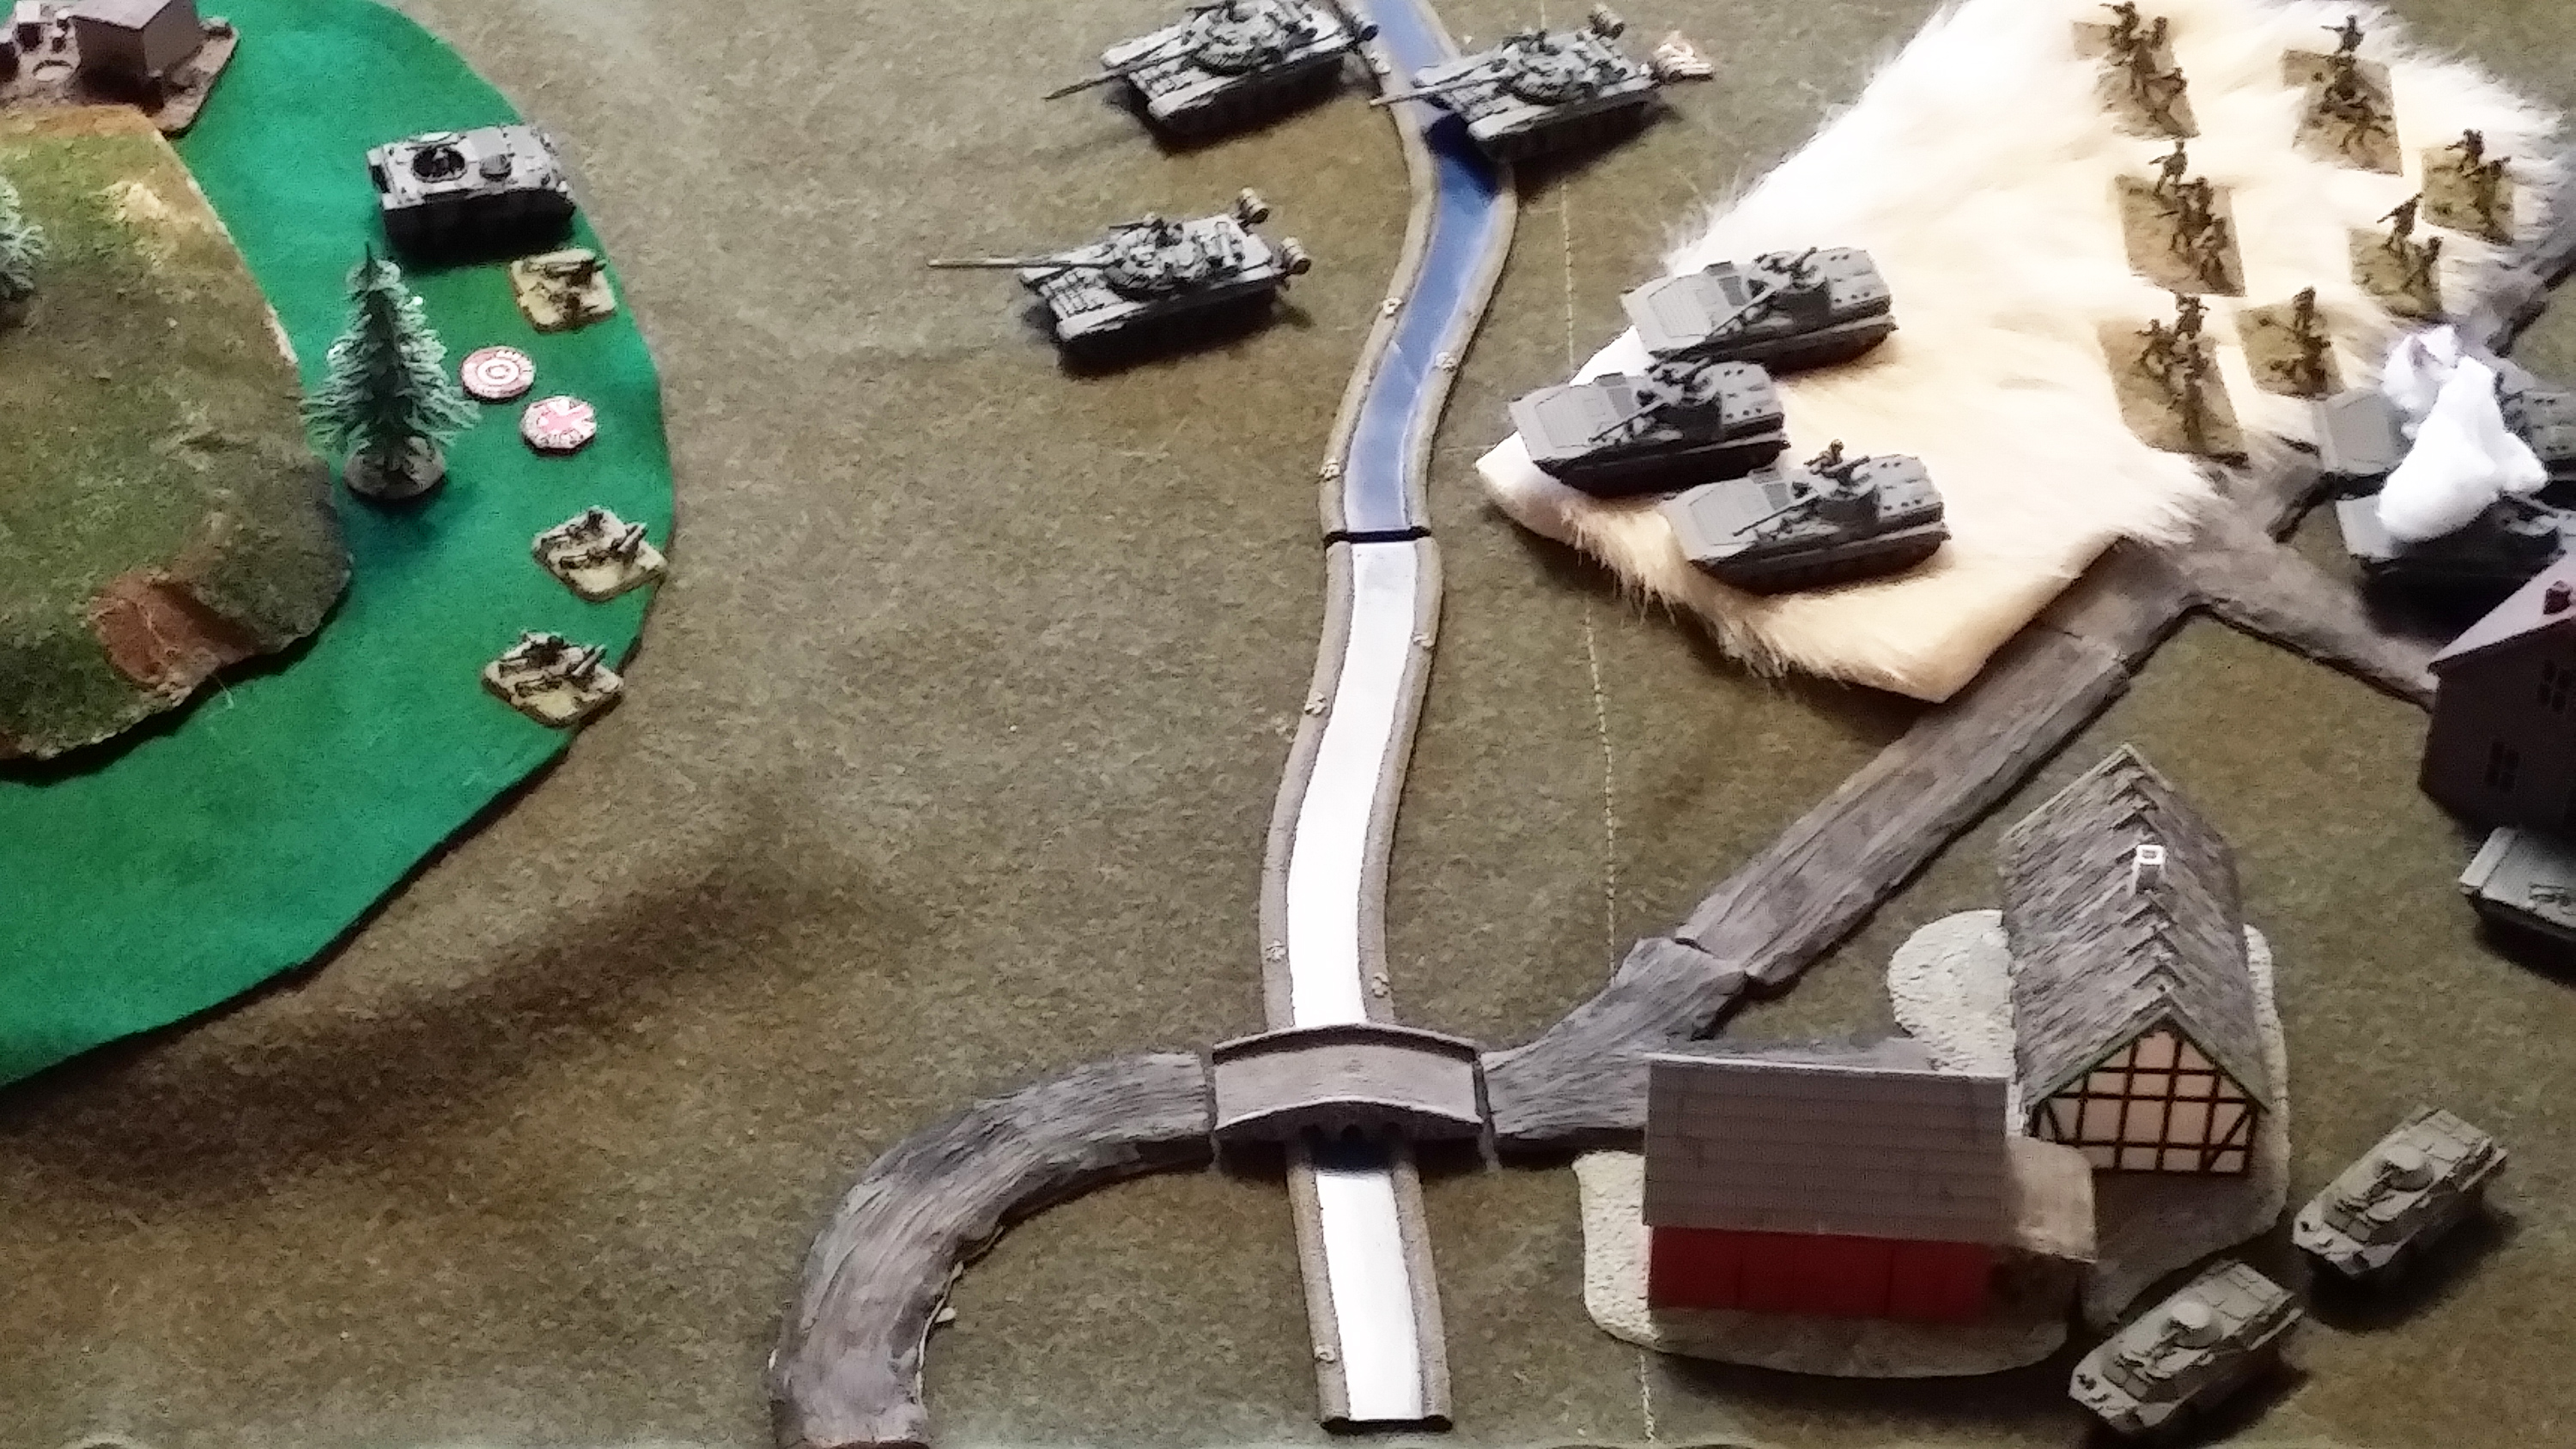
The 1st BMP company deployed its infantry and moved forward as well, engaging the Milan teams with their autocannon. Additionally, the artillery battery shifted fire to where the Milans were and managed to kill one which, despite the volume of fire from the Soviet line was the only casualty inflicted on the British force.
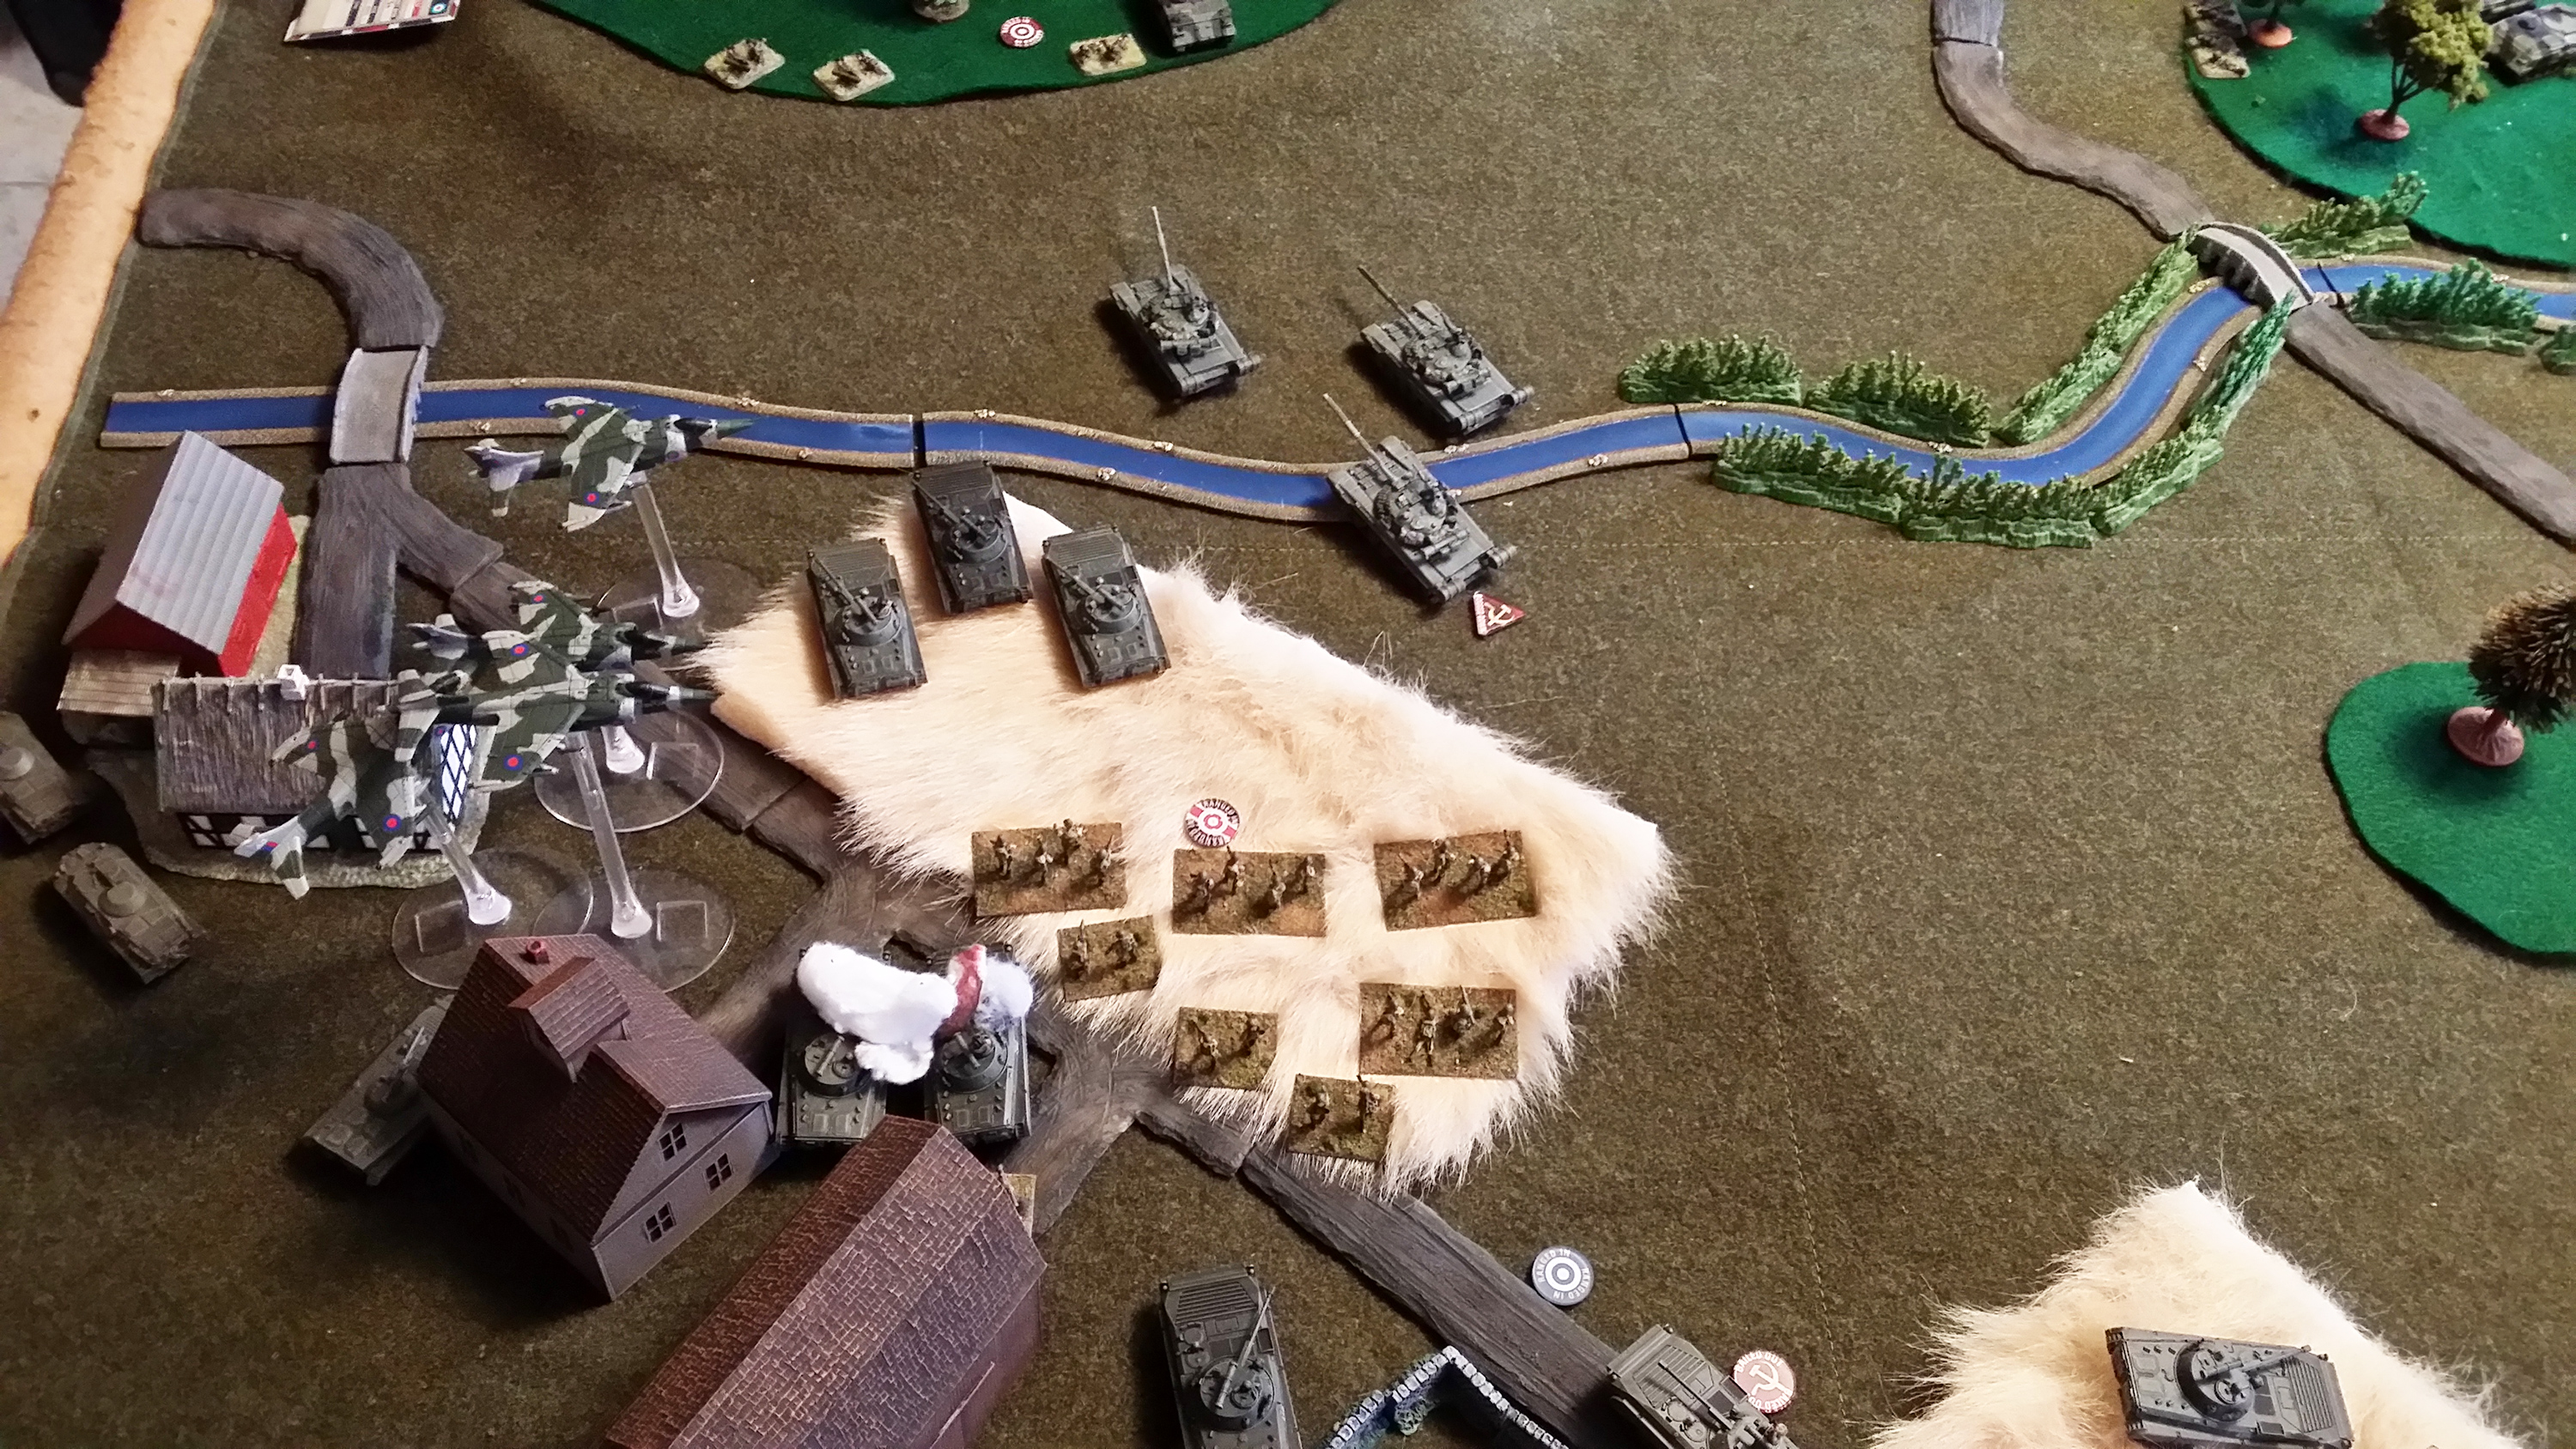
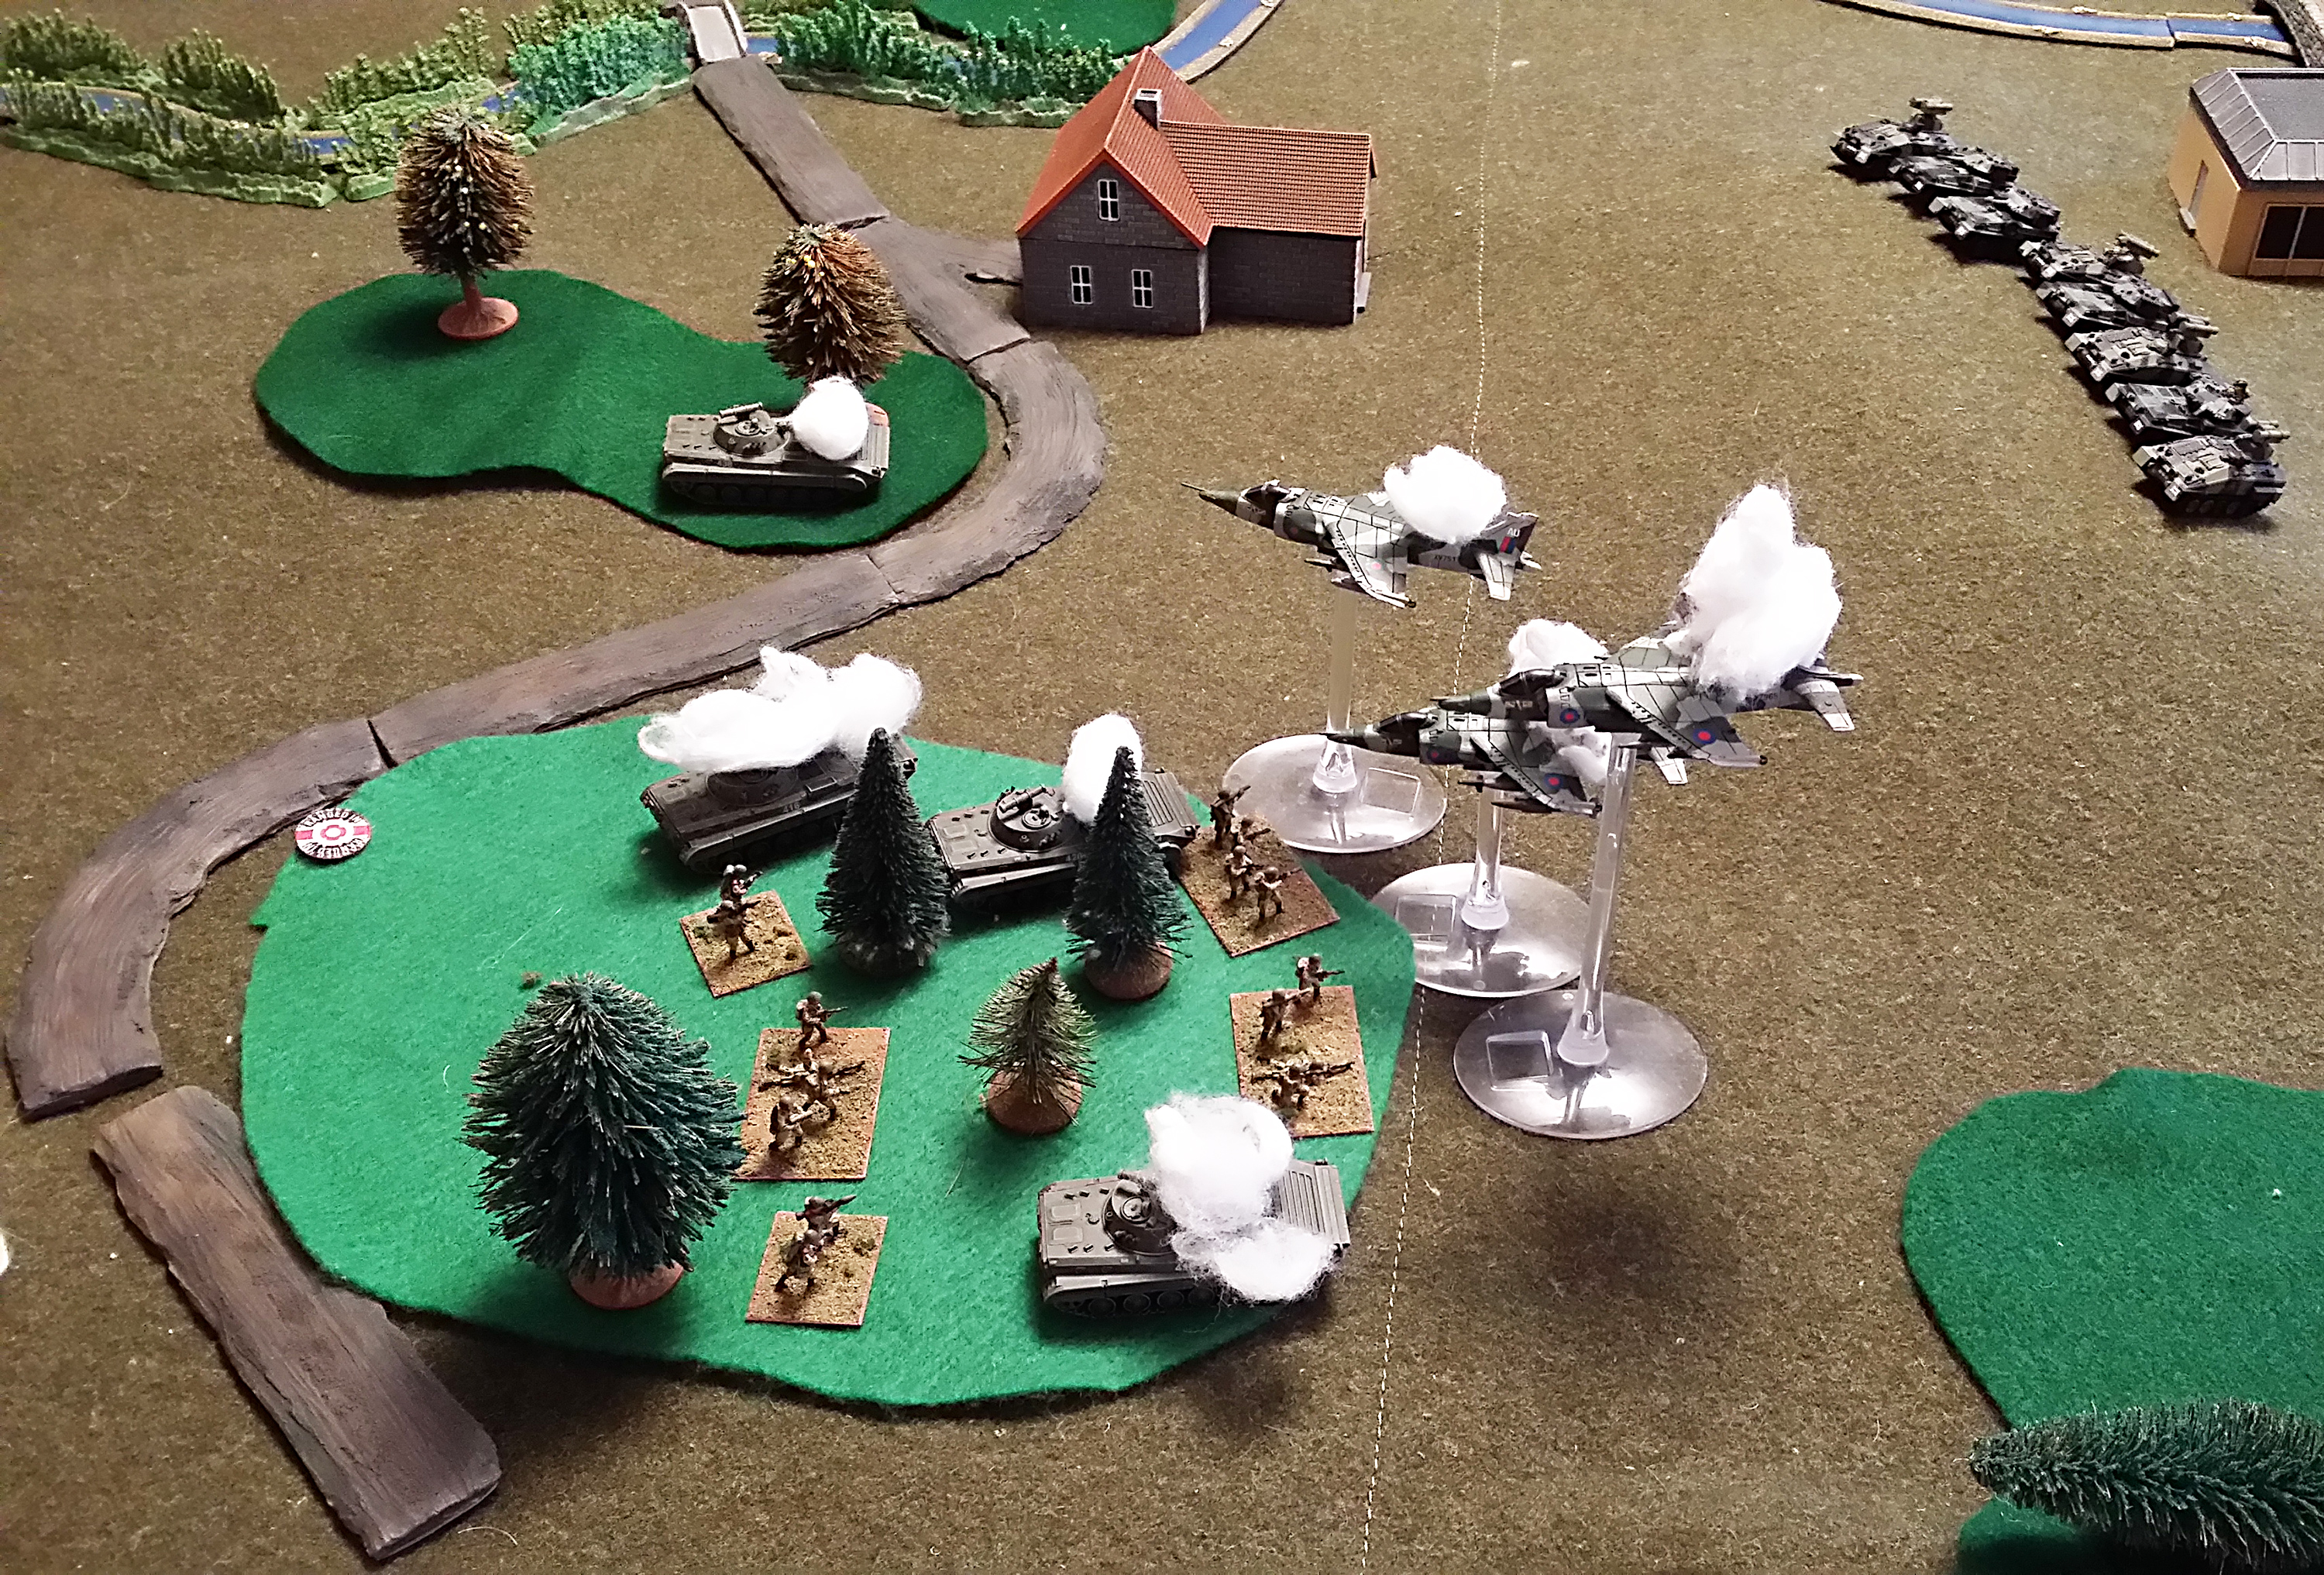
The British countered with a Harrier strike on the deployed 1st MRC in the south and in the north, ran a Spartan/MCT section up the road to support their Scorpions. Meanwhile, a second British mech platoon deployed behind the woods near the western edge of the battlefield, rushing south to reinforce the south objective. British fire from the Milans and the air strike destroyed two more BMPs and killed several stands of infantry.
The Soviets dismounted their second MRC, sending the BMPs north into the woods with the infantry following on foot. The battalion’s 3rd MRC finally arrived and moved directly west to cross the Lamme in support of the main effort. The T-64 company closed the range with the Milan section, along with the remaining 1st MRC BMP, only to come under fire from the British Milans that’d just deployed in the woods to their north. Again, there was lots of Soviet fire but the only casualty, again from artillery, was a second Milan team.
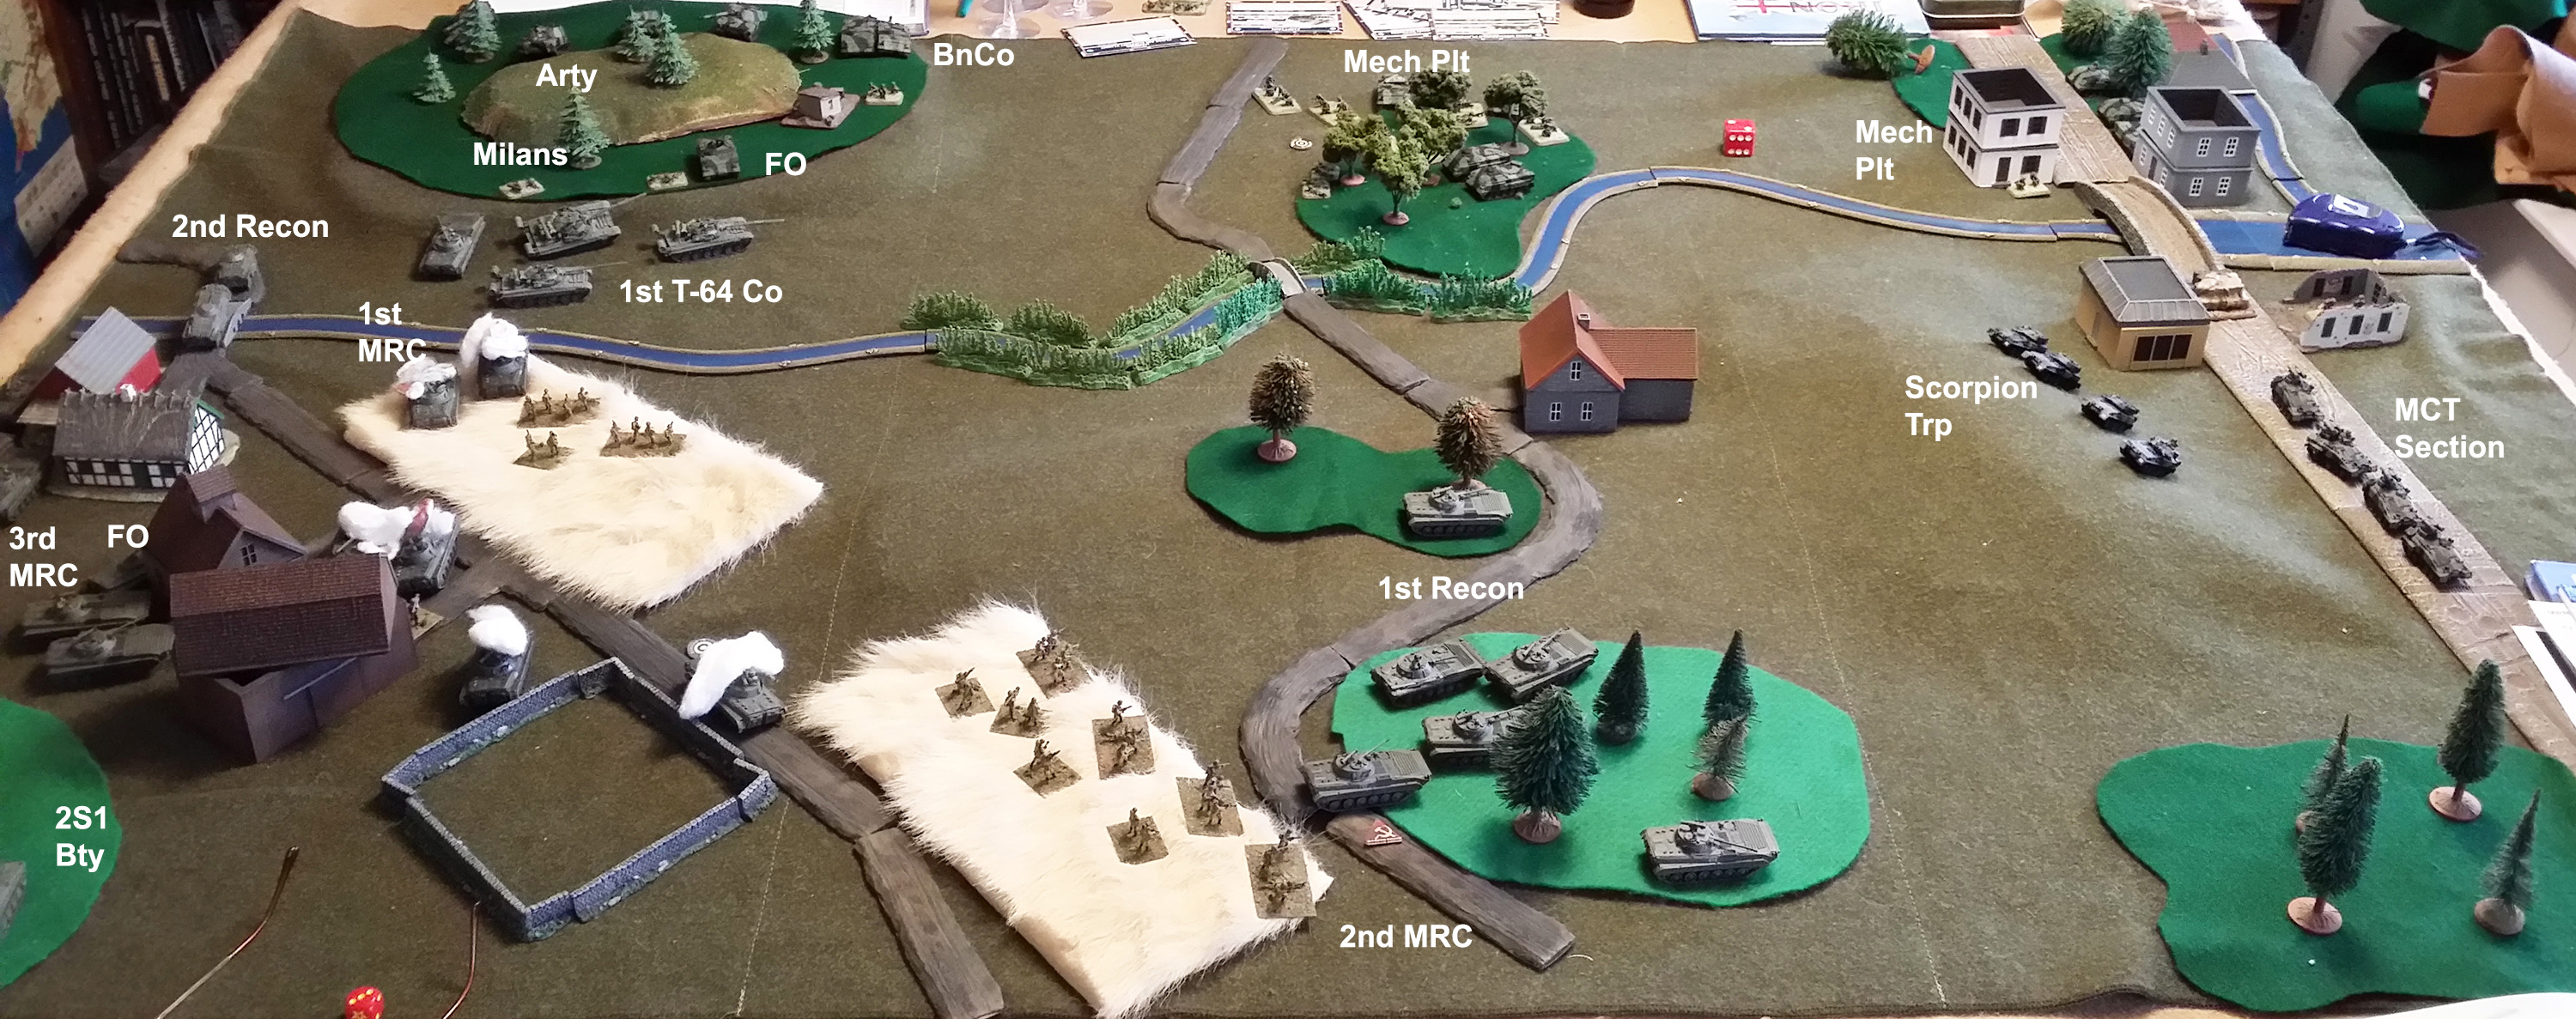
The British managed to kill one of the BRDMs in the recon platoon that’d crossed the south Lamme bridge while their Milans from the ambush unit fell back into cover deeper in the woods. The recently-arrived mech platoon, dismounted, rushed south to the woods. Without exposing anybody, the Scorpion MCTs moved into line with the Scorpion troop. Soviet infantry advanced in the south and north along with the northern BMPs and both the Gopher platoon and the 2nd MRB’s T-64 company arrived, the latter moving forward and engaging visible targets. The British FO, riding an FV432 on the southern wood edge, survived several T-64 shots as well as BMP autocannon and infantry RPG fire.
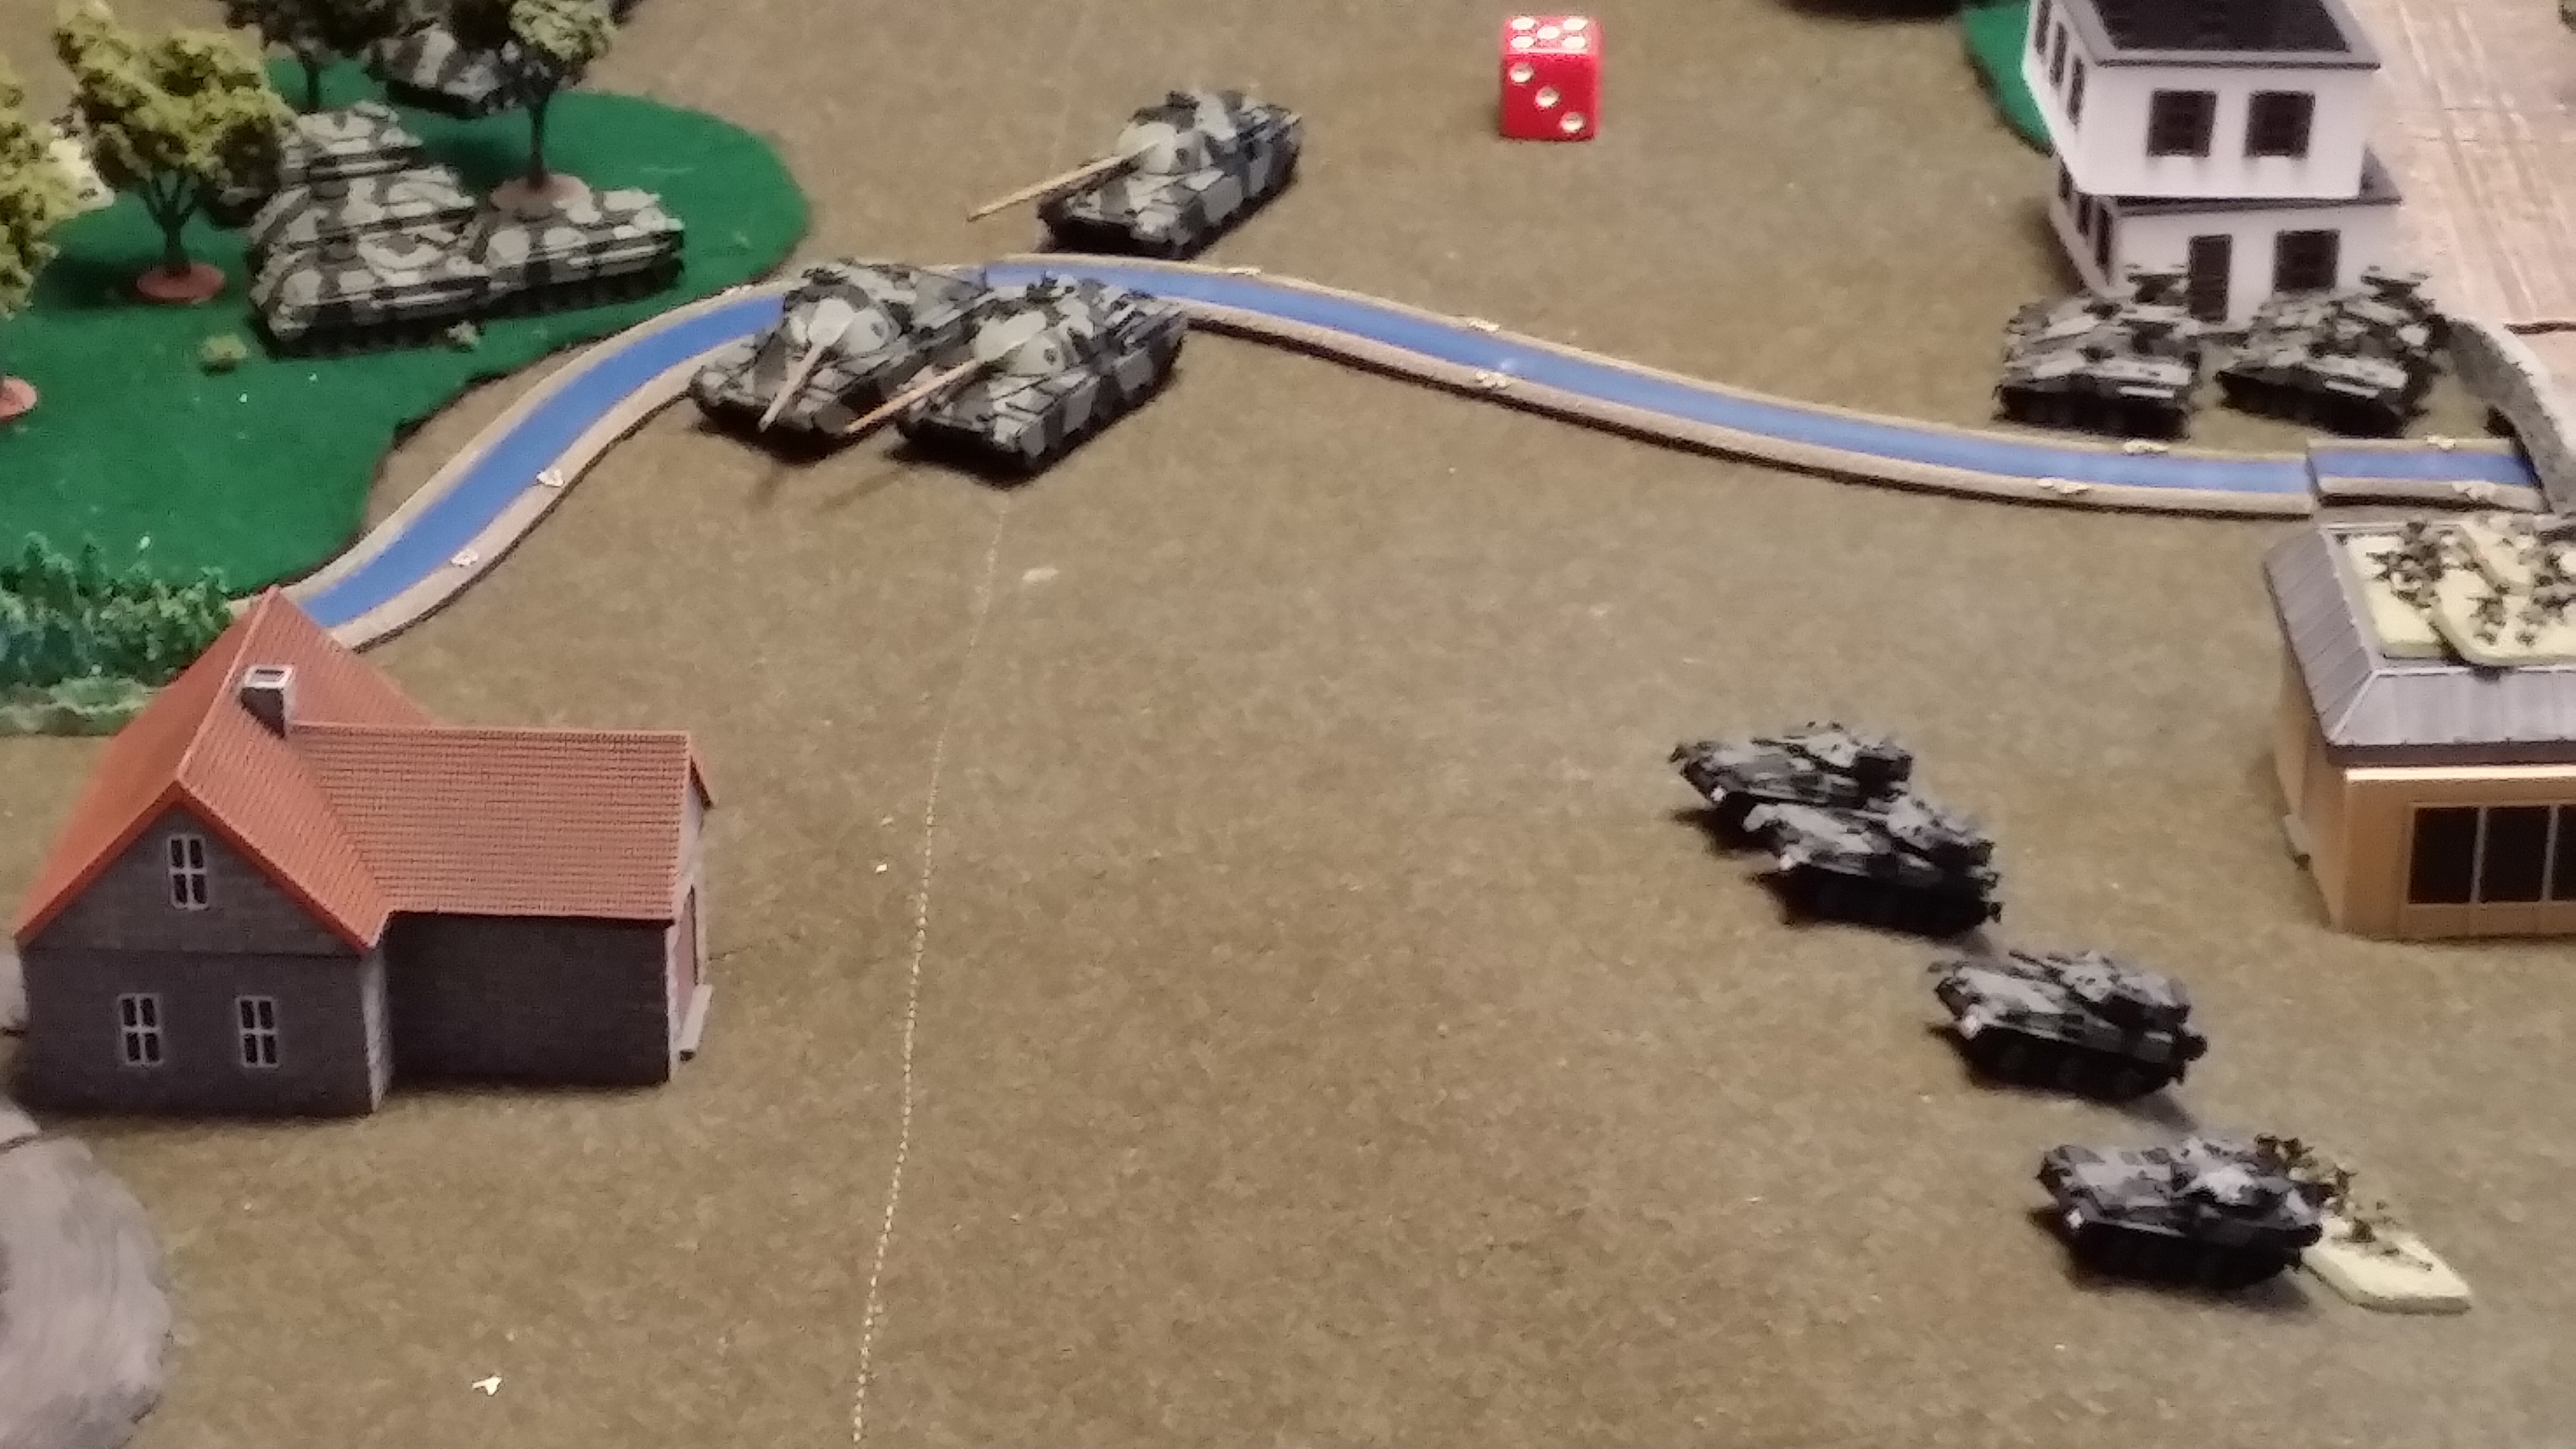
The British now received a Chieftain troop as well as another mech infantry platoon; the former rushed south while the Chieftains moved at tactical speed and engaged the 1st T-64 company, destroying two. The second Milan section continued to destroy BMPs. The British Harriers returned and in conjunction with blitz moves over the hill top by both the Scorpion troop and the Spartan/MCT section, struck the Soviet MRC and recon platoon holding that flank, destroying most of the BMPs there and causing, upon failures of both their morale checks, the remaining recon BMP and MRC BMP to flee the battlefield. The Soviet manpad crews earned their pay, though, shooting down three out of four of the attacking Harriers.
The Soviet force received a MRC in the way of reinforcements, moving it to the west to try to reinforce the attack there because there was still just time enough to get troops near that objective before turn 6. The remaining two squads from the 1st MRC attempted to close assault the FO in the FV-432 in the woods and was wiped out to the last man by defensive fire from the FO.
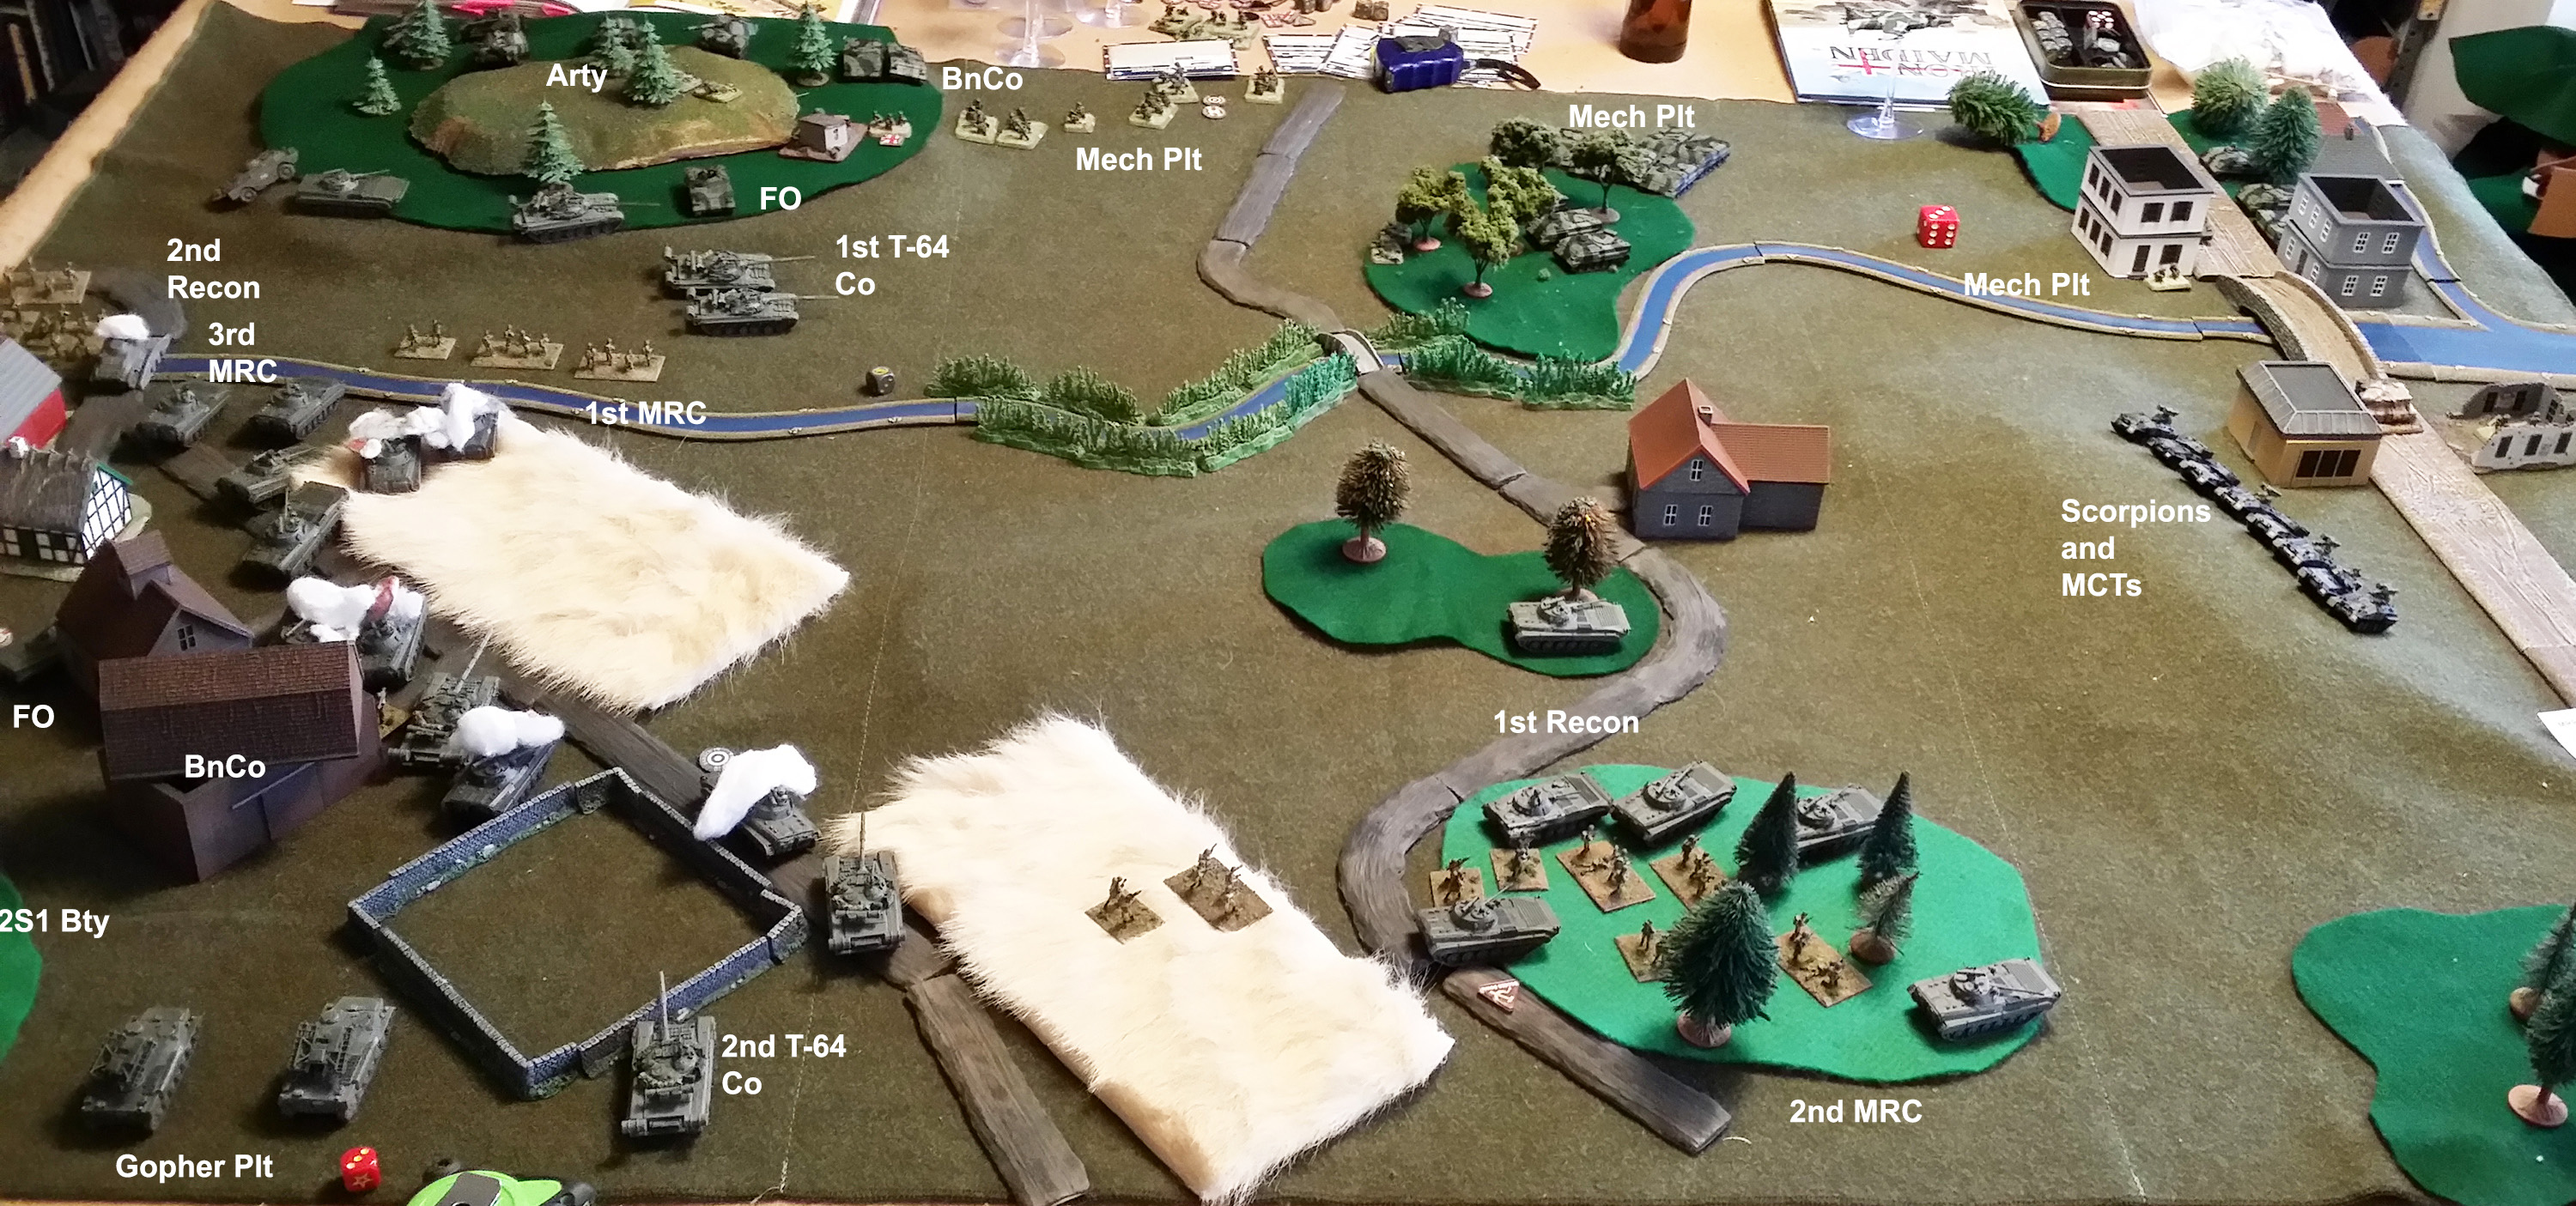
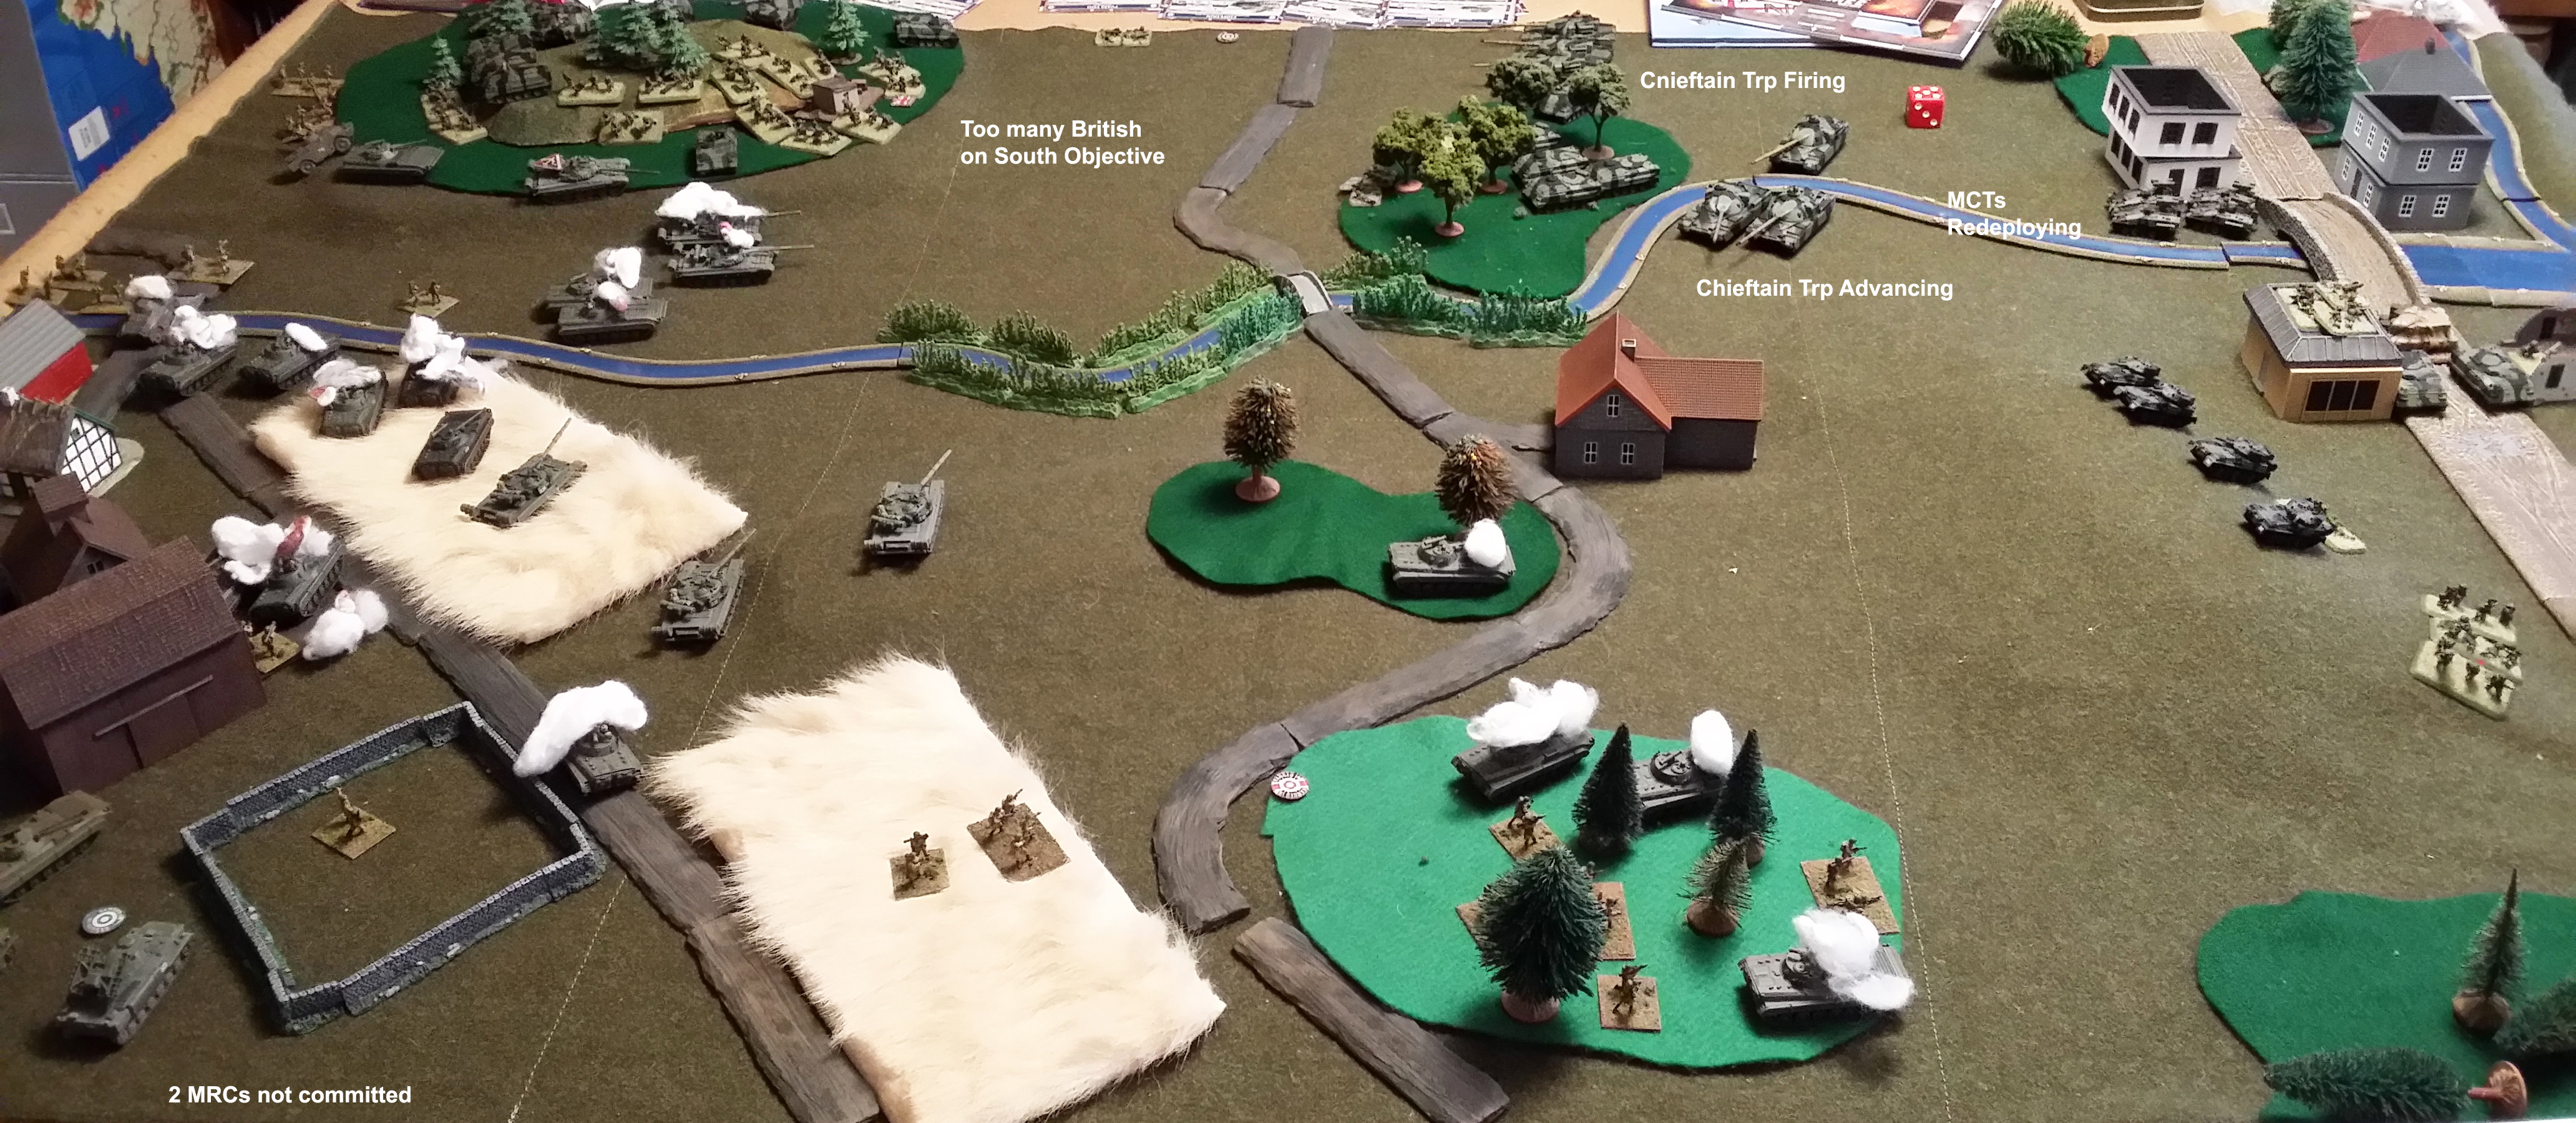
The British brought up another Chieftain troop and realizing the Soviet force didn’t have enough movement to get to the north objective before turn 6, pulled back their Spartan/MCT section to redeploy it to the south. All of the infantry in the south deployed to the front of the south objective to protect it. The new Chieftain troop advanced across the northern part of the battlefield, planning on outflanking the 2nd T-64 company during coming turns.
The Soviet force received another BMP company and advanced with all elements, but by this point, things quieted down a bit because the Soviet force didn’t have the movement to contest the north objective and were significantly outnumbered by the British around the south objective. The T-64s did some long range sniping at the original British Milan section to see if they could kill it, but without effect. The battle ended at the end of turn 5 with a British victory. The Soviets lost several units and the British lost none.
In case I’ve not mentioned it before, I hate Milans. Really hate them. The members of the British Milan section deployed from ambush at the start of the game should all get medals because they stymied the 1st MRB’s attacks for a vital couple of turns.
I need to think out anti-ambush artillery pre-registration better. In this game I placed it to support where I initially planned to attack, then saw a squirrel (or more correctly, a bunch of Scorpions and infantry) and attacked elsewhere, where the pre-reg was not.
Don’t ever assume you can pass a bog check. My vehicles could all pass with a roll of 3+ but many of them didn’t, seriously hindering my ability to attack in the south. The wrecked BRDM on the only bridge didn’t help matters…
Once you commit, carry through. I diverted third company to my north because the British were getting restless there, figuring my 2nd MRB would support the attack in the south. By game’s end only one infantry company from 2nd MRB showed up.
Air assets would have been useful but, experimenting with a mob of tiny units OOB I simply ran out of points. Need to rethink that one. Meanwhile, I discovered that anti-air points are never wasted.
Pay attention to previous lessons learned! Otherwise you get to learn them all over again. I.e. I learned a few of these lessons the last time my MRR attacked near Hanover but didn’t remember them…
Battle Report Author
Opponent
Army Lists Used In This Battle
Recommend Commander For Commendation
Share this battle with friends
kayjayWins

+++
8/10 and a commendation for a high quality report.
Need to work on winning 😉
too bad, i liked the map though
Well done! You put a lot of effort and detail into this, so commendations for you.
M. Nisbet: Warconsole support responded within about 12 hours, delinking my unpublished report so I was able to link to kayjay’s report so all should be good!
recce103c: %#&*$&#^&!!!! Milan teams!!!
Nicely presented AAR & excellent supporting photos with schematics.
those Brits are stubborn aren’t they Comrade 😉
Nice Report! Sadly outcome
Hard fought and nice report
Very nice report!
A very nice AAR. Very well put together!
It shows they are linked when I look at mine. I cant unlink them.
Absolutely awesome report. Tough outcome but highly commended comrade.
@Tovarishch Vilgelm; If you find you are unable to do it manually, get in touch with Beasts of War. They should be able to sort this out for you.
M. Nisbet: Kayjay and I are working to straighten this out. I made a mistake when originally submitting the battle and Kayjay got linked to a bad code. Still figuring this out… 😉
Good reading. Not only because of the result, but because it is a well made AAR and you learned a valuable lesson or two.
You get a commendation.
Nice report, comrade. Is this one supposed to be linked to the one below? If you leave it unlinked, it will be treated as a separate loss for the Warsaw Pact. You may wish to link it with your opponent.
Very nice AAR. I greatly enjoyed the real life location tie in.