Fought At Amsterdam
2223 days 5 hours 1 minutes ago
True Survivor
View Linked Report - CLICK HERE 50 POINTS+++ 50 points, Recon in Force, Amsterdam +++
+++ East Germans vs. West Germans +++
Today we have Hoffel's fourth game of the season, covering an engagement in Amsterdam (See post-game debrief).
My opponent today is Nabeshin, fielding a West German force so it's going to be The Beast from the East, versus the Pest from the West! Let's see how they measure up so far!

Looking at the stats, both commanders are at 100% records, but on opposing ends of the spectrum.
Will the upcoming match continue the trend, or will there have to be a 'one' put in a new column on each of the commanders?
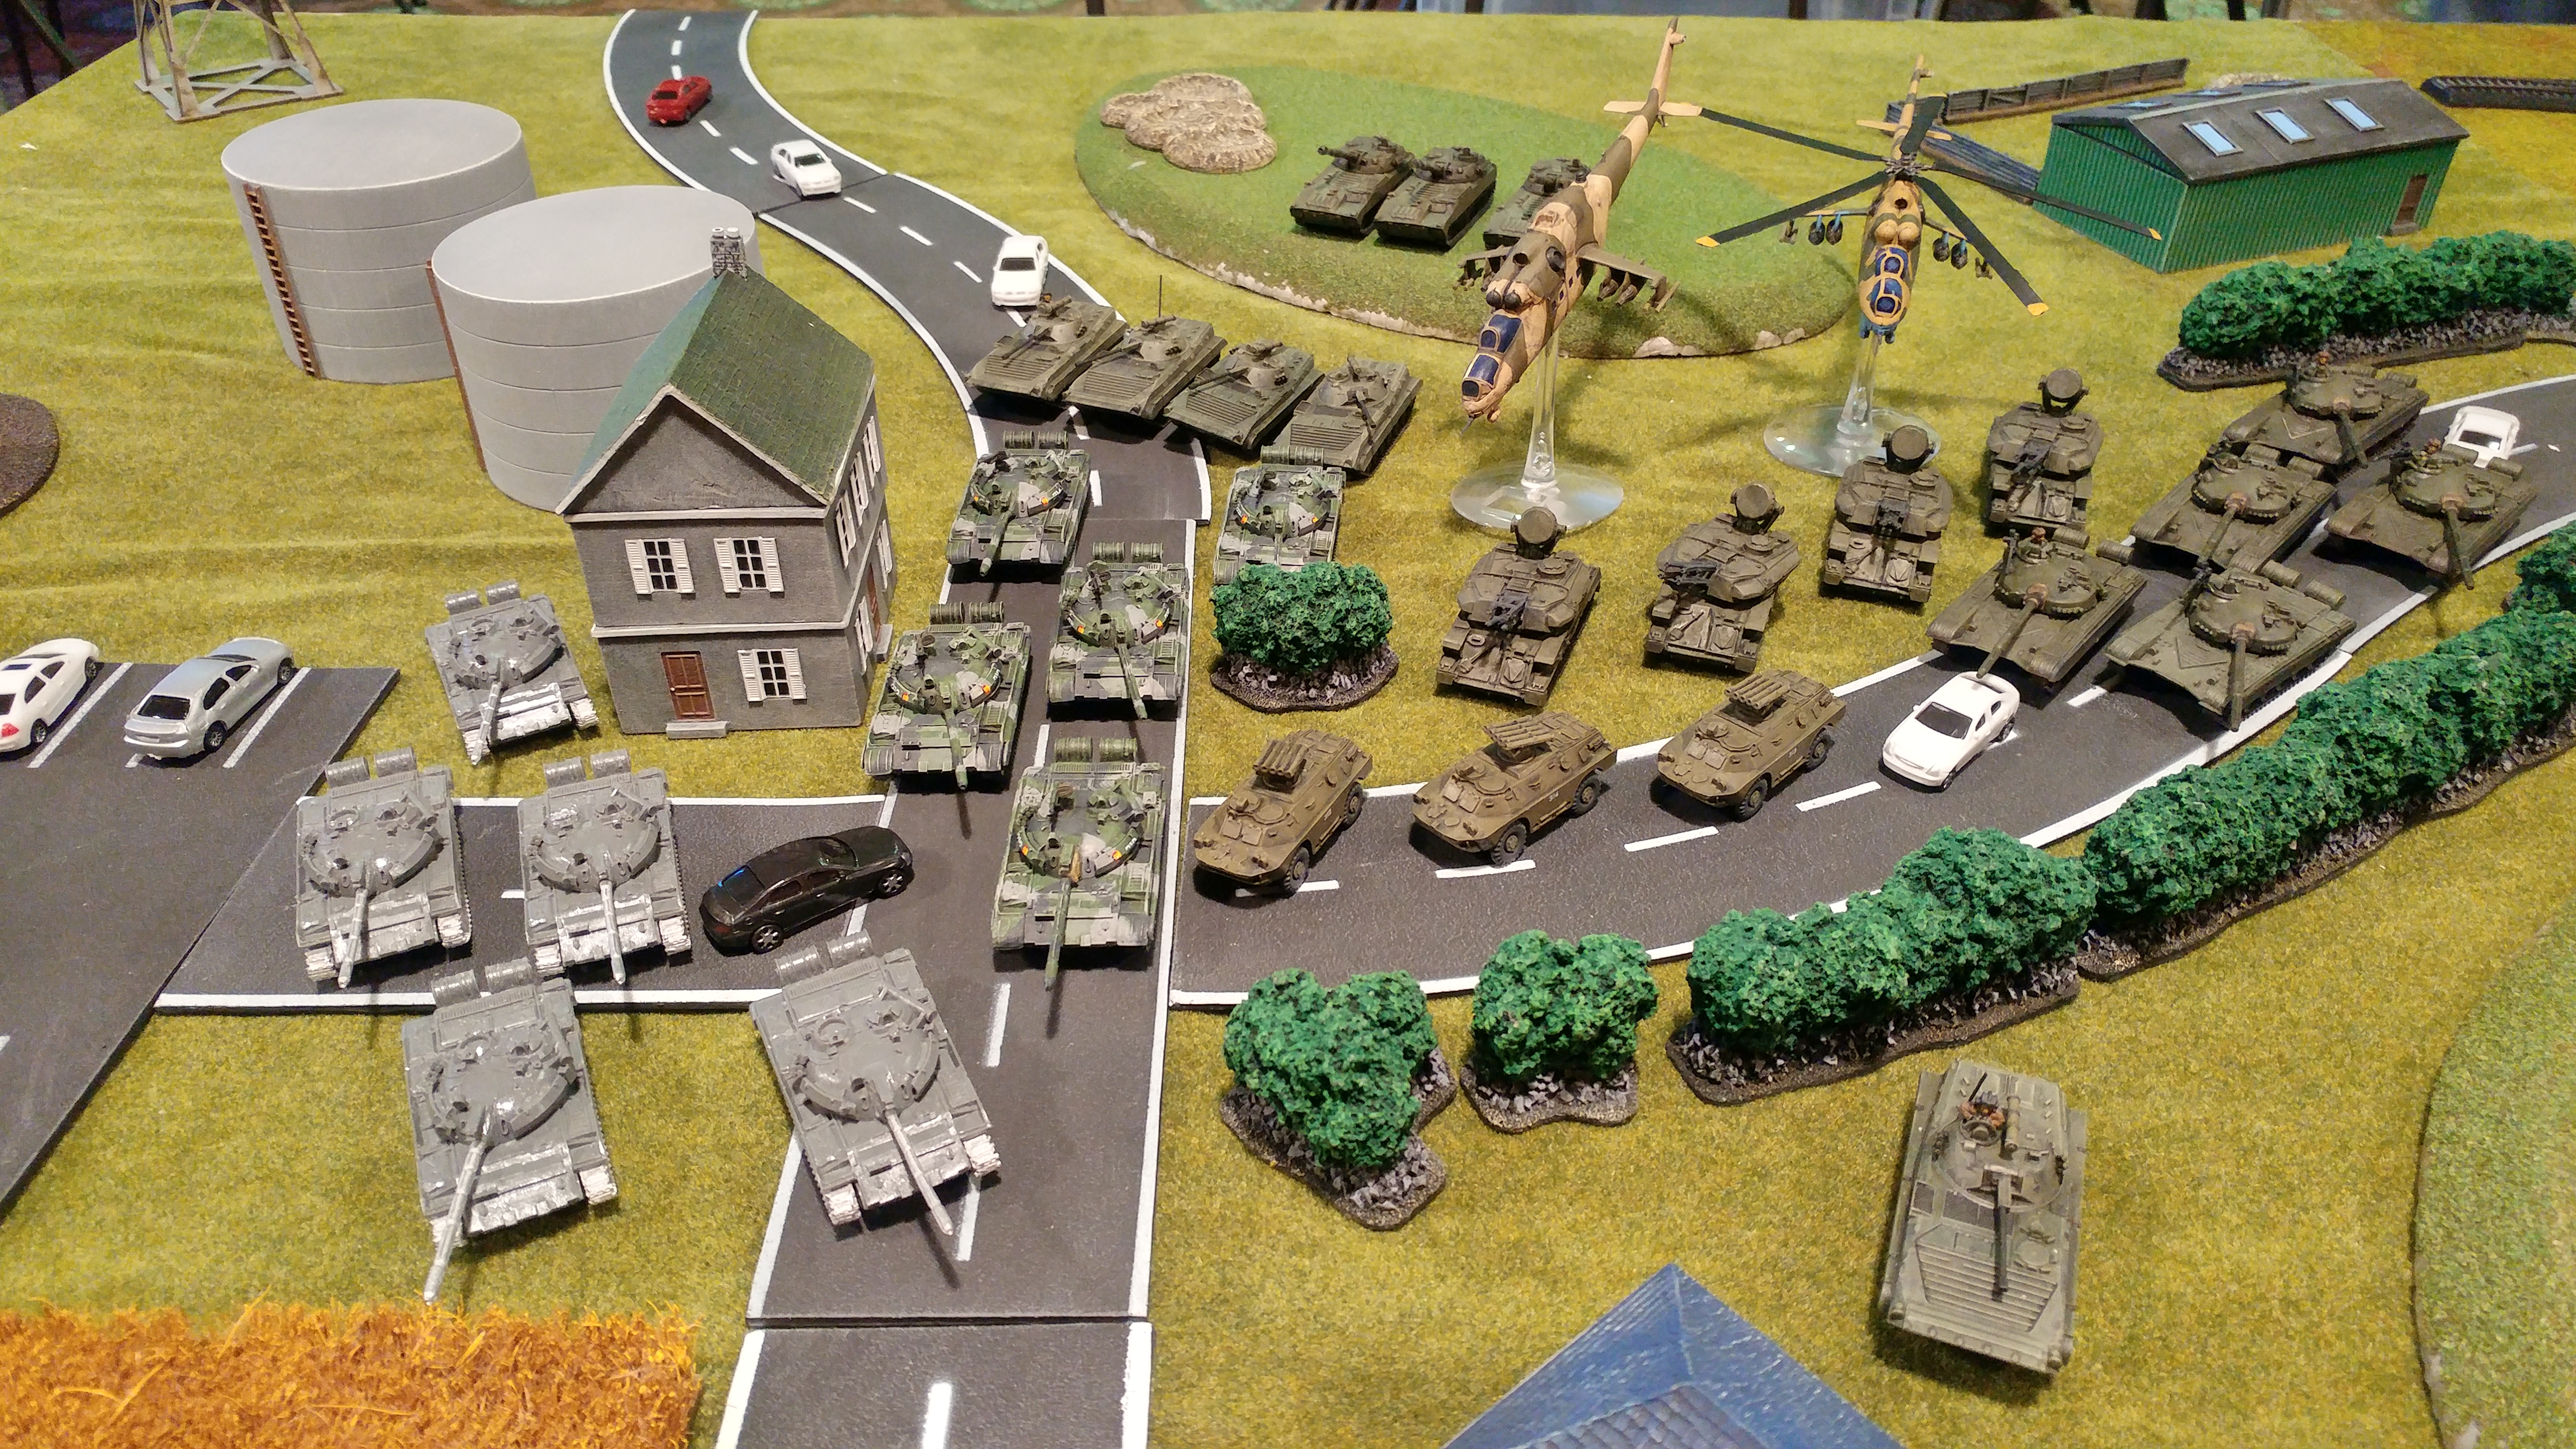
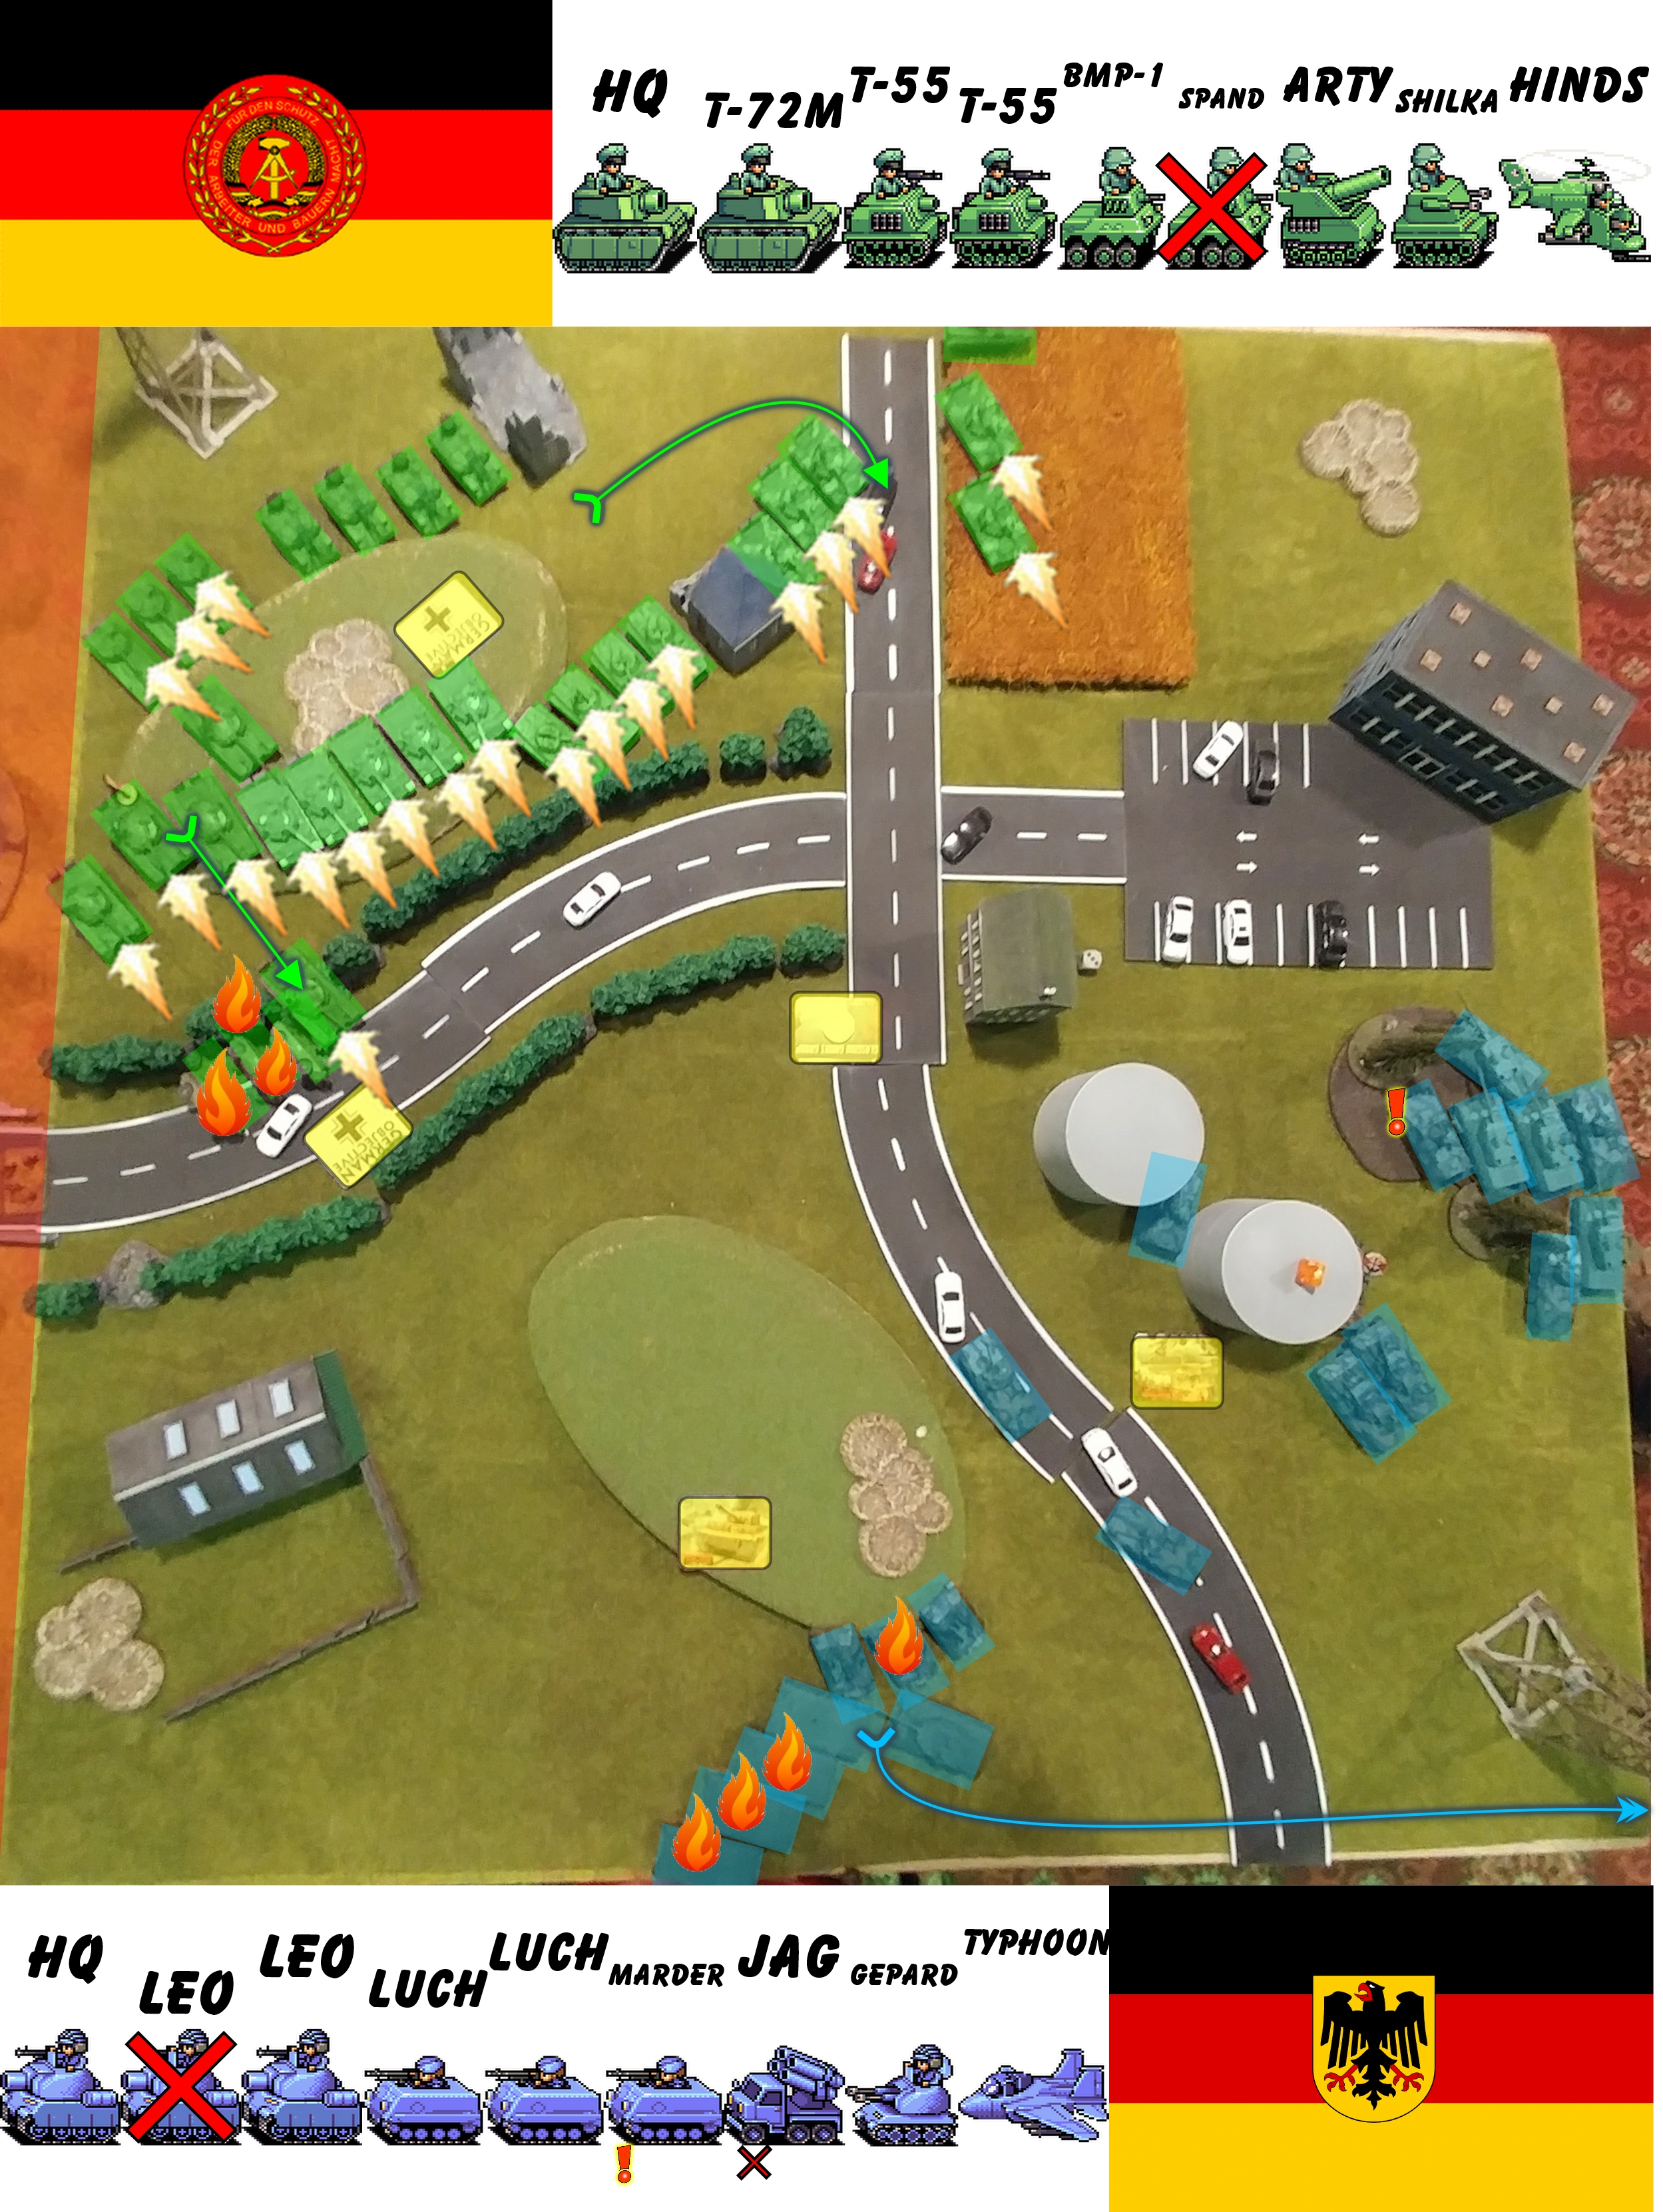
Let's go battlefield side and check in with the contenders and the deployment.
This time around, I though I'd try some T-55AM's as the main part of the force, with T-72M's to be the speartip to push where needed. I'm still a bit unconvinced with aircraft and artillery but stuck with the Carnations and opted this time to take a couple of Hinds to see how they perform.
Further to my 'everyone and their dog has anti-tank' from previous matches, I took a unit each of BMP's with Saggers, and a unit of Spandrels.

The mission is 'Recon in Force' from the Quick Missions book.
1 centre objective, 4 others no more than 16" away from centre. Victory is hold centre and one other, OR hold 3 other objectives.
Deployment is a 12" from each opposing table corner, and this is where the correction to the above picture comes in. Nabeshin encountered a problem with Spearhead and interacting with objectives, so couldn't deploy as depicted above and ended up in a box formation, that will be shown in my Turn 1.
I particularly suffered with the tight deployment (and those bloomin' pylons!) so I had to put a few units into immediate reserves and trundle them on in my first turn as attacker.
With objectives so close to our forces, this could be over quite quickly.
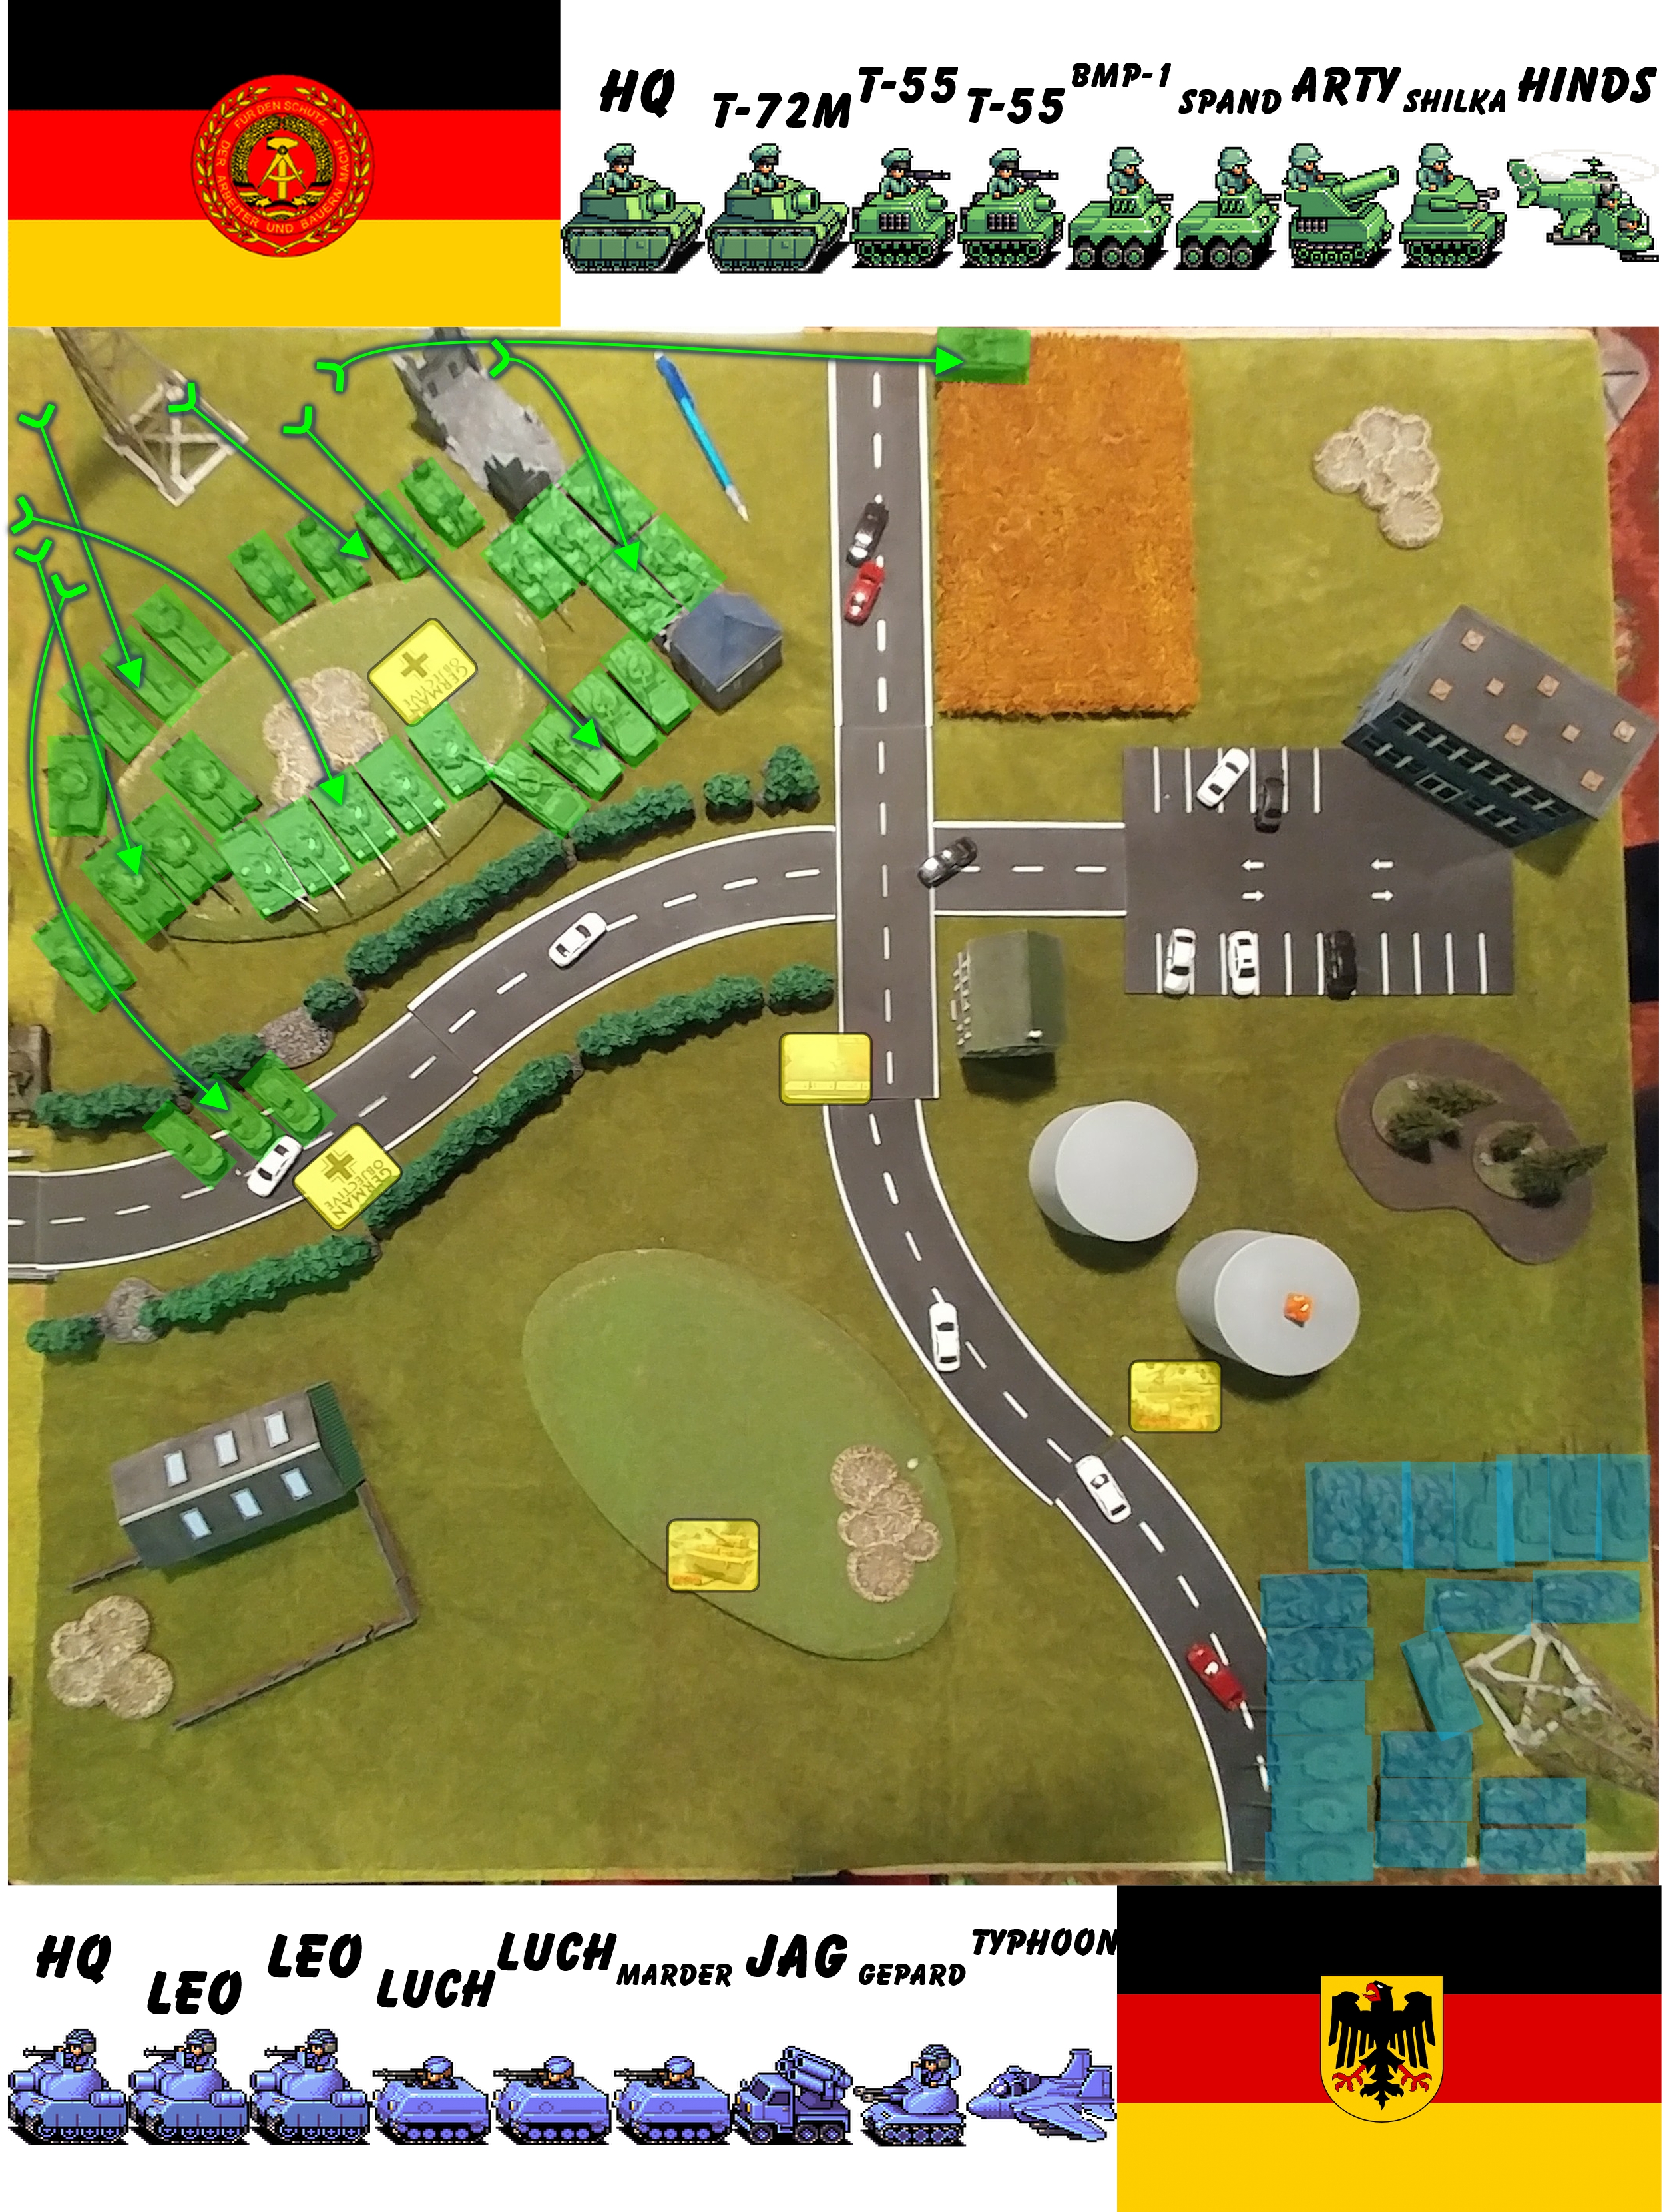
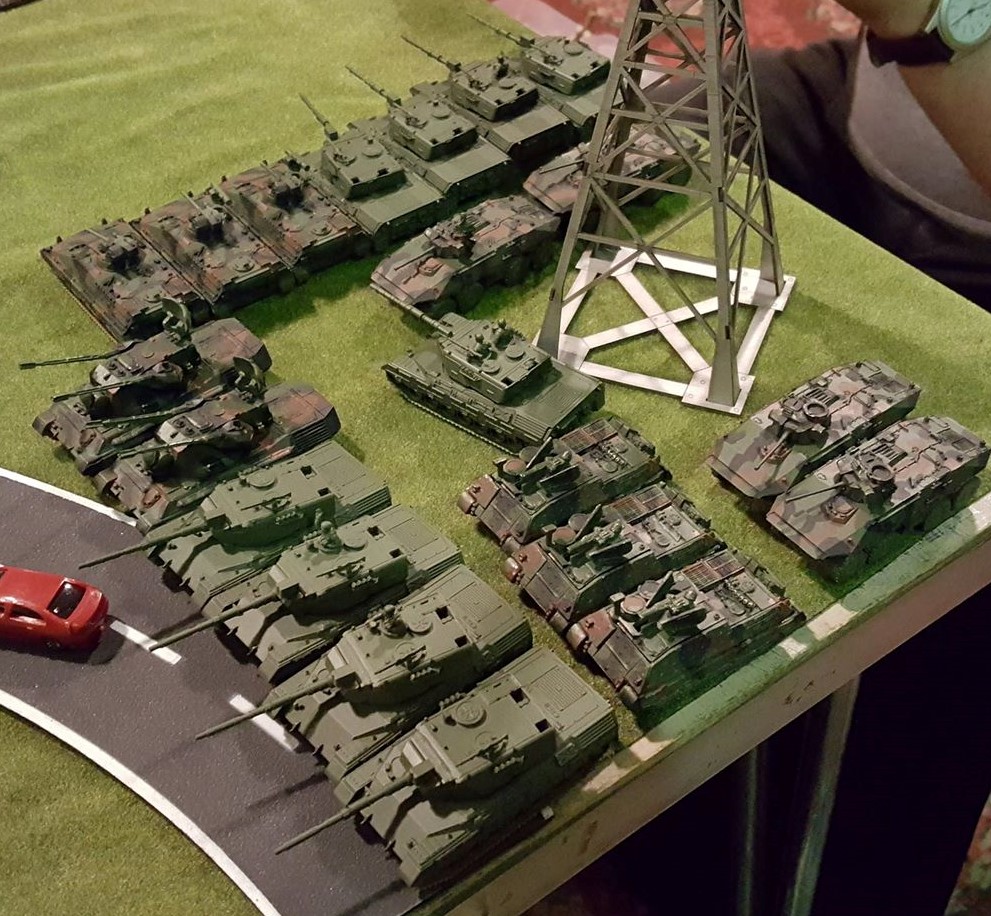
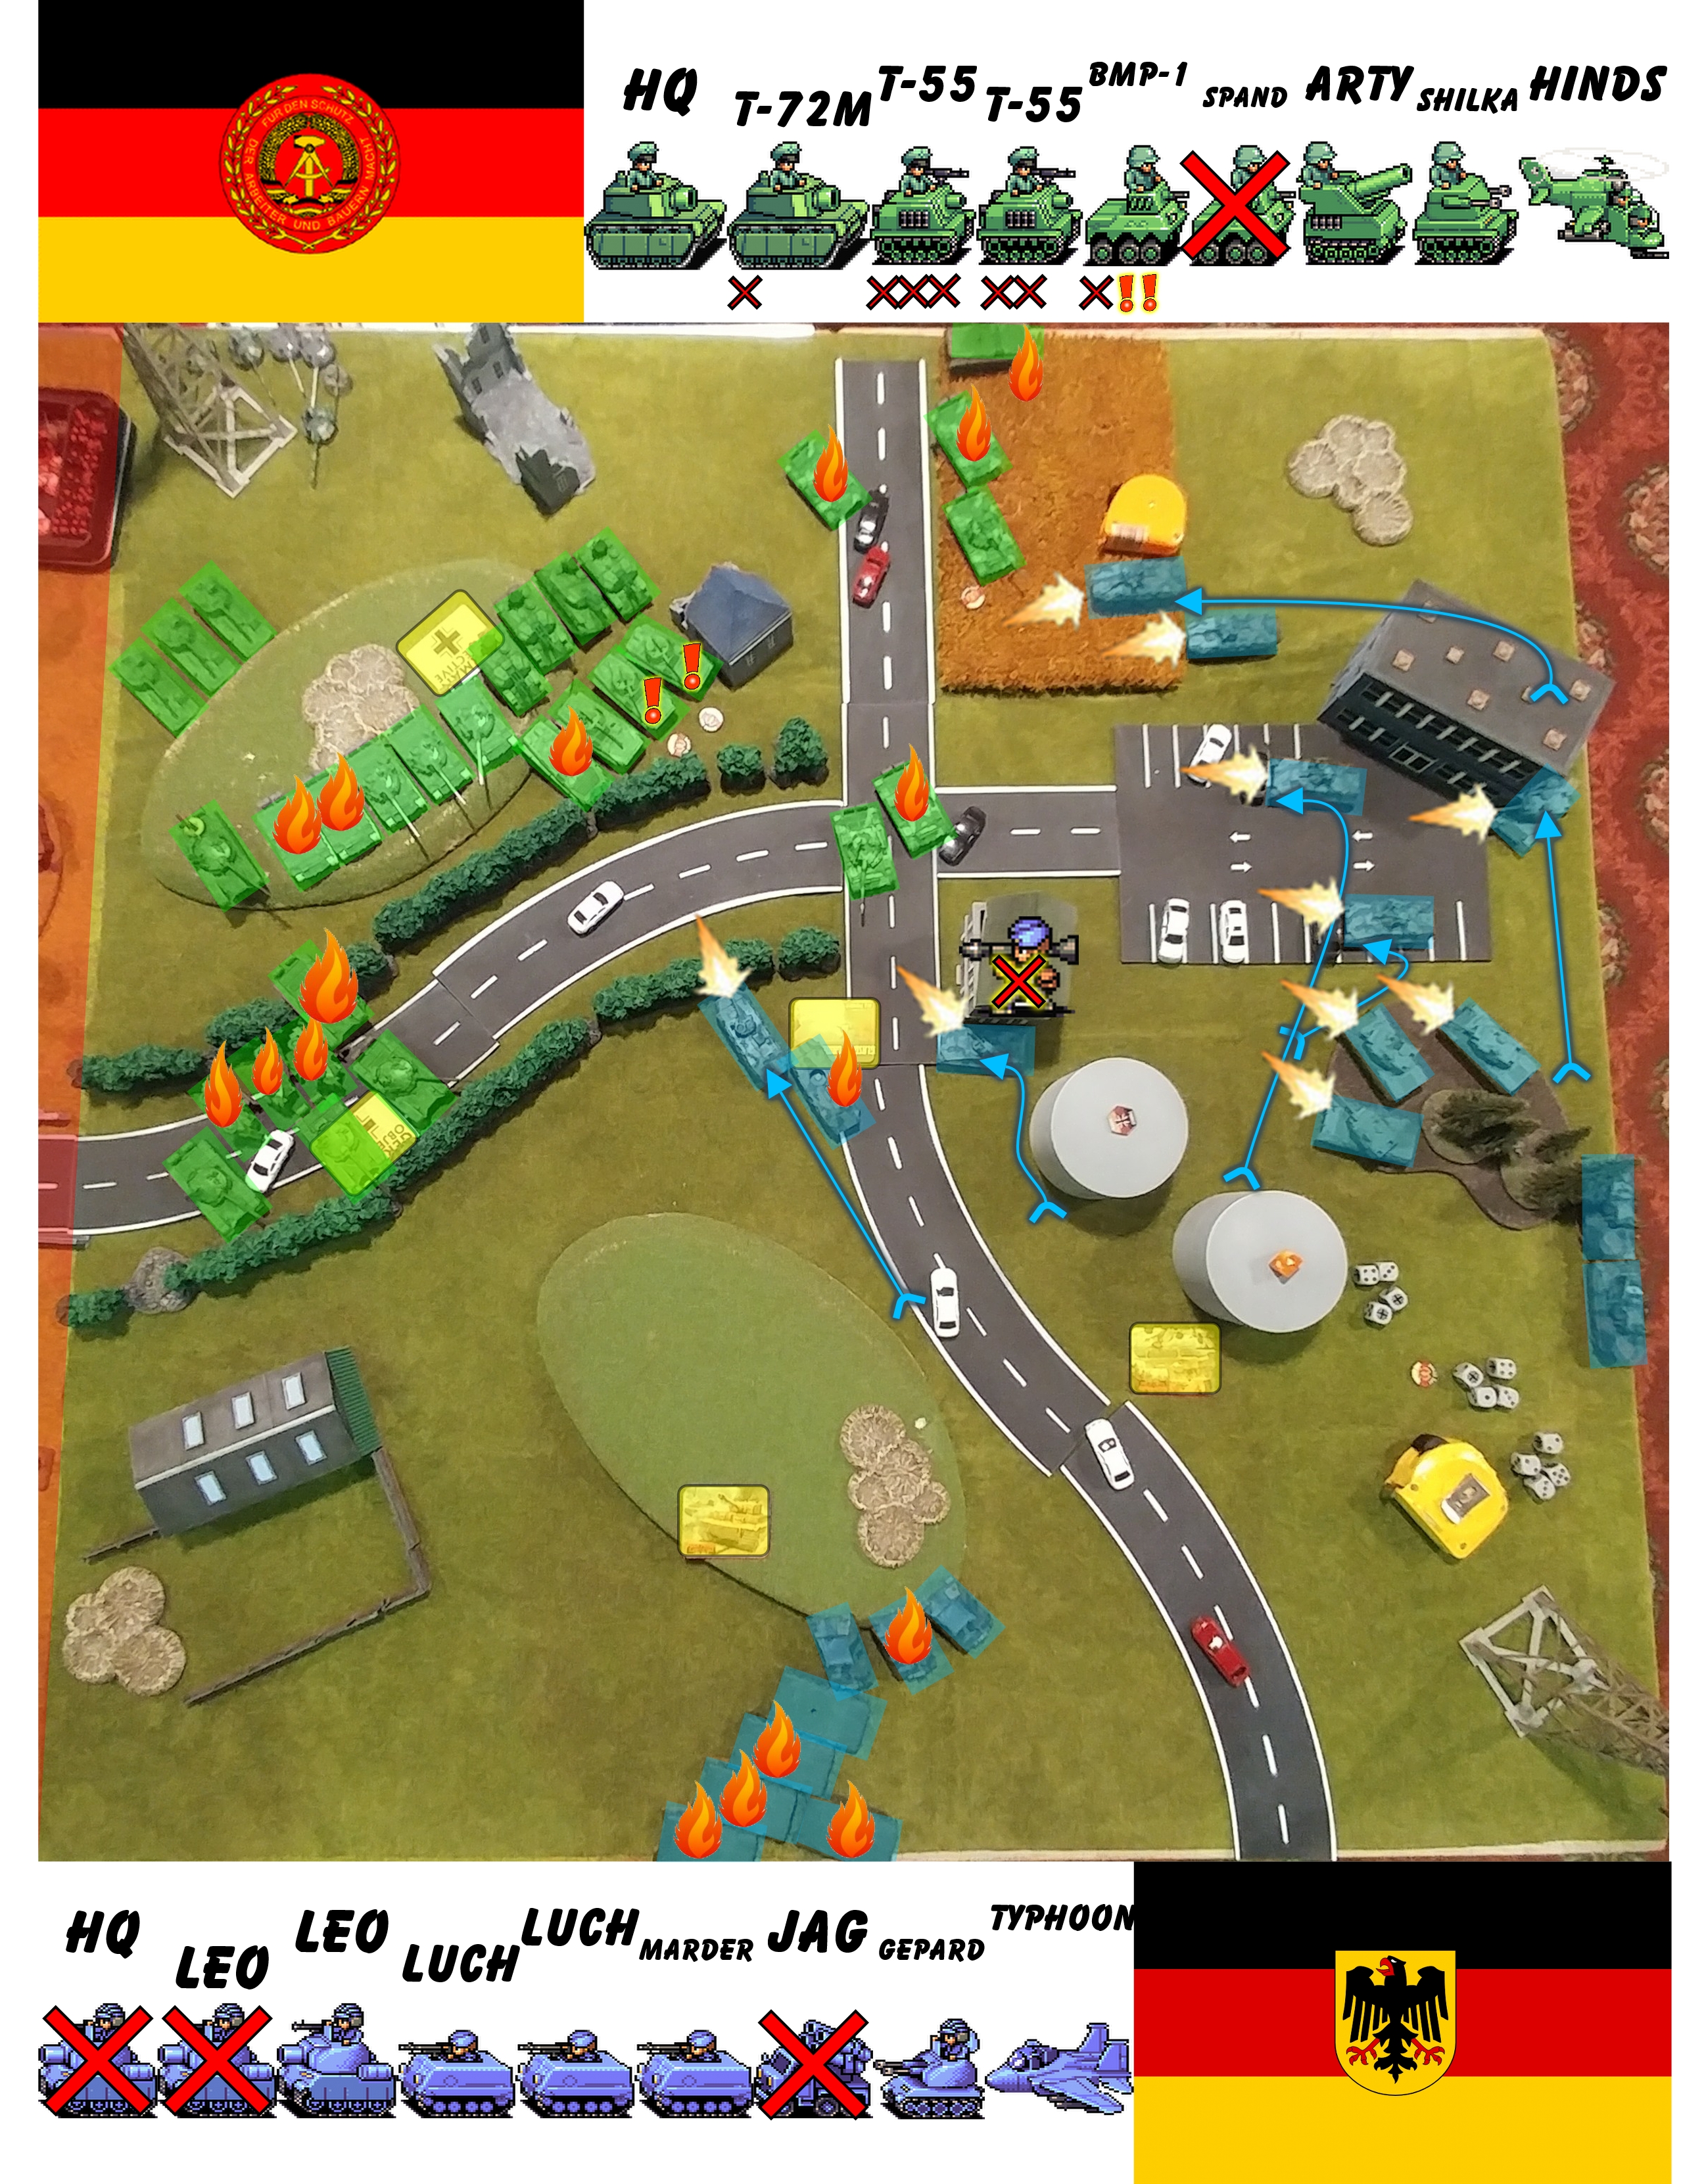
My first turn as a relatively quiet affair, pretty much everything moved to take up gun line positions with the hill as an anchor point.
I have a BMP Observation team scoot off into the wheat field, covering a fair bit of the battlefield in his vision, and my unit of Spandrels rush an objective out on the roadway.
I asked what the Gepards are like as anti-aircraft vehicles and after being told, I wisely decided not to bring them in just yet. Getting rid of the Gepards would be the focus of the Carnations, then I could bring the Hinds in with a bit less to worry about in terms of Anti-Aircraft fire.
So, I've presented myself as a target but hopefully taken the upper hand with a gun line ready to blaze on the next turn.
Nabeshin took his forces and split them in two, heading round in a pincer. A small remainder made up of Luchs went forward for the centre objective. The Tornadoes fail to arrive this turn, much to my relief.
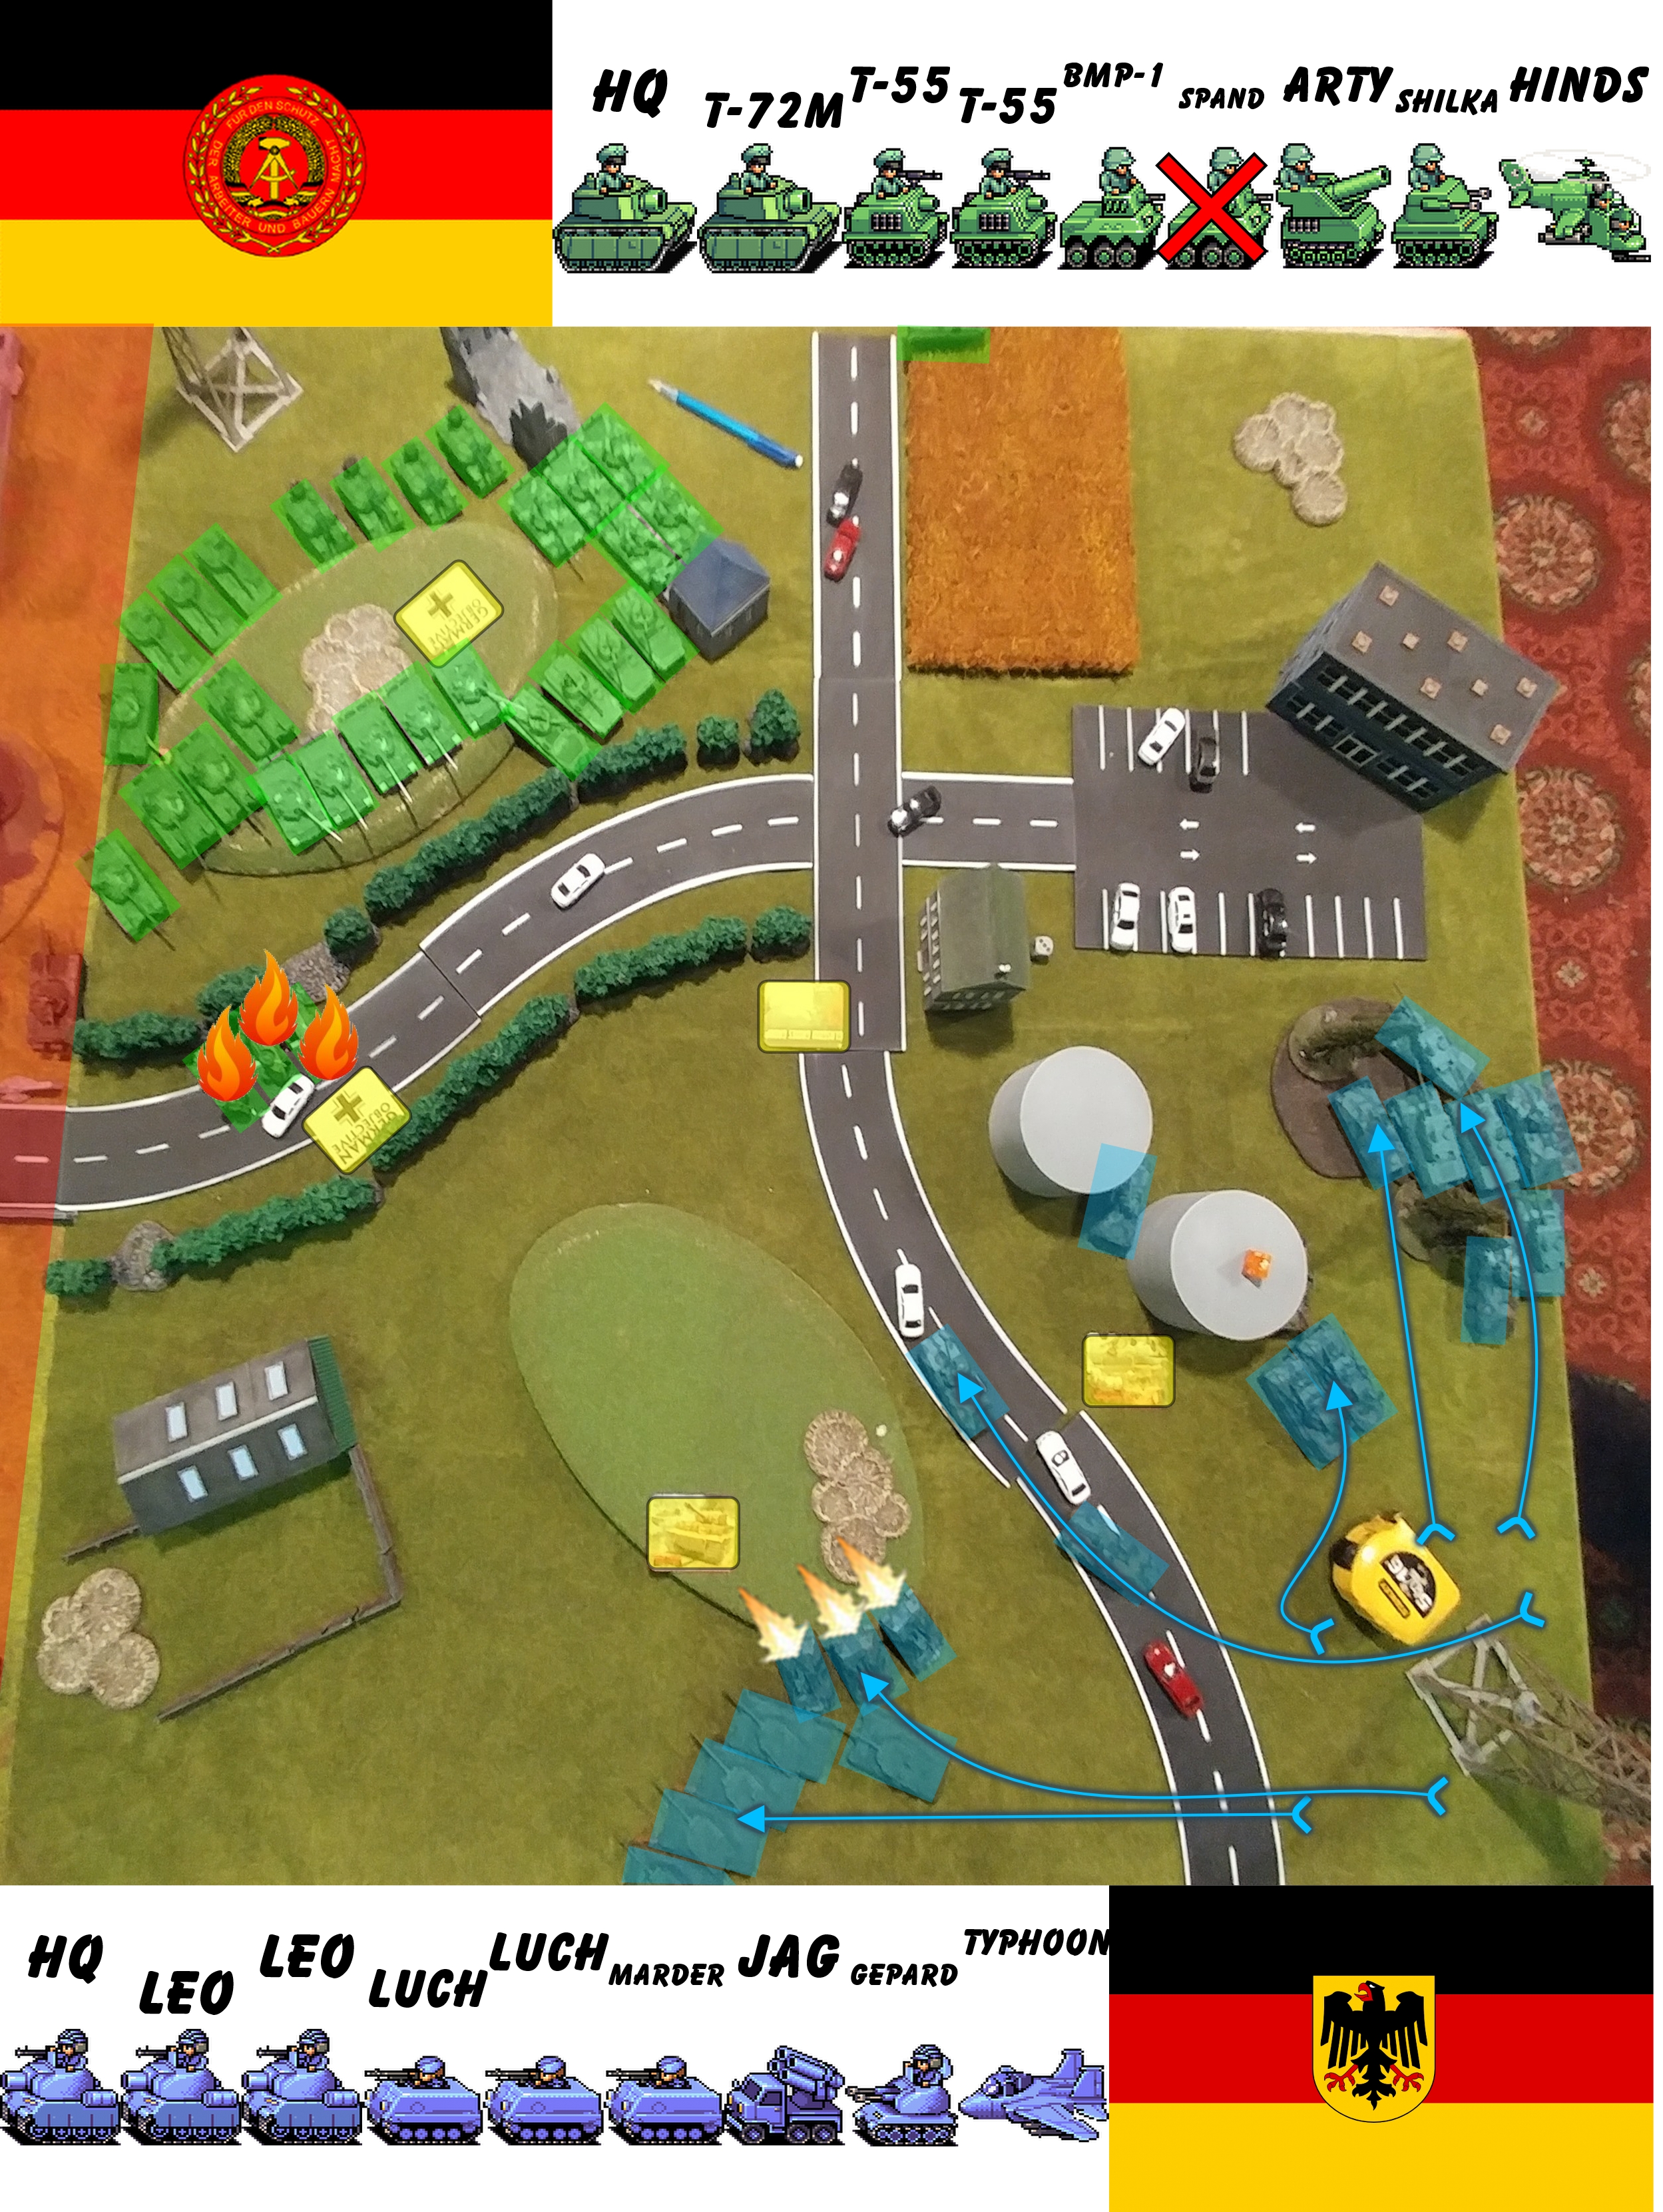
Once in position, the Jaguars on the crest of the hill opened fire on the Spandrels below them on the road, with some great accuracy taking out all three of the vehicles.
First blood to the West Germans!
I didn't expect the loss of the Spandrels so early, was hoping to use them in an ambush but the chance to go cap something was a bit too much to resist.
Turn 2 gave me this big nice gun line and a good few targets to shoot at.
My Carnations, using the BMP-OP as a spotter fired a salvo over at the Gepards and catching one of the Marders in the nearby woods. Didn't get any luck with the Gepards but the Marder crew was bailed out.
The BMP's behind the hedge opened fire on the concealed Jaguars, getting one kill on the unit that was now #1 on my kill-list after finding out the strength of the firepower.
My T-55AM's in the north split their fire, going for the Luch's on the road and the concealed Gepards. Unfortunately, all the of the shots go wide in this instance.
The gun-line T-55AM's on the hill opened up on the Leopards to the south, managing to destroy one of them.
My T-72M's on the west tried their luck on the remaining Leopards and are rewarded with two of their targets being destroyed.
Following that, the remaining Leopard broke and retreated, leaving the HQ Leopard and Jaguars protecting that objective.
One glass-cannon unit down, a relief!
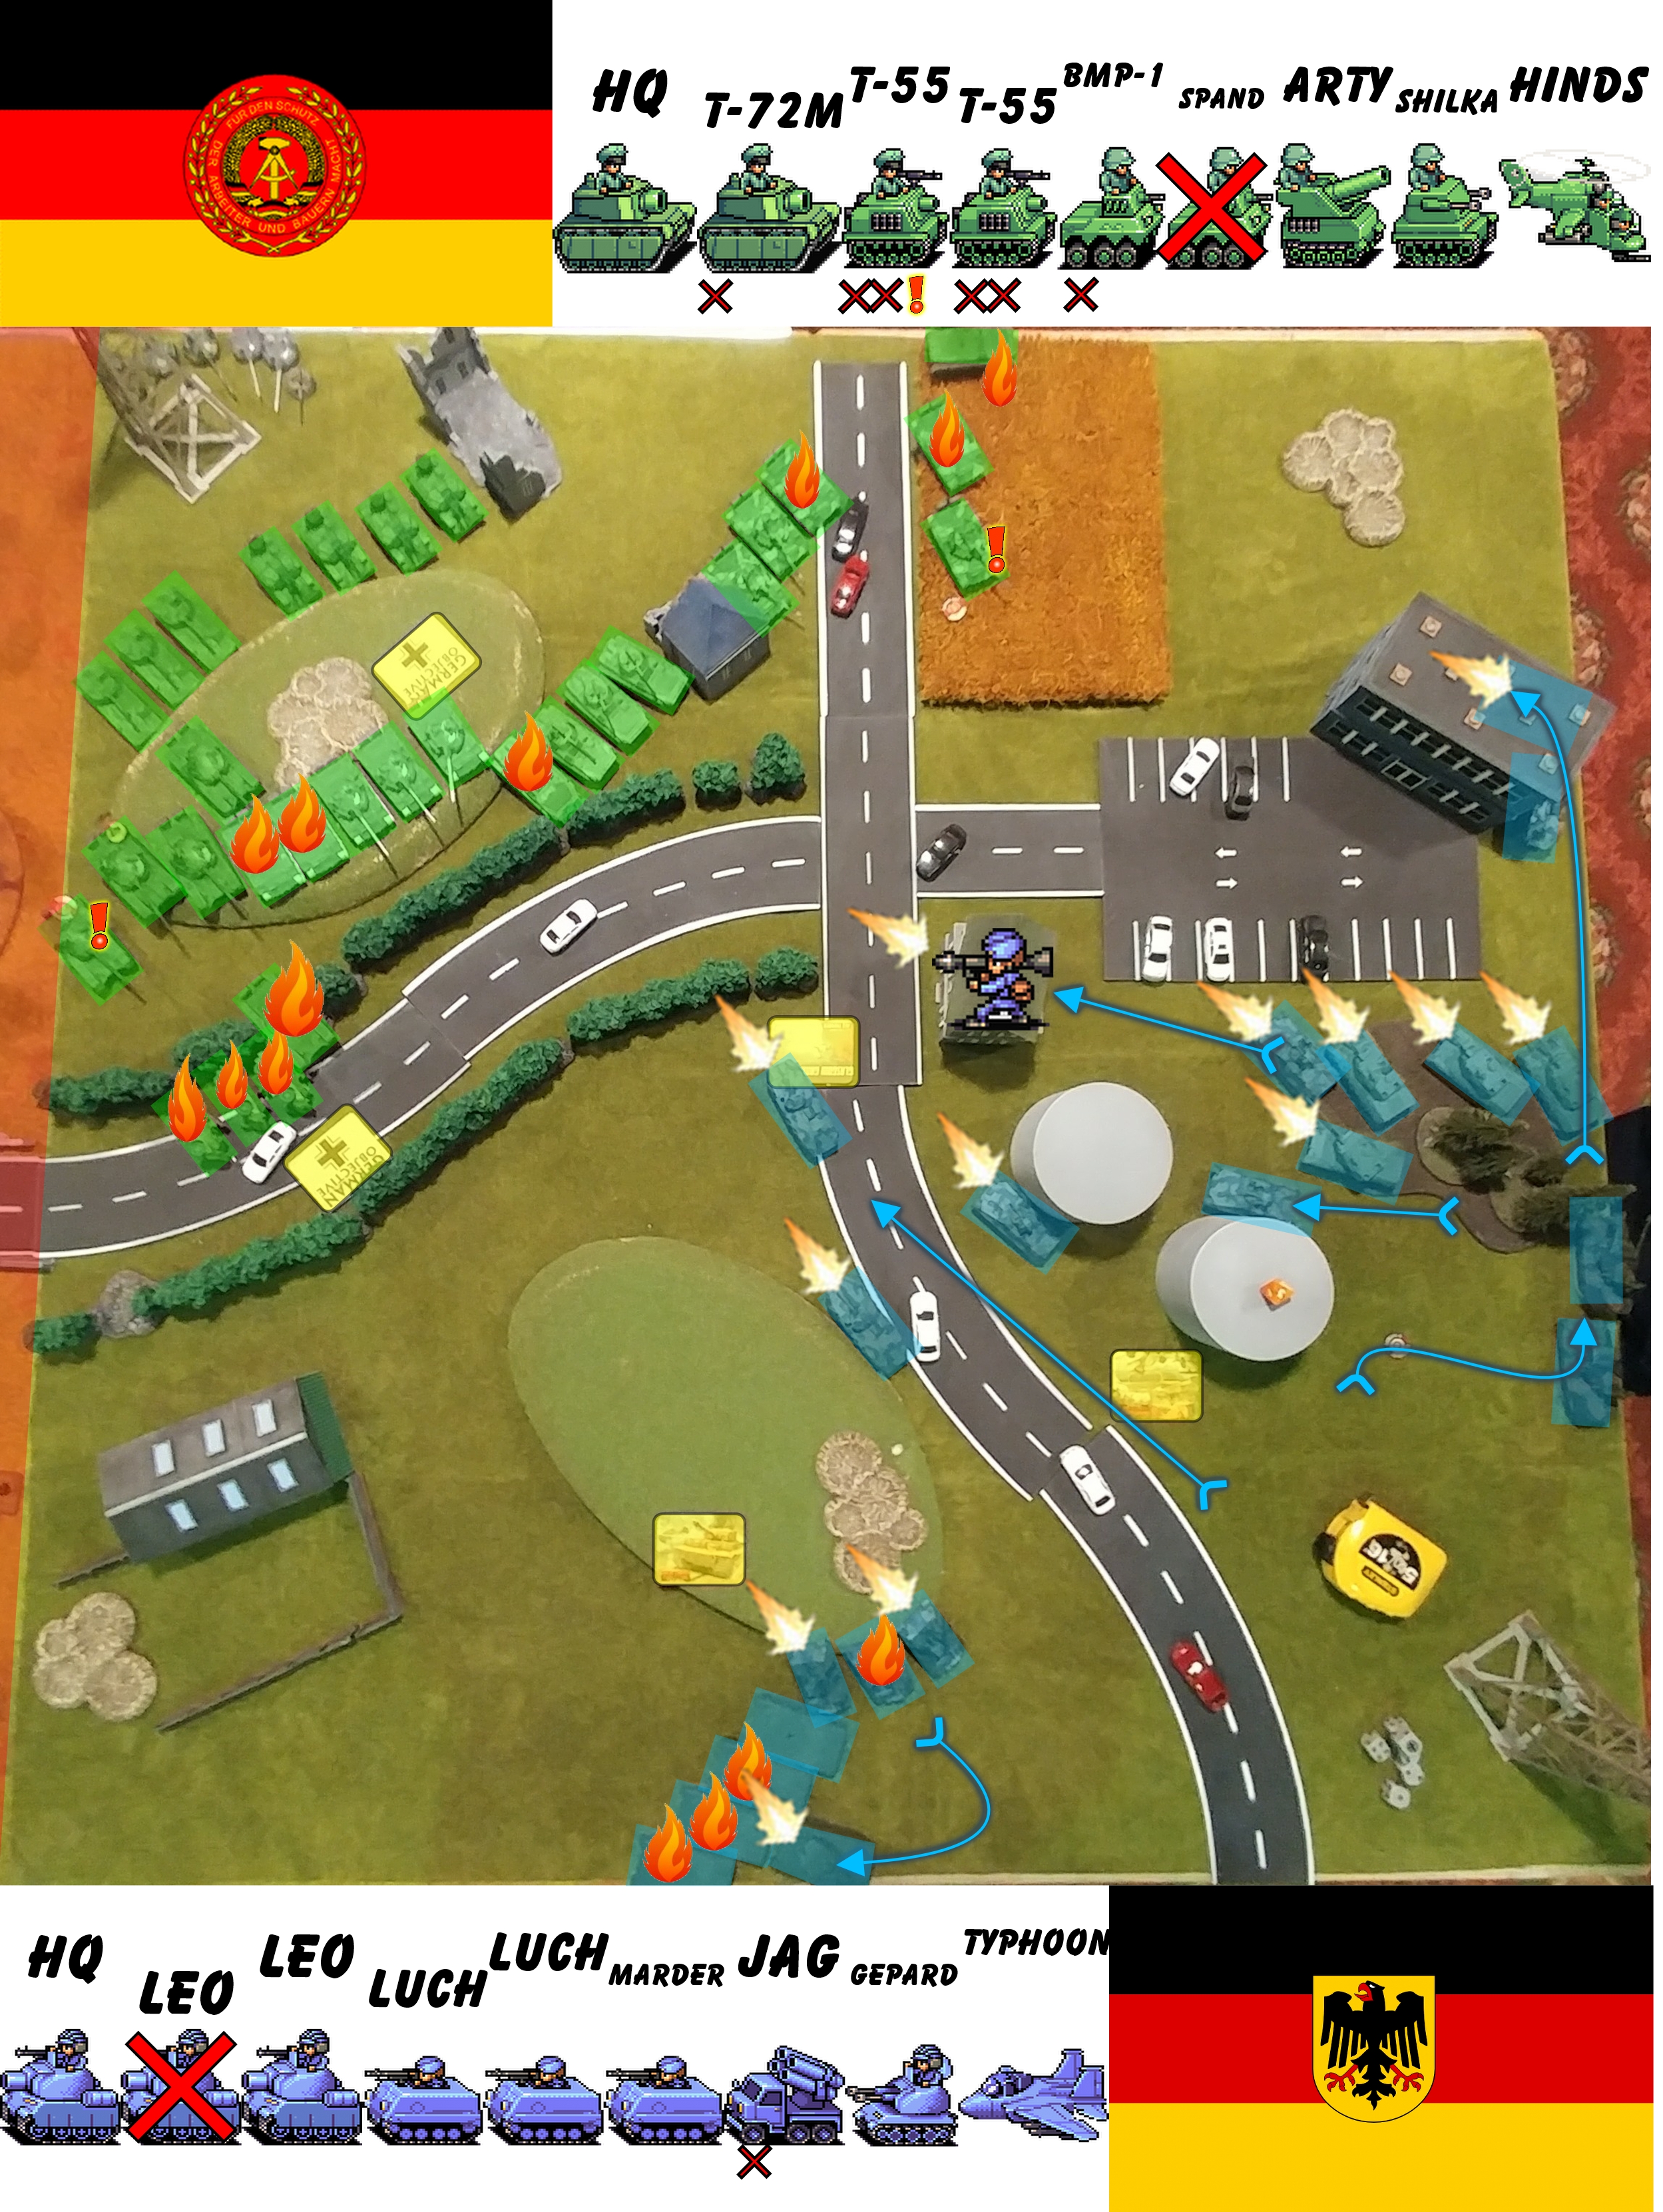
Not wishing to have the Gepards caught in a repeat bombardment, they are relocated to behind the eastern woods, still able to protect the friendlies in the area.
To the south, the Leopard positions to get a shot at the T-55AM gun line and gets a kill. Accompanying it, the Jaguars fire on the T-72M's on the western side, destroying one that poked it's hull through the hedge at the objective, and bailing another.
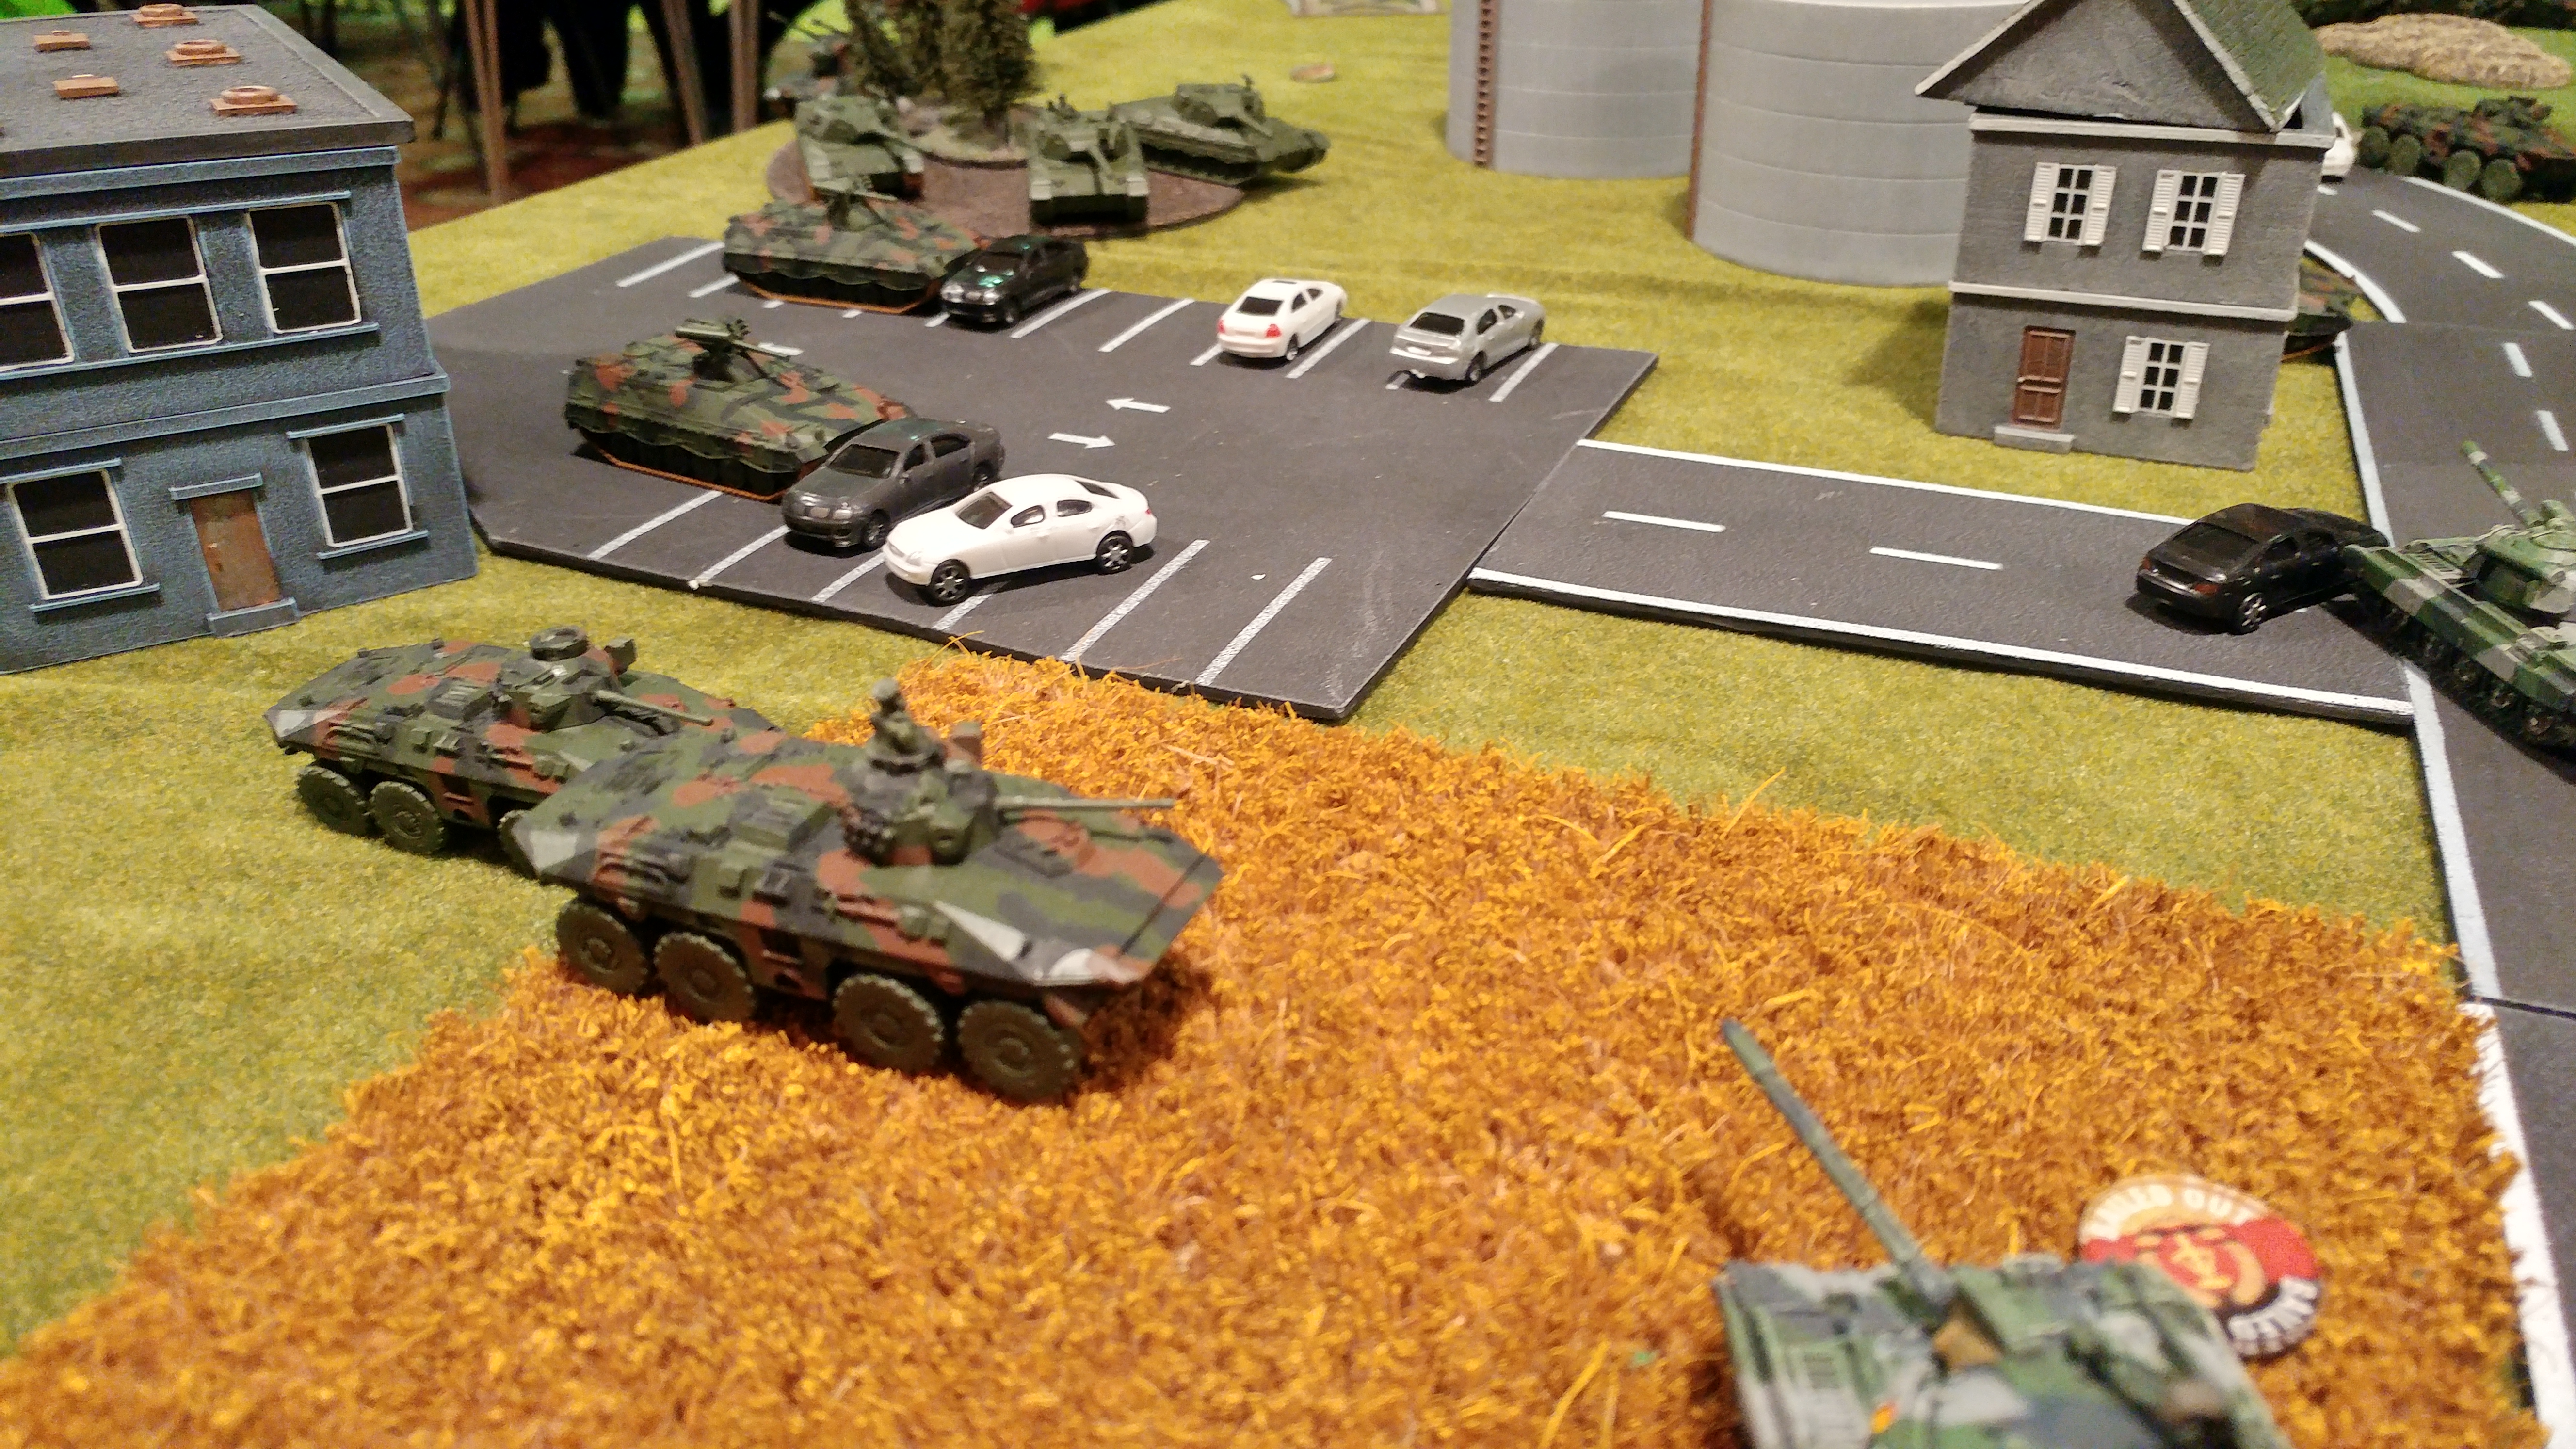
The Marders in the woods deploy their PanzerGrenadier infantry, who manage to get to cover in the centre building overlooking the objective. The remaining Marders give them covering fire, peppering the BMP's with hits but none finding a weak spot. Once set up, the infantry crack a shot off at the BMP's, getting a good hit & kill on one of them.
Towards the north east, two Luchs push round the building, one of them managing to get a shot off at my BMP Observation platform, luckily they were not bailed out or destroyed.
The Leopards in the woods split their fire, with three going for the T-55AM's to the north, and one going for the BMP Observation team. These guys find some excellent targets and manage to score two kills and a bail on the T-55AM's and take out the BMP Op skulking about in the wheat field.
The centre Luchs push aggressively to the centre objective and opened fire on the BMP's through the hedges. Lucky for me they didn't find any hits, but they (and the PanzerGrenadiers in the building) were now in control of the centre objective AND at least one other. This would trigger the end of the game in Nabeshin's next turn if I can't do something about it...
 "Hans, we're going to have to drive and sit in front of the suspicious building, aren't we?" "Ja natürlich, Hoffel is in charge!"
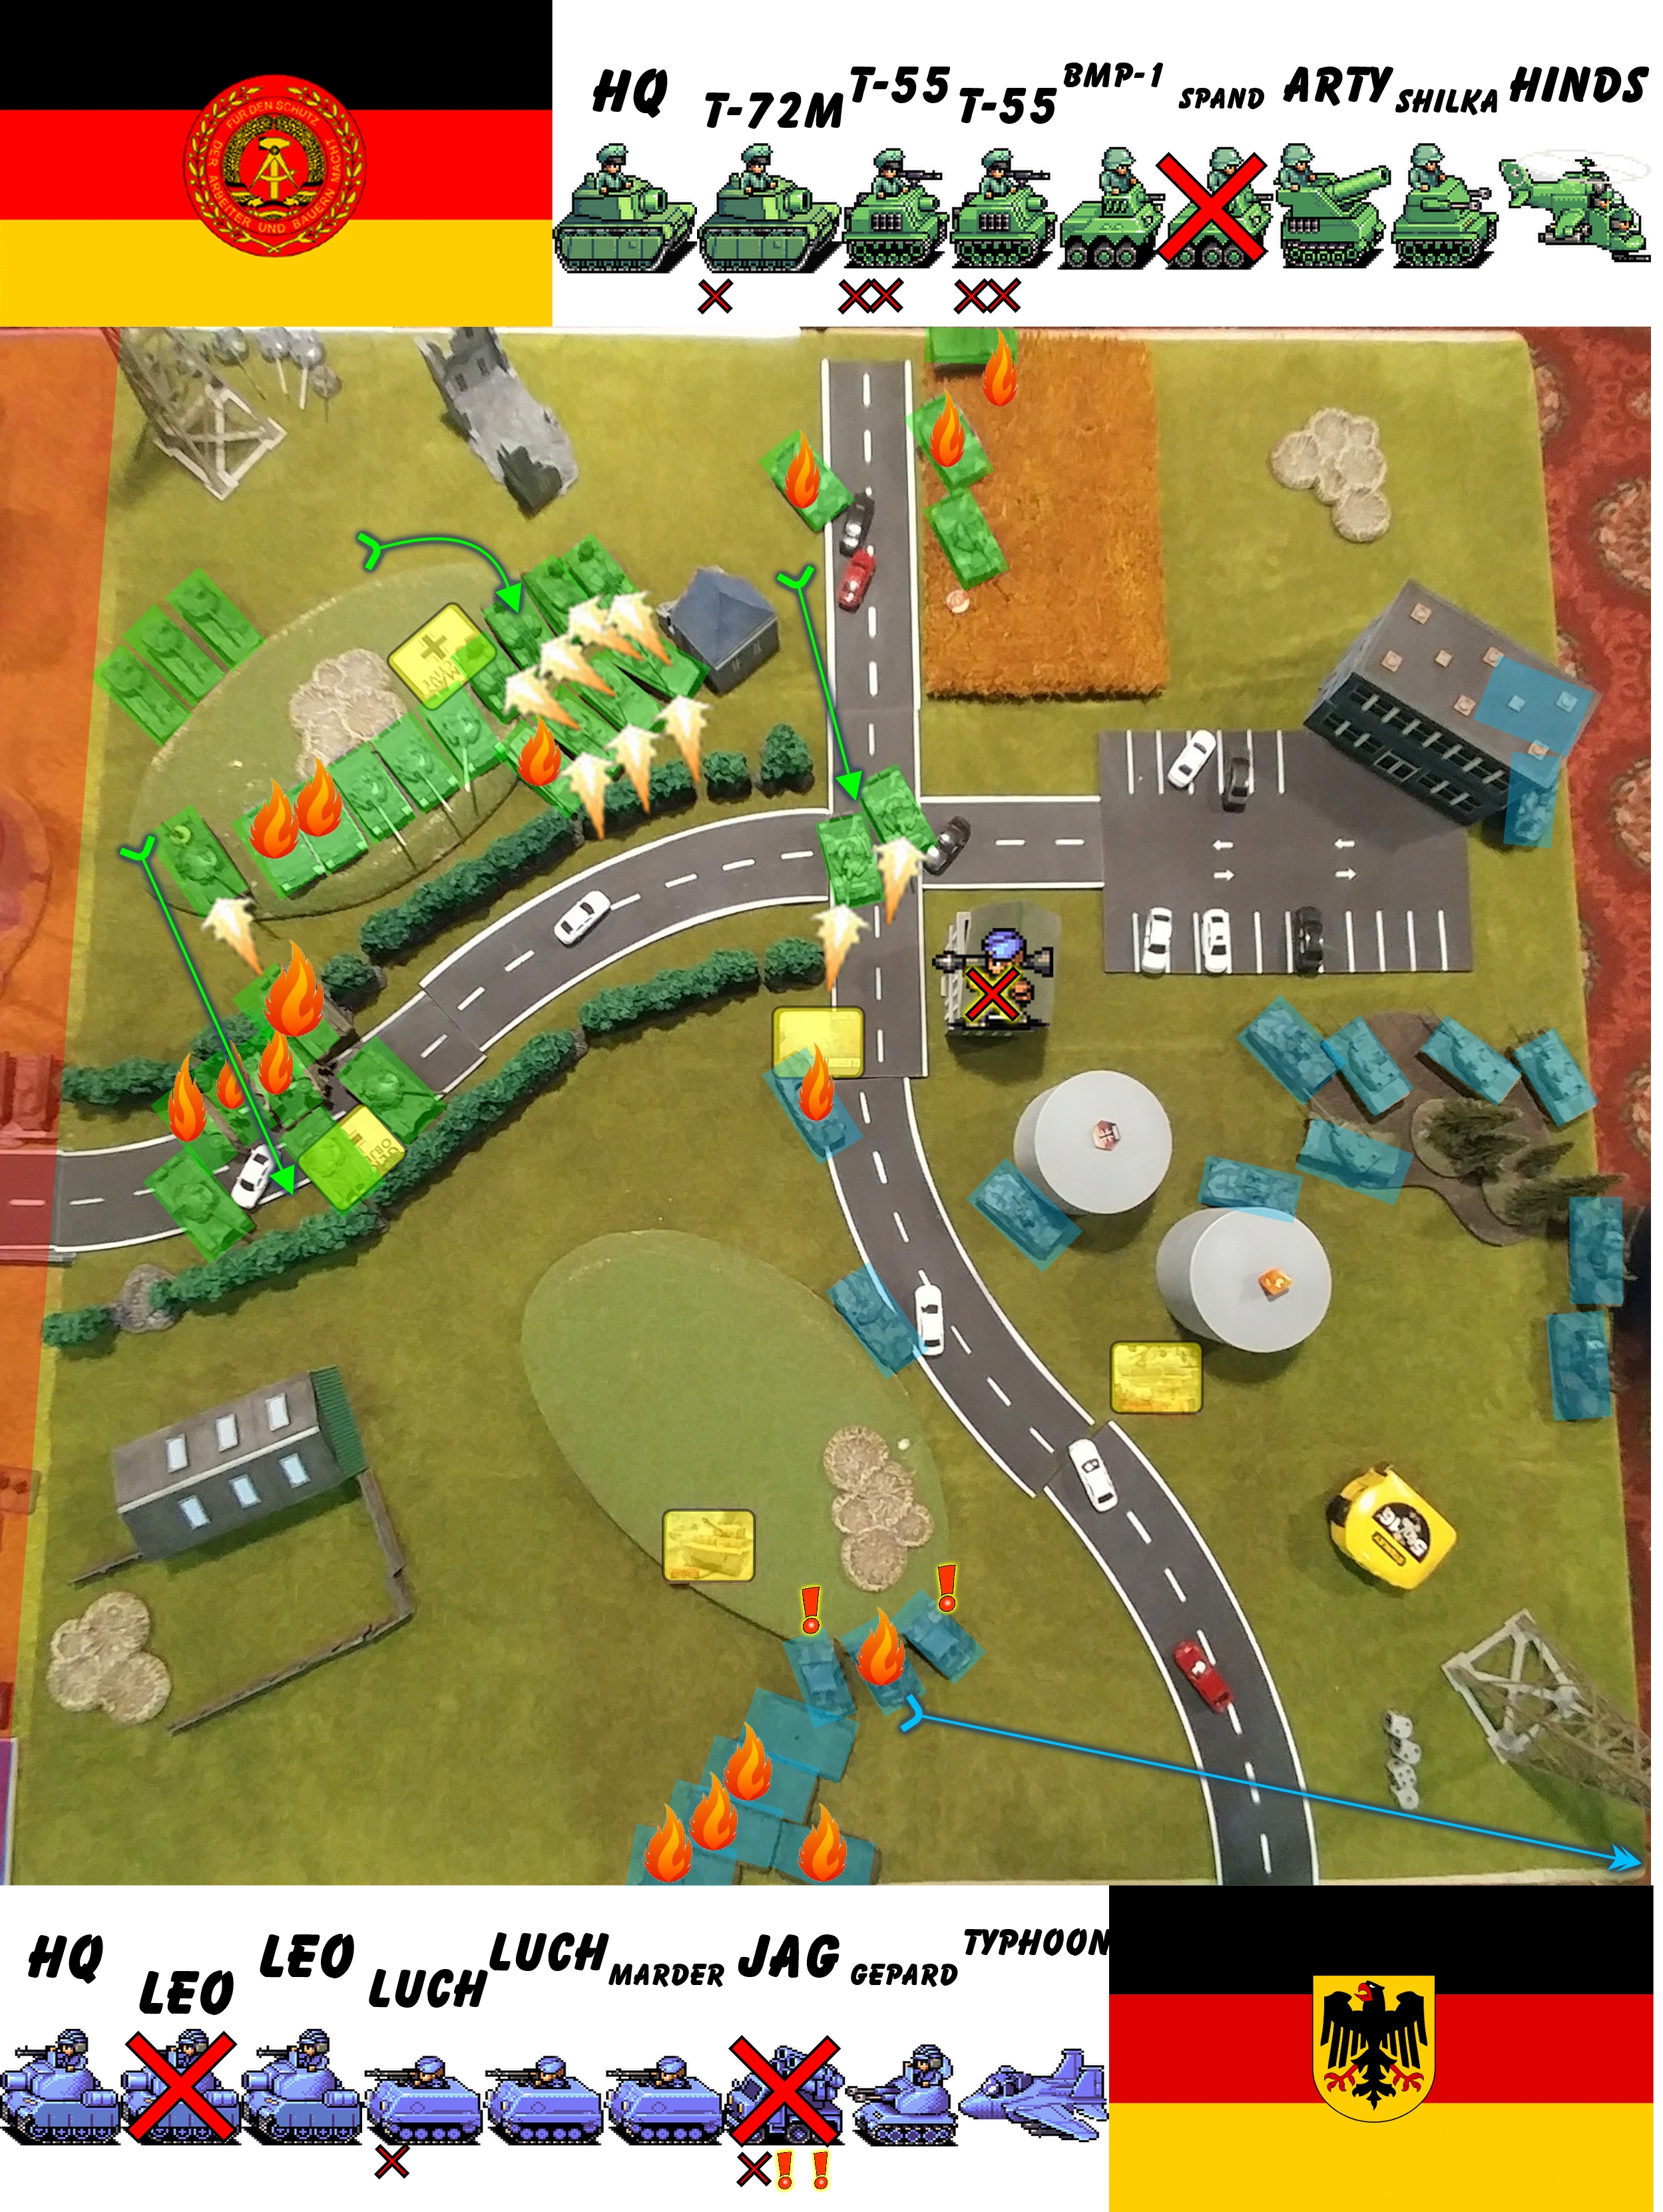
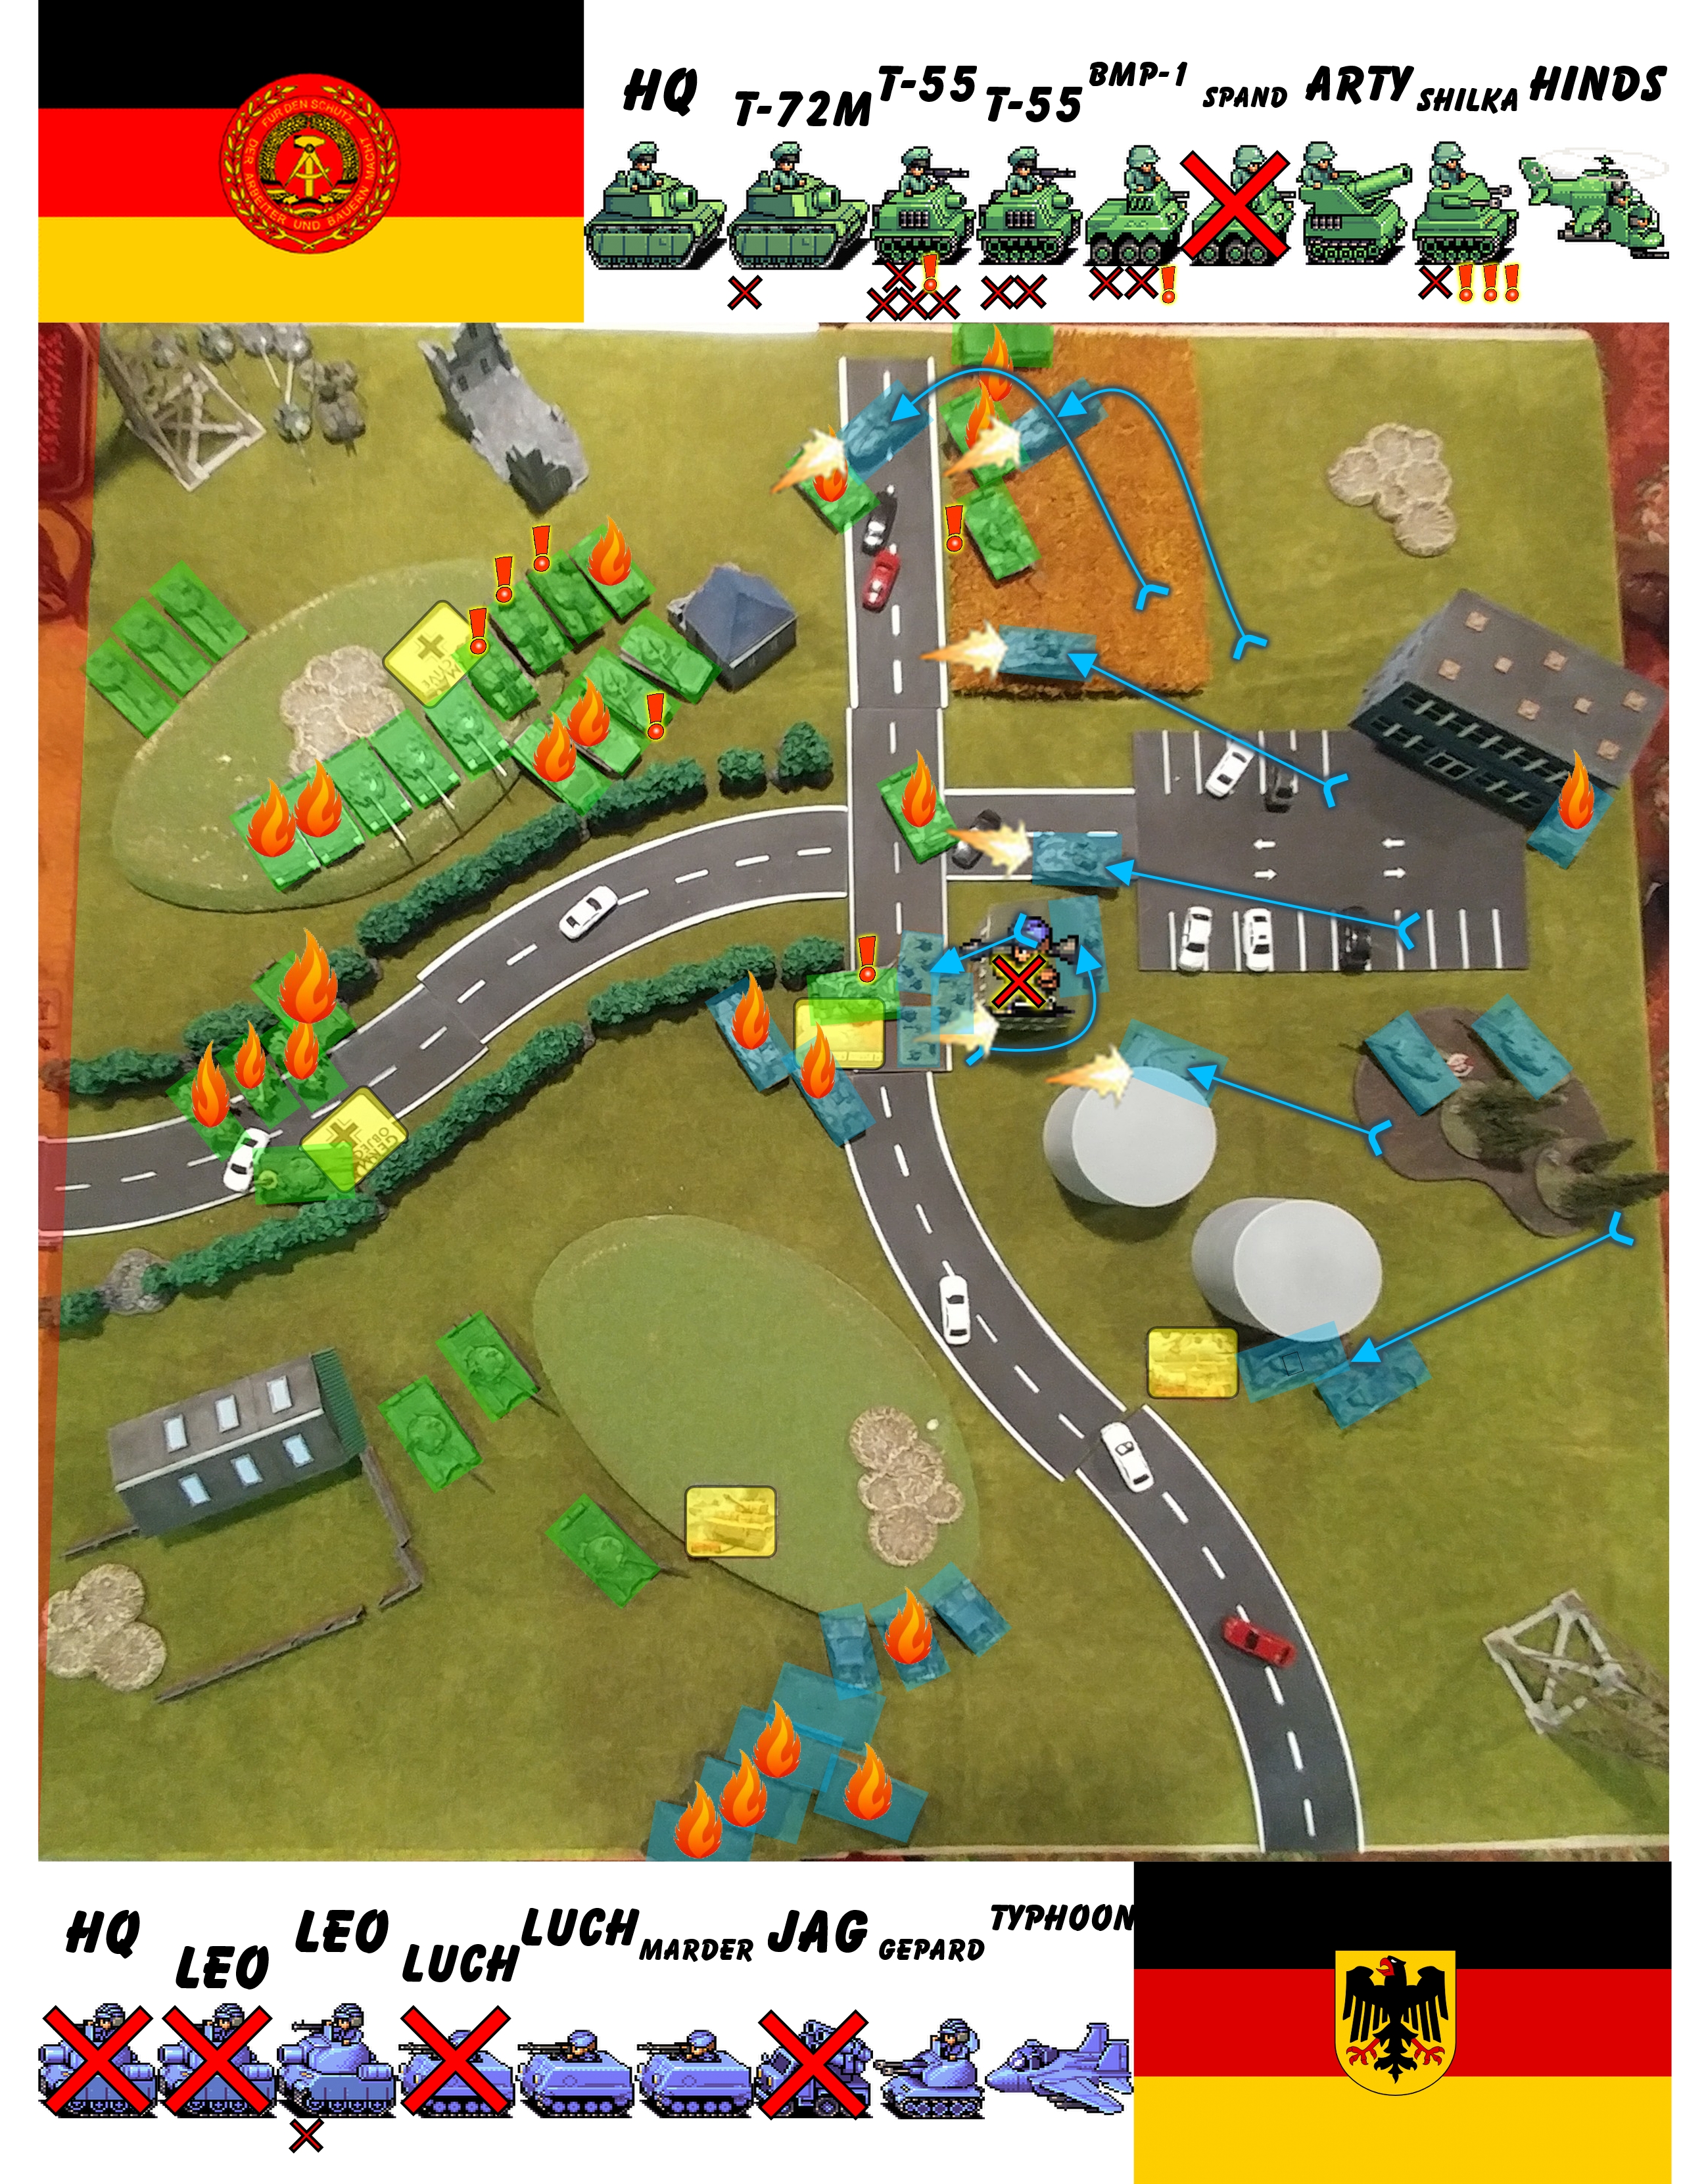
Right then, time to commit a unit to contest to save the game. The remaining two active T-55AM's to the north abandon their bailed out pal and head to the centre, under the range of Milans and able to contest the objective. Their firing manages to get a kill on the Luch that was on the objective, buying some breathing space, but they are sitting awfully close to the building with the infantry inside.
My BMP's fire missiles at the Jaguars, and with good accuracy as well. They manage to bail out the remaining two vehicles, who then decide to follow the Leopard that was nearby and retreat from the field.
Presented with infantry to try and shoot, the Shilka's advance and open fire on the PanzerGrenadiers in the building, knocking out a Milan team and forcing the infantry to keep their heads down.
In an HQ-on-HQ duel my T-72M gets a shot clean through the Leopard, knocking the vehicle out.
The centre objective has now been contested, and thankfully we fight on.
On to turn 3 for the West Germans, and the eastern side of the table lights up as a push is made to dislodge the Volksarmee. Once again, the air support Tornadoes fail to arrive.
The remaining centre Luchs pushes forward, and with the support of the Marders manages to bail two of the BMP's. Centre objective is still in contested state!
Out of the eastern woods, the Leopards split their fire on both the T-55AM units, getting a kill on the central unit, and a shot bouncing off the unit positioned on the hill.
The Luchs on the wheat field open fire on the Shilkas, scoring hits but doing no damage to the unit.
It's starting to look a bit grim for the West Germans but the attrition rate on the Volksarmee is starting to catch up, with many units near wavering.
Turn 4 beckons!

On to turn 4, and I decide to push for the southern objective with my T-72M's. A failed 'follow-me' order leaves just one vehicle at the objective.
The T-72M HQ takes up the mantle at the western objective, and opens fire on the Luchs to the centre. Unfortunately, the shot goes wide and the HQ is facing down that building with the PanzerGrenadiers inside. Looking at the replay I should have taken a belts-and-braces approach and moved the T-55AM's on the hill down to give a backup capture unit as well. Hindsight is 20-20 I suppose.
On the subject of Hinds, they are once again loitering. Although by this point I'd probably forgotten I even had them. The threat of the Gepards was pretty much enough to deter me putting them on the board.
The T-55AM's on the hill that I mentioned about moving, instead opened fire on the Luchs and Leopards and land hits on each, resulting in a kill on both units.
My BMP's maintain their disciplined firing, this time getting the crew of two Leopards to bail out.
The now lone operational T-55AM in the centre takes the easier shot at the Marder, but unfortunately misses. I say lone, because his pals in the bailed out T-55AM in the wheat field *still* haven't managed to pass a remount check!
Four of the Shilkas fire, with the unit leader electing to spot for the Carnations. The shots from the Shilkas tried to focus down the PanzerGrenadiers to try and force a morale check but no such luck as only a single shot lands but fails to take a team out.
With the Shilka lead spotting, the Carnations open fire on the Leopards in the woods, scoring decent hits to bail two of the vehicles.
With the end of my turn we have three objectives going to be under my control, and the centre one contested still. All I need to do is hope the weak link in the chain (the HQ T-72M) doesn't get wrecked.
With three of the objectives shortly under Volksarmee control (though looking at replay, it could have been prevented perhaps?) the West Germans aim to make the Volksarmee pay a high price.
Yet again, Tornadoes do not arrive.
The Luchs to the north push through the field (past the T-55AM that has been bailed out for ages) and open fire on the Shilkas. With remarkable dice the West Germans are rewarded with one kill and three bailed results!
The Marders move to get a firing angle on the BMP's, converting three hits into one kill and one bailed result.
PanzerGrenadiers seize the chance to take a trophy in the shape of a T-55AM and assault from cover to the tank. The crew are caught napping in the assault, and surrender their vehicle.
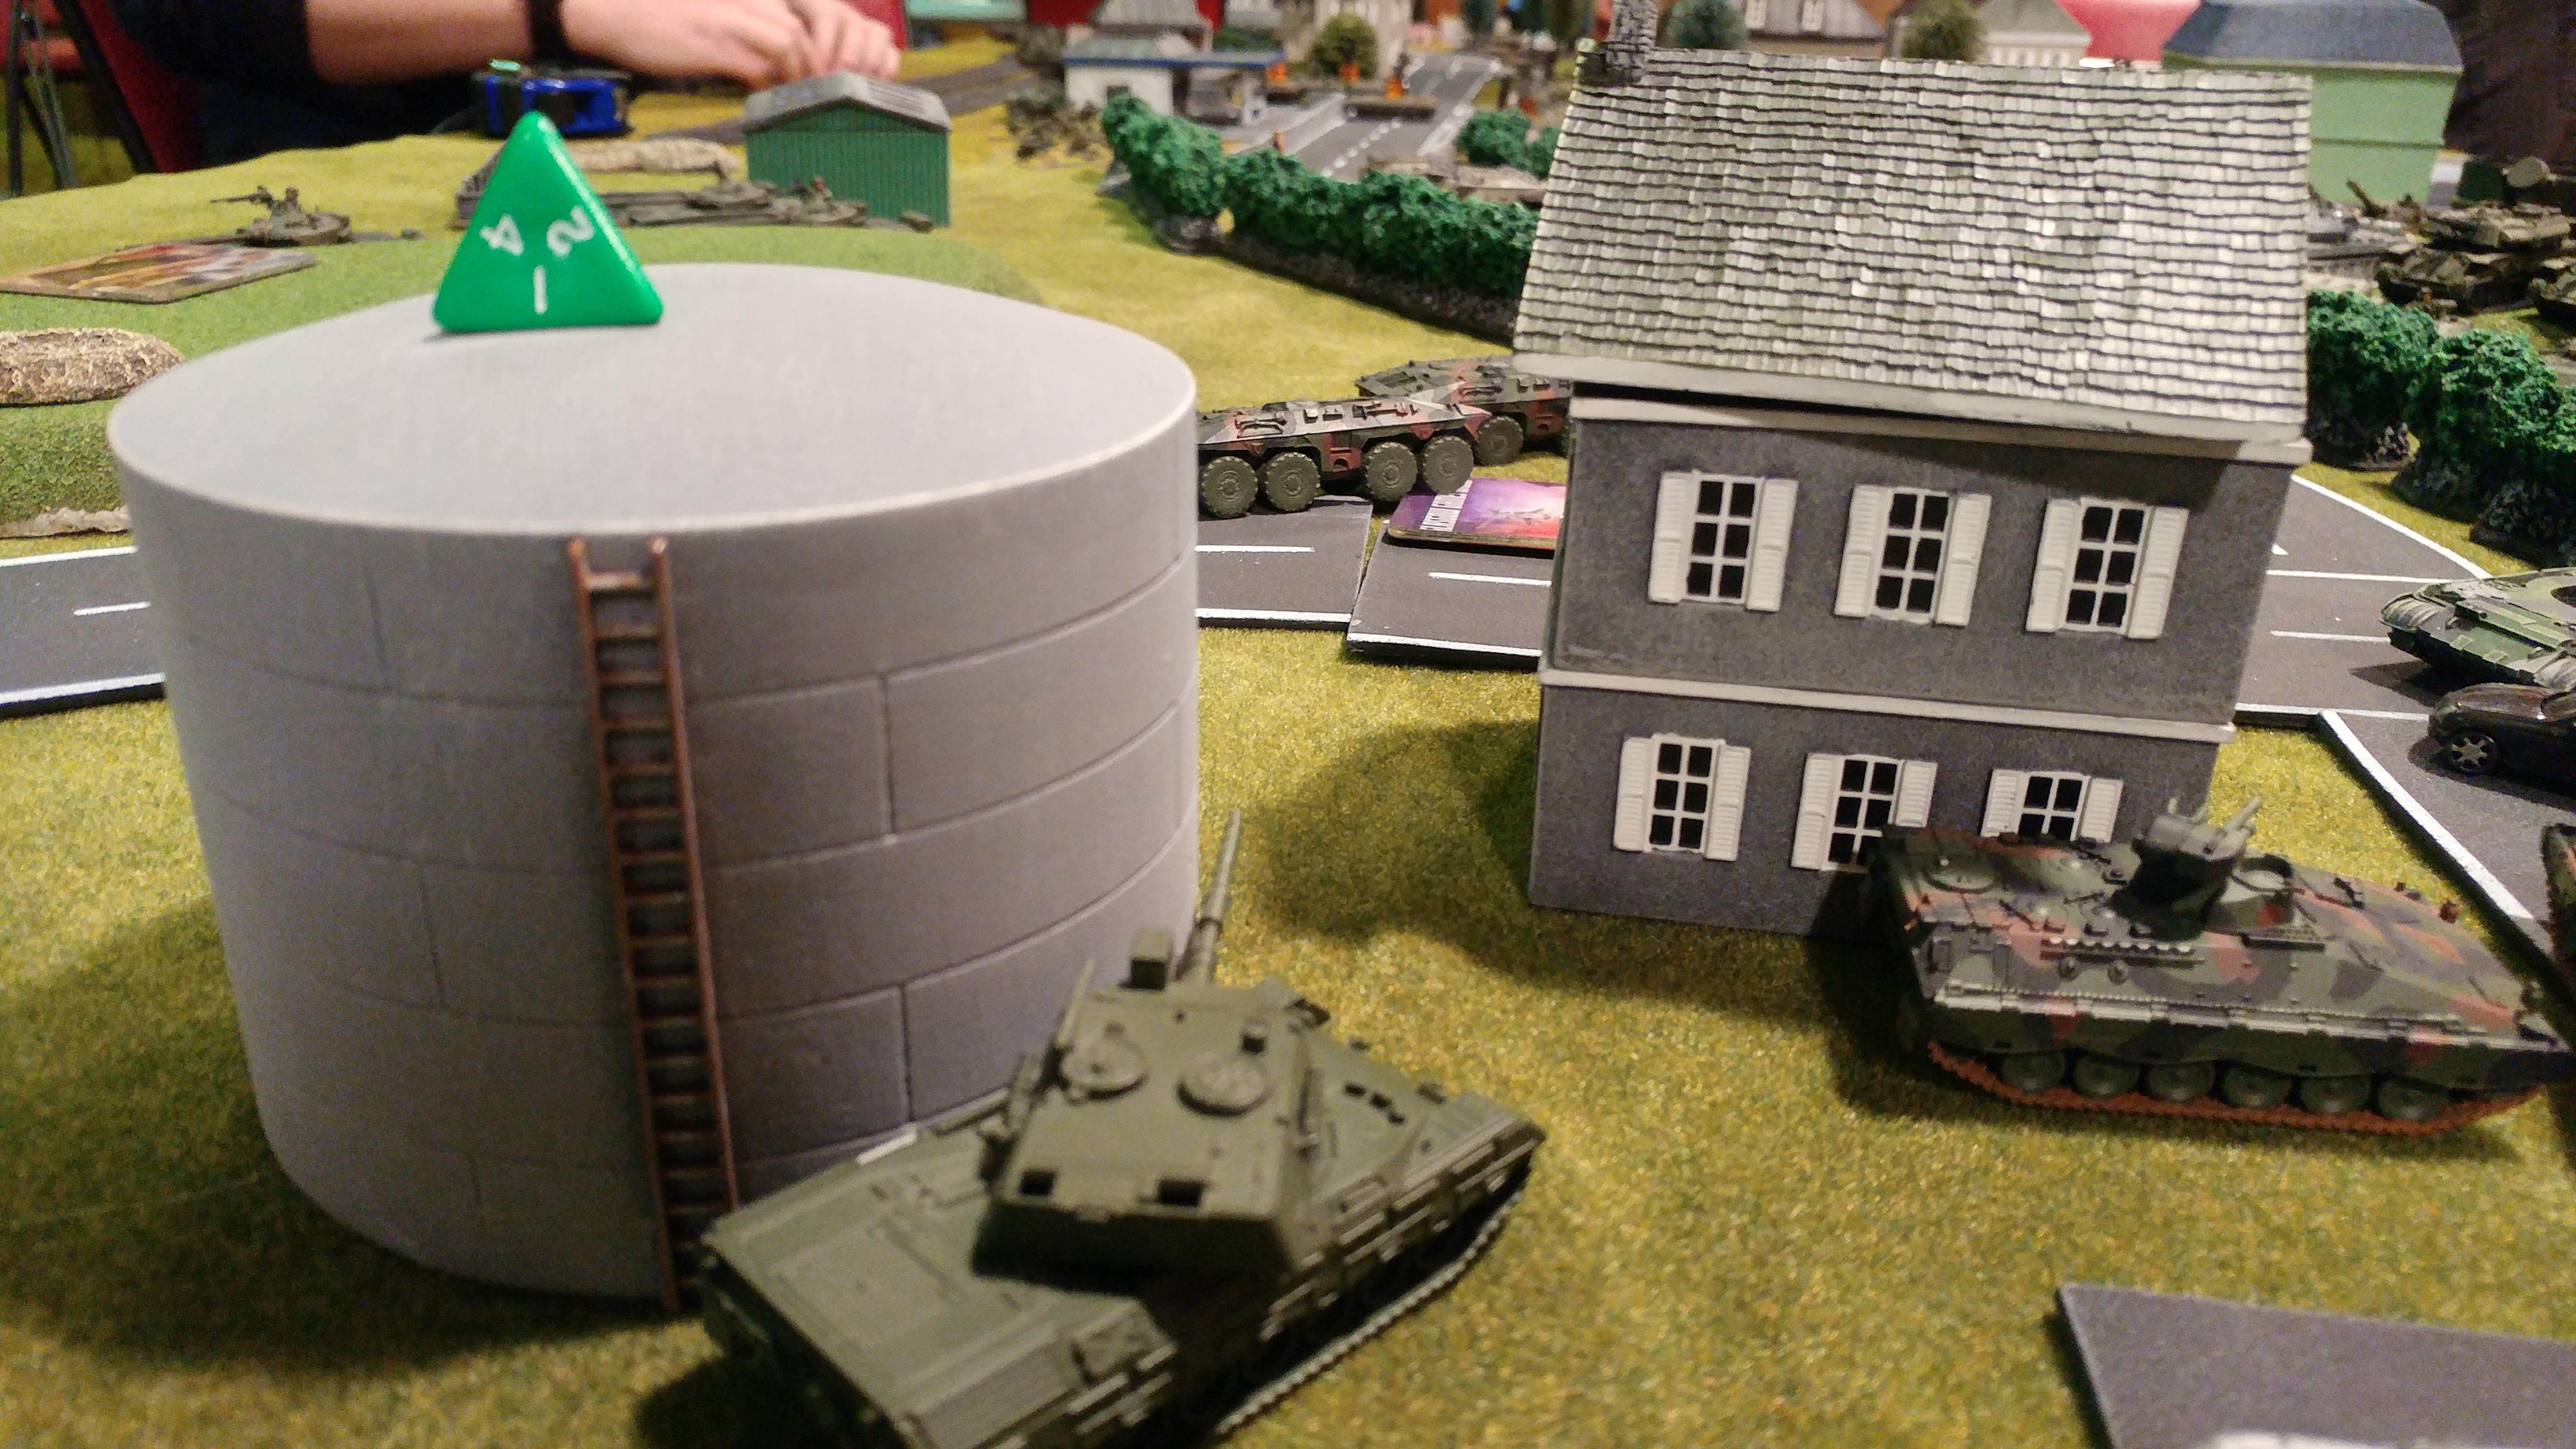
The Leopard unit doesn't manage to remount it's bailed out crew, leaving one vehicle to move to the gas tower and try to sneak a shot across the battlefield to the Volksarmee HQ T-72M. Fortunately for the HQ, the shot misses!
The next threat to the HQ is the Milan team in the centre building. The team takes careful aim and fires... the shot goes wide! The Volksarmee HQ T-72M is living a charmed life.
And with that, the end of the turn, and indeed the game as Volksarmee turn 5 gives three captured objectives.
4-3 to the good guys!
[The more astute of you will notice that my list is invalid - I can't have a T-72M HQ and then units of T-55AM's. It should have been a T-55AM HQ and not a '72.
Mea culpa - model proxy and my inexperience of TY-era ID's has bit me on the ass with this one. Can only offer apologies.]
That was most unexpected to pull a win off in that game, given my record thus far in the campaign.
I'm normally a defensive player, I am used to throwing units away to contest objectives already under control but it's not very often that I will take the initiative and push an objective like I did with the T-72M's.
As I said in my previous reports, a huge factor in my winning/losing games comes down to objective placement and deployment. I feel in this case everything just landed the way I wanted - a defensive hill, objectives near me and later in game a collapsed flank on the West Germans.
Watching the replay pics, I can see situations where I could have positioned better, or opportunities that were missed. Always useful to see, but this battlefield has been and gone now and tomorrow is another day.
The T-55AM's were pretty good, very good firepower rating compared to the T-72M's but my man of the match has to to go the BMP's in the centre for the Volksarmee, and the Jaguars for the West Germans.
Still, I am not won over by aircraft. Without knocking out the Gepards I was too reluctant to bring the Hinds in. Also, how the game would have changed if Nabeshin's Tornadoes turned up (I think he declined to roll in turn 1 now I think about it), but it would have been a target rich environment on that hill, if they could brave the Shilka fire.
It should be noted also, that had my T-72M been knocked out, the game would have been won by Nabeshin on his next turn, unless I could re-contest the centre objective that the PanzerGrenadiers just cleared out.
And why Amsterdam? With my current record of three losses and zero wins and low confidence I wanted to select an area that in the eventuality of my losing that it wouldn't have an impact in the grand scheme of things. Local commanders recommended Amsterdam, so that's where we ended up.
That wraps things up for this report, hopefully it was an enjoyable (if a little dry) report, storytelling is not a strong suit here!
Thanks to Nabeshin for the game, good sir.
Onwards for the glory of the Hoff!
Battle Report Author
Army Lists Used In This Battle
Recommend Commander For Commendation
Share this battle with friends
Hoffel Roffel Woffel VIIWins

Pfft, typical Soviet propaganda; West Germany never loses… Also I’ve painted TWO tanks pink, thanks.
Glad I check this one out, as it was an enjoyable read and I loved the kill trackers in each frame. Great report.
i like the little animations, well done on the win,
Well done on your battle. Keep it up.
Great report comrade
Very nice battle report. Where did you find the tank symbols? They were great representations of force units. Congrats on the win. Provided a commendation for the great report.
Nice report. Don’t worry about the error.
Great write-up comrade. Another glorious victory for the People’s Army!
Those metal slug counters are super sexy. Everything is forgiven!
@Cryofrost – case in point, my lack of knowledge. Began with a ‘T’ I know that much!
I’ll edit the stuff tomorrow perhaps, good catch thanks!
Excellent report, entertaining introduction, and the pictures made it feel quite, old skool video gamey.
on a side note, are you absolutely sure those “Typhoons” weren’t Tornados. just saying cause I know that Nabeshin is good, but i doubt he is “time-travelling” good. 😛
@Tovarishch Vilgelm – I was toying with the idea of using the MTV Celebrity Deathmatch guys, but my photoshop skills are not as great as Nabeshin (go check his report of this one – brilliantly done)!
Excellent – and entertaining – report! Good to see the Warpac win, too.
Where’s the camera crew & announcer?
Probably one of the most creative and interesting ways I’ve seen an AAR done! Well done Comrade, on both an excellent AAR and a great victory!
Moar! Even though I know you’re sitting next phase out, this report was excellent, ignoring corrections
Scunnered about getting my list build wrong.
Took feedback from previous reports and made objectives a bit easier to spot.
Reports still a little ‘nuts and bolts’ but with zero TY-Era knowledge I’d only be making an ass of myself with my lack of knowledge.